Until a few years ago, Christmas meant the release of the latest limited edition mega-kits from Fine Scale Miniatures and South River Models, but with the retirement of their owners, the era of the major mega-kit Christmas release seemed over. A mega-kit by my definition is one that offers more than a single structure, and contains either multiple structures or a structure with extra components and details. Mega-kits can include rolling stock, but would have to be fairly impressive to qualify.
Fortunately, Art Fahie of Bar Mills, P.O. Box 309, Bar Mills, ME 04004, (207) 929-3400), a friend and fan of George Sellios, has stepped up over the past years with a mega structure kit of his own each Christmas. In the September/October 2017 Gazette, I reviewed the impressive 2016 release, Delancey Street. Last year, Bar Mills released Queen City Coal as its 2019 Christmas special. As with all of Bar Mills’ holiday releases, this kit quickly sold out and was only produced in limited numbers. So I thought I would discuss what to expect in general from a mega-kit and encourage you to consider assembling one.
Here, I want to describe my experience in assembling, modifying and adapting the Bar Mills Queen City Coal kit for my needs. The Covid-19 flu pandemic stay-at-home order earlier this year provided the opportunity, and excuse, to spend the considerable time needed for this project.
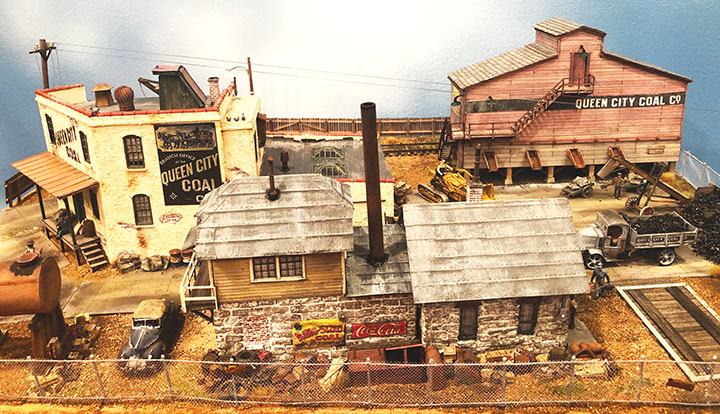
Queen City Coal is a diorama in a box with very little else to add. Besides three distinctive buildings, you receive two Woodland Scenics vehicles and a set of figures, an overhead crane, two conveyors, bags of urethane and cast metal details, signs, and a tutorial in fine model building. The three buildings differ from each other in appearance and construction techniques, each with its own instruction booklet. The large stucco warehouse/shop building with attached overhead crane indicates more goes on there than just the sale of coal. The wealth of stacked barrels, tires and general junk could justify any number of industries. I decided early on to add a few peripheral items to generate more traffic from this impressive complex.
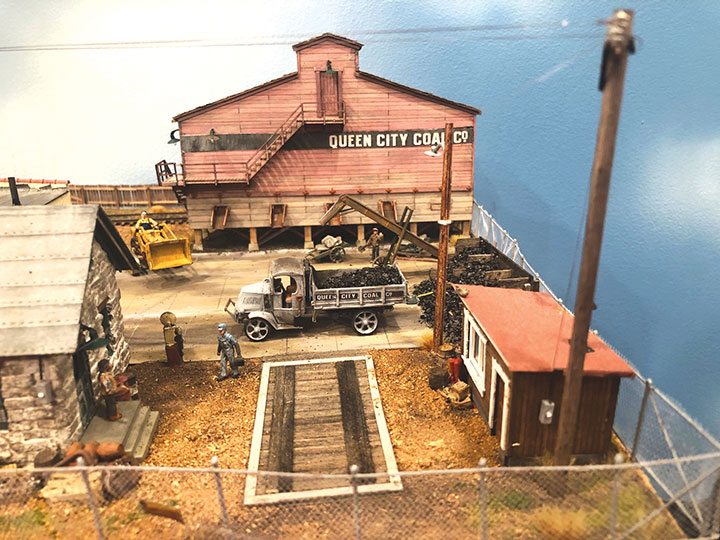
For example, I added a scratchbuilt loading dock across from the stucco building for the loading and unloading of products from a spur for whatever is made at Queen City. That justified my adding a stationary crane. I also added a scratchbuilt series of bins adjacent to the bunker for ease of loading coal into trucks or wagons. And if you sell coal, you need to weigh how much is loaded, so I built a simple planked scale for vehicles to be weighed empty when arriving, and loaded when departing. I also added a scratchbuilt weigh office with table and scale inside to cover an otherwise blank spot on the base. Serendipity often happens when tackling a project and by gosh, this project was no different. In building the office with its cast resin one-piece stone base, I recalled a venerable Master Creations kit called “The Office” and confirmed that its cast-metal stone walls matched the Bar Mills resin stone perfectly! Viola! I had an addition to the Bar Mills office. By mating the two, I created a middle section from a portion of the Bar Mills office building, perfect for adding a tall brass-tube smokestack to create a boiler house to power the complex. So now I have a boiler house and office combined.
Each of the Bar Mills buildings is the subject of its own assembly manual, plus additional manuals for the overall scene and “boilerplate” tips (Art’s term) on assembly and finishing. Each structure manual contains a parts diagram and full assembly instructions. As Art says in the “Boilerplate” section, the instructions are “front-loaded” with some similar techniques like weathering, bracing and detailing common to all. Each major component was packaged within its own plastic pouch, which I really liked. What a great idea! It was also noted that not everything shown was included, and some generic detail items were made from household sources, some of which were included. An example is a thin plastic straw for piping. I mistook 3D printed coal chute parts meant for the tipple for a duct that was not included, but shown in the photos of the warehouse. Oops, but I simply boarded up the hole in the tipple where the missing chute would have been and created a distinctive detail.
I decided to start with the hardest building, the triangular shaped stucco warehouse. With its one-story addition, it is perfect for a warehouse and machine shop. And with Art’s guidance, it is not difficult at all. Entitled “Building No. 2,” this mostly rectangular building, with a biased front wall, is very interesting. Diagrams of each side, plus an overhead plan, parts description and bracing plan precedes the folksy casual well-illustrated instructions. This kit is designed for the experienced builder, so not every issue is addressed exhaustively. For example, Art notes you may differ in assembly sequence. In some areas, you rely on your own experience, for example, continual testing for light leaks should you provide interior lighting as I did.
There is a lot to do here but each step was well explained. Again, I used my judgment to vary the assembly sequence, add or omit details and generally conform the structure to my own vision. I color copied a sign from the instruction manual,reduced it, and placed it on a blank wall of the building. I used Liquitex Stucco, applied by hand, using my fingers, for a fantastic 3-D effect. I really like the look of this material, though I am sure the stucco is closer to O scale than HO. I also added additional roof details, and two ducts made by mistake from the coal chutes. The one story addition features two large freight doors, and with its twin skylights, would be ideal for full interior treatment as a machine shop or some form of manufacturing plant. I am still struggling with what to name this complex beyond a coal company. In honor of the Roadrunner cartoons, Acme Mfg. Co. comes to mind.
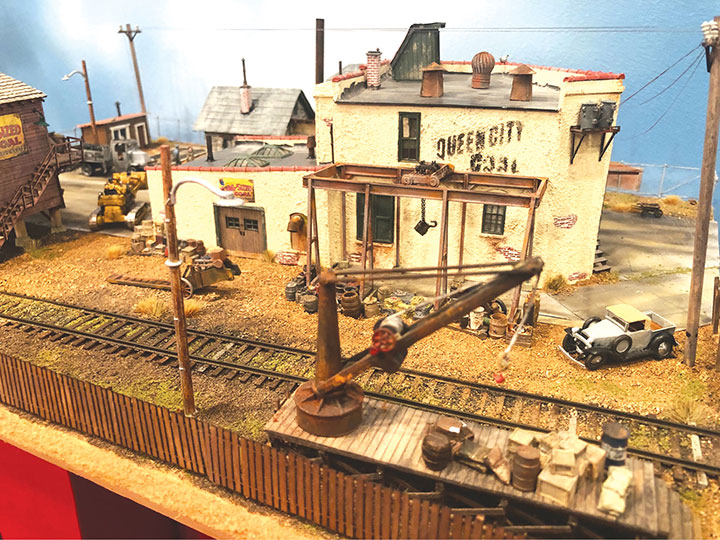
A delicate overhead crane is attached to the rear wall and Art warns that its assembly is “…the most demanding part of the kit.” He is correct. I made an L-shaped card jig to construct my crane with base and wall, but still had to fuss. There is nothing inherently difficult. It is just fragile and easy to build out of kilter. Less problematic were two plastic conveyors and a resin/wood oil tank, also part of these instructions. But even the conveyors required some head-scratching at times.
After the Stucco building, both the office building and impressive wood tipple were relatively simple. I added working outdoor lights to the office and tipple, but goofed on the office. Initially I drilled a hole too low on the sidewall, later moving it up under the rafters. To hide the original hole, I used an extra crane bogey wheel that fit perfectly, resembling a fire alarm. As mentioned, I married the Master Creations “Office” kit to the Bar Mills one and created a simple planked truck scale. I also added a small scratchbuilt coal bin to stoke the boiler in the boiler house.
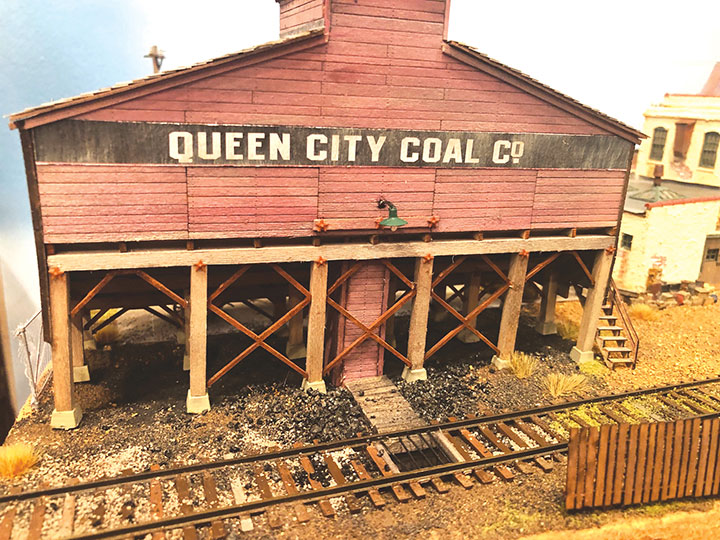
The Tipple, or Building No. 3, as Art calls it, is very FSM looking. Using double laser-etched wood, the board definition is spectacular. I double stained the walls for a faded red paint effect. First, I used my generic weathered wood stain from Micro-Mark. Then I applied a Hunterline Colorado Red stain, followed immediately by what I call skip painting red craft paint. By skip painting I mean loading my brush, wiping most of the paint off, then painting, starting on top where the color is strongest, and as you go down the wall, the paint naturally skips coverage until it runs out. This may need to be repeated. It is a bit like dry-brushing, but with more paint and a heavier hand. The goal is to get paint transferred but not to completely cover the surface.
I copied the full-size bent templates to create jigs using double-sided tape to ease assembly. The pre-cut braces are laser cut in what appears to be Amazonite, and do not take stains well. So I painted them black and rusted them to look like iron braces. These braces helped strengthen the bent assemblies. For the roof, I substituted Wild West shingles for the tarpaper provided in the kit using transfer tape. The outside stairs were a bit fiddly and I had to scratch a small section to add between two pieces. But all fit. Wiring for the outside lamps was routed inside the bunker and down the conveyor housing. Finally I added a scratchbuilt coal-unloading pit, as recommended. Art included a close-up photo of his pit on the instruction sheets. This is essentially a box between the rails where coal would be dumped for conveyance and sorting in the bunker, although I built mine deeper than Art’s with bars to cover the open pit.
After completion of the three major buildings and attendant details, I tackled painting the numerous detail castings following Bar Mills suggestions. As mentioned, a Woodland Scenics truck, bulldozer, and figure set are included, and I added some vehicles and figures from my own collection. The next task was to place the components on a 21- x 15-inch base, maximizing the space. I tried different arrangements until I found one I liked. A single HO spur serves both the tipple and loading dock/yard behind the stucco building. Whatever widgets are made at Acme Mfg. Co. located in the Queen City coal complex, both the overhead and stationary crane can hoist them onto either a truck or freight car. The dock with crane was scratchbuilt using an SS Ltd. kit plan. You could easily use the SS Ltd. kit; but I had built mine and still had the plans. Alexander also had a similar crane kit.
Scenery is minimal and weeds dominate. Thin styrene base formed the concrete surfaces covering much of the complex. The styrene was painted and scribed as the instructions suggested. I added spilt coal, soil, weeds, grass and gravel to make the complex come alive. The last part of assembly was my favorite, adding the myriad of details and junk, mostly provided in the kit. I also added a Walthers chain link fence. There is a more complex chain link fence in the kit, but I got lazy. After adding a Bar Mills Insta-fence along the back of the scene, and some wires for the poles, my Queen City Coal complex was complete.
Although titled “Queen City Coal,” and although Bar Mills is a Maine company, the design is universal. Remember, Denver is also called the “Queen City of the Plains.” Queen City Coal (and Widgets) can be a major source of traffic for your railroad and a point of interest. And it all starts in a box as a Mega-kit from Bar Mills. I am not sure what 2020’s kit will be, but I’ll bet it will be an adventure.
Well, that’s all for now; until next time, write if the mood strikes.