It is no secret that I am a fan of Inter-Action Hobbies and the kits they produce. Inter-Action Hobbies, P.O. Box 1021, Chase, British Columbia, V0E 1M0, Canada, 1-888-850-1742, www.interactionhobbies.com, produces some innovative and frankly challenging kits. From N to O scale, vehicles to ships, to structures, Darryl and Joanna Jacobs have something of interest for you. If you try one of their more complex kits, I guarantee there will be a step in the assembly when you will look at what is next to do and say to yourself, “Oh heck no!” Not that it cannot be done — but it will be a detail so fine, no one will ever notice it!! Believe me, this is not a dig or complaint: just a statement of fact. From itty-bitty knobs on roll-top desk drawers to some minute soon-to-be hidden detail, you will conclude it is just not worth the angst to even try.
Well, sometimes that feeling applies wrongly to the entire kit. Kit #15002, the HO Seabiscuits Boatworks is a lovely, beautifully done boat repair and fabrication facility, sitting on pilings complete with an exquisite cabin cruiser and marine railway ramp to the water. Designed for a harbor-side setting on a slope, this two level facility features an interior, aforementioned cabin cruiser, dock and even a dingy with detailed 3-D printed outboard motor. I salivated over the ads as the sawtooth building is an excellent representation of a factory suitable for the 1940s to the present. The facility also looks complicated with all of the pilings, boat ramp and components. That is unfair as the superb fully illustrated instructions make any Inter-Action kit approachable. However, for a Colorado-oriented narrow gauge modeler, a boatworks makes little sense. For some modelers, that would end the discussion.
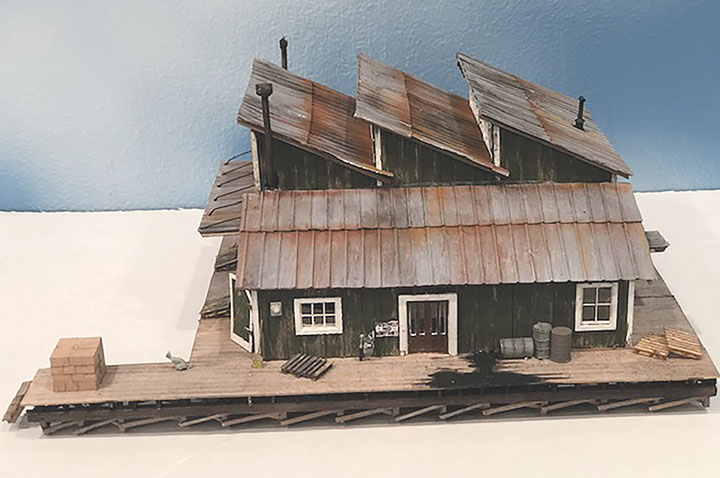
My friend Tony Koester gives a great clinic on kit-bashing, starting with the observation that a certain manufacturer had placed a kit for a passenger station in a box labeled “warehouse.” He meant of course that one should not be dissuaded by the title of the kit but look beyond to its potential. With that excellent advice in mind, I looked again at Seabiscuits with new eyes. I ordered one with the optional detail kit and began sketching modifications. Designed to be built on two levels, I elected to modify it for a one-level factory with annex, using as much of the dock timber as possible to create a wrap-around loading dock for rail and truck service, and viola! Darryl’s Widgets was born!
Now I freely admit that far more creativity could have been used to repurpose this kit. Truth be told, I am no Art Curren, the fabled kit-basher who could turn a few inexpensive plastic kits into a complex major industrial masterpiece. How folks like Art can envision such creative leaps is beyond me. So, my rather modest “adjustment” really did nothing more than keep 90 percent of the original design and “flat-land” it. Surely a better eye could have retained the split-level design with one level served by rail and the other by truck.
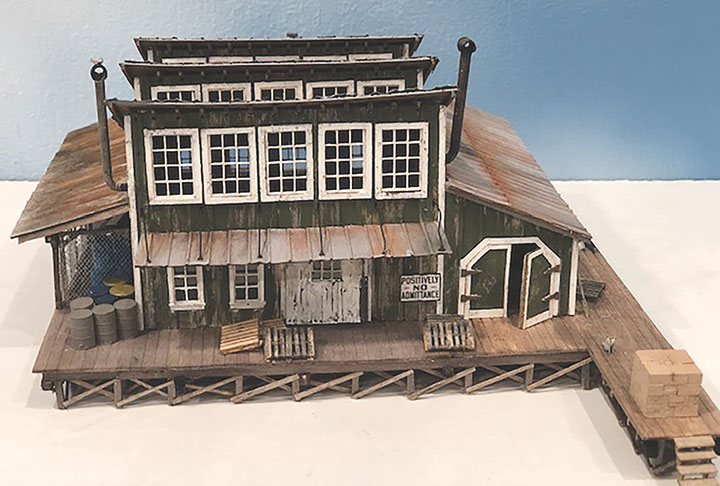
However, I was pleased with the overall look of the boat works design including that sawtooth roof, the corner office with full interior and the shipping annex. A screen mesh storage porch was a nice touch as well. These features were just fine as is, so I decided to retain them. Any modification of a complex kit begins with sketching the proposed new design and deciding how to reconfigure the elements of the kit to fit that design. Using the walls as a pattern, I determined what worked best where and how, as well as what modifications might be needed. Truly it is an exercise in creativity, but backed with a little pragmatic knowledge of engineering. Now, I am no Tony Koester, but I can see the wisdom of not being controlled by the label on a kit. So, lesson #1 is to look at each kit as a series of components and ask how those components might be converted to another more useful design. As a bonus, you end up with a model not to be seen on anyone else’s layout.
Once you have doodled the new design, the next step is to review and annotate the instructions. Obviously, there are steps and materials for a boatworks of little use in building a widget factory. And what is a logical progression of assembly for the boatworks may not be so logical for the widget factory. Modifying a kit is not unlike scratchbuilding in that sense.

My good friend Bob Brown and I go round and round on the issue of scratchbuilding. Bob is a superb contest-winning scratchbuilder. His prowess is legendary, and results, impeccable. I tend to build kits, admittedly for the double duty of review and eventual use on my own long-planned model railroad. I occasionally have scratchbuilt, but here is where Bob and I part ways. For me, scratchbuilding is nothing more than assembling your own kit. Yes, you design it (unless you are copying a prototype) and yes, you create your own, often internal, instructions. But beyond that, I submit the process is similar to kit building. After the design is created, you assemble the materials. Then you begin construction.
With a kit, the design has been done for you (except for modifications such as described here). So have the instructions. The materials have been gathered. But once you open the box, your job is very similar to the scratchbuilder. You build a model using mostly the same skills for weathering and construction whether scratch or kit. Actually, I maintain that building a complex kit is harder than scratchbuilding because you are interpreting someone else’s vision and instructions instead of your own. That means often you will need to deviate from the instructions, which you rarely do in scratch-building. Well, as with how many angels fit on the head of a pin, this is one debate never to be resolved.
With Darryl’s Widgets, I spent quite a lot of time thinking about and sketching the alterations needed, then determined which sections of the instructions I could ignore, and which needed adjustment. Similarly, I examined the components to determine what could be used as supplied and what could be repurposed or recycled for a future project. These extra steps are crucial to a successful outcome. Only then could construction begin. I annotated the instructions heavily, often noting a step many pages later be done earlier, or reserving an earlier step for later. I also gathered any additional items needed to create my own “custom kit.”
Construction proved straightforward because of this pre-planning. There were some hiccups. The large engine house-sized doors on the two-story annex looked awfully small when cut down to single story size. Yet in the end, they worked just fine. I spilled some black paint on the new loading dock on the annex side and hid that by placing an oil barrel on its side as if it “leaked.” In fact, I increased the size of the black stain. Bob Brown jokes he hides his mistakes with a “bucket” but this mistake was too big for a bucket.
I eliminated the lovely full-width folding doors on one end and created a new lower end wall with two windows and a freight door from my large scrapbox, to fit the space. I also modified the sidewall on the “annex” by shortening it and replacing the middle window with a venerable double door found in my door detail drawer from an old Tru-Scale General Store kit to service the new loading dock. As an example of little tweaks, you can make the interior workbenches use two boards to create L shape legs. I substituted an L wood shape from Northeastern. Just being lazy. By the way, my “impossible” step was on page 20 when Darryl suggests adding microscopic wood drawer pulls to a shelf/drawer unit. Nope, and the lack does not show. For a contest entry, please do add those pulls.
I also added additional interior details, although the kit has more interior items than space, and I happily will add the extras to my growing collection of spare parts. I did add some machinery “necessary” for a widget factory instead of some of the details provided. The office interior fittings and wall clocks are superb, so I installed even more lighting to that provided in the kit. Also superb are the gas and electric meters, available separately I believe. I changed the signs since the provided ones are nautical. I will add a roof mounted Darryl’s Widgets sign in the future.
Another modification was to substitute CC Crow, ex-BIS, standing seam roofing instead of making my own from materials provided per the instructions. Again, nothing wrong with the do-it-yourself roofing; just being lazy. Converting the dock and materials into a loading dock was mostly successful, but some of the timber is quite large for a loading dock. A created extension allows the right-hand side to be dedicated to rail service with the “front” for trucks. I used an NMRA clearance gauge to determine the proper height and will insure when installed, the proper clearance is provided for the rail spur. Given the Colorado location, I also added more stoves and stacks to the interior. Anything not used, and there is quite a bit, goes into that growing pile for future use. A tip: I photocopy those parts of the instructions for each saved detail to pack with it in a baggie. By the way, as a “bonus” there is a 1911 Ford Model T closed cab truck included in the detail kit as well as a Tichy Jib Crane.
It took me three weeks of enjoyable planning and construction to finish the kit. Adding the extra details and modifications made the kit all that more rewarding. One example is adding lead foil shields (from old Dental X-Ray film) behind and under the stoves to protect the woodwork. The same material makes great roof flashing. Frankly, there were no challenges or unexpected complications from the modifications I made. Adding two more smokestacks to a sawtooth roof did require some head scratching, but that was about it. Although it is recognizable as Seabiscuits Boatworks for those in the know, I submit, Darryl’s Widgets will remain unique unless you decide to build your own.
And I encourage you to do so, or better yet, modify another of their fine kits. If you do, please share the results with us. Those with far more imagination always inspire me and it is always fun to see what such modelers can do with a kit. These ideas also are not limited to Inter-Action. Those with a collection of Fine Scale or South River Model Works kits might look at those as well. Even those venerable AHM plastic kits so near and dear to the late Art Curren work. Above all, enjoy yourself and let the creativity flow.
For those expecting a column this issue on things to do in Hickory for the (hopefully) upcoming National Narrow Gauge Convention, apologies. Blame the recent pandemic, as uncertainty at press time as to how long closures and restrictions would last make prognostications very difficult. I hope we can all soon get back to normal, which for narrow gaugers is hard to define. Until then, model on, and perhaps next year will be different.
Well, that’s all for now; until next time — write, if the mood strikes.