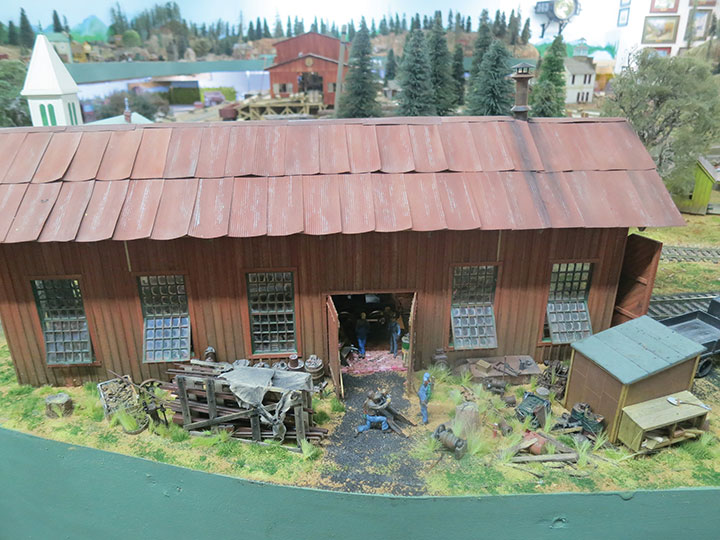
When I started building my O scale layout, I laid out the Town of Tuolumne with its major buildings, including the sawmill, planer mill, company store, offices and dispatcher offices, along with several company houses. I planned an engine house for my On3 line and figured I had room to add an engine house for my standard gauge section. I located a kit at a train show, built and installed it on the railroad. So far so good. Then I took on the project of building my O scale sawmill which was published in the September/October 2018 GAZETTE. When the mill was installed in the town, suddenly the standard gauge engine house didn’t look so great anymore.
I removed the old engine house and cut out the Homasote so I would have the track location and a pattern for the area I had to work with. I transferred the outline to a piece of Gator Board. I am not real big on drawing up a full set of plans. Why draw when I can build? Since the sawmill across the pond was of timber frame construction, I decided to build the engine house the same. I figured I could use the jig I made for the layout of the sawmill framing and just adjust the height and length. After figuring its length, I cut a batch of scale 12- x 12-inch scale wood. Then I wire brushed and then stained it. At this point I knew the length, but not the width of my engine house, so by temporarily bracing the sides, I played with them on my base until I got what looked to be the right proportions. I saw that I even had room for a shop area and separate blacksmith area.

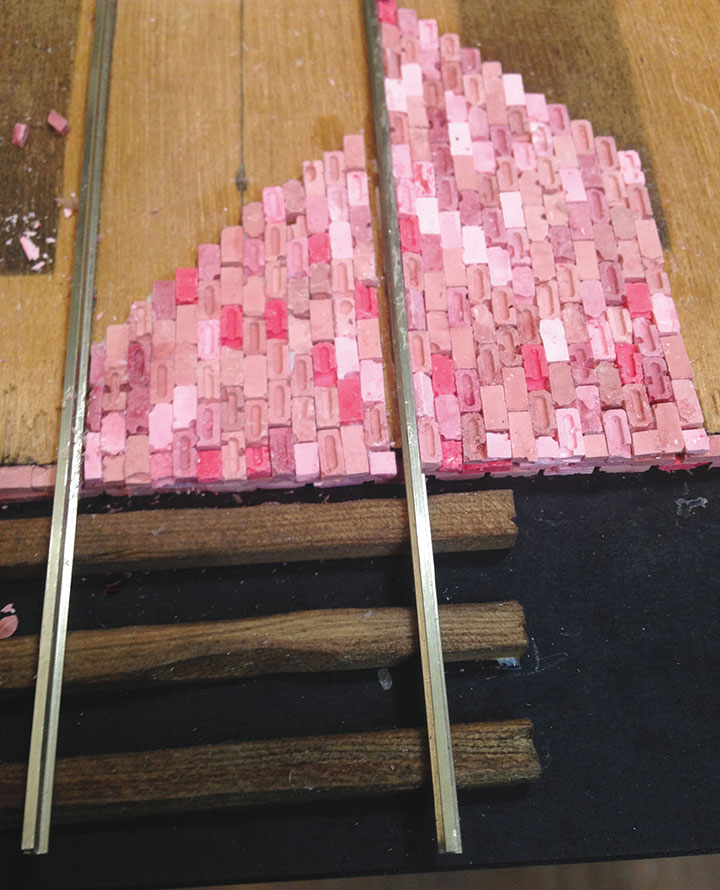
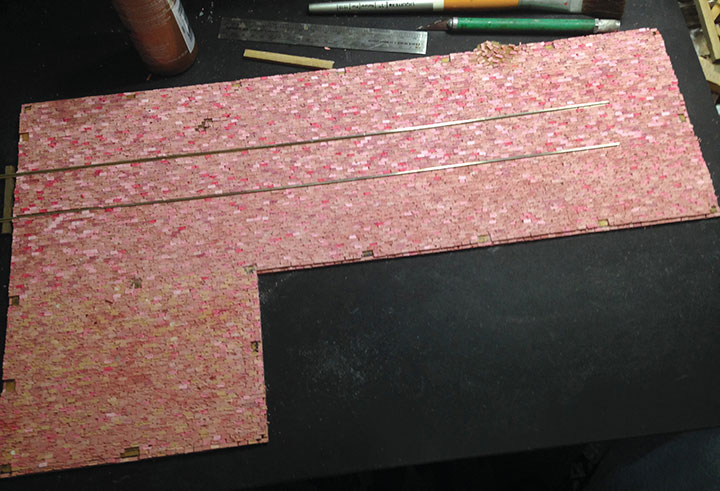
I looked at several ideas for the floor and decided on a brick floor. I experimented with some laser-cut bricks, but just couldn’t get the look I wanted. I had purchased a mold for making 1:48 bricks from a military modeling site. They were for German bricks but looked like regular bricks to me. I had used the mold for several smaller projects, but nothing like this. I started mixing molding plaster and adding paint to the mix so the bricks in each batch would have a slightly different shade. I laid my track and used some 1/8-inch plywood as the base for my bricks. This would allow the top of the bricks to be level with the top of the track. I drew out the location of the timber frame posts so there would be no bricks in that area. Then the fun began, installing the bricks one by one with my tweezers. Just shy of 7,500 bricks later, the floor was finished, and I still had my sanity. I weathered the floor with various Pan Pastel colors. When satisfied with the results, I sealed it.
Using my sawmill wall jig, I glued up the scale 12- x 12-inch wood and added the braces. After removing the wall frame from the jig, I decided on using Grandt Line roundhouse windows, then added scale 6- x 12-inch framing for the windows. My decision was to use board and batten for the siding. I cut and distressed scale 1- x 12-inch strips for the boards, and scale 1- x 3-inch strips for the battens. They were stained, and when dry, the boards were laid out and the outside colored with Pan Pastels. At this point the boards were randomly applied to the timber framing. The window trim was added, then the battens were applied. While the walls were still flat, I started using gray and black Pan Pastels to weather the bottom sections of the walls giving them a well-weathered look. I also used the gray and black colors on the upper portion of the inside walls to give the look of smoke built up over the years.
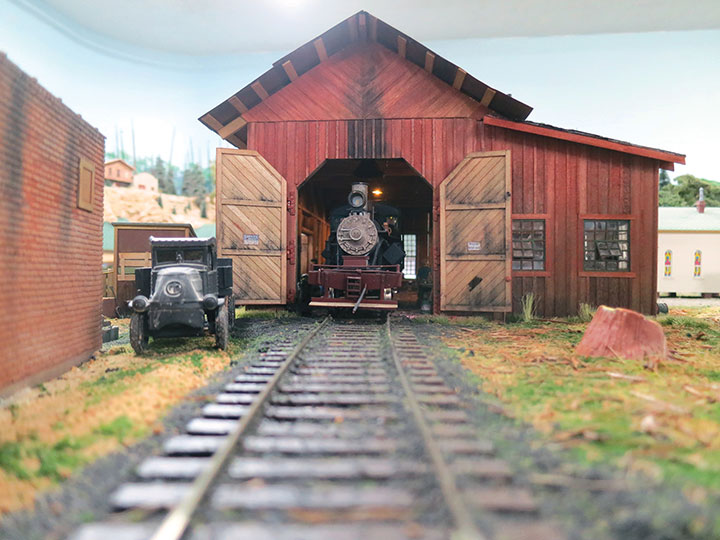
As I stated, I used the Grandt Line roundhouse windows. I wanted some of the windows open, so I figured it would take 2 window castings for each window, but I was wrong. With the open windows you could see the backside of the windows, so now it was 3 windows needed to make each finished window. I didn’t want the look of clean windows, so I used chalk on the windows swirling it with a brush dipped in alcohol which gave me the desired effect.
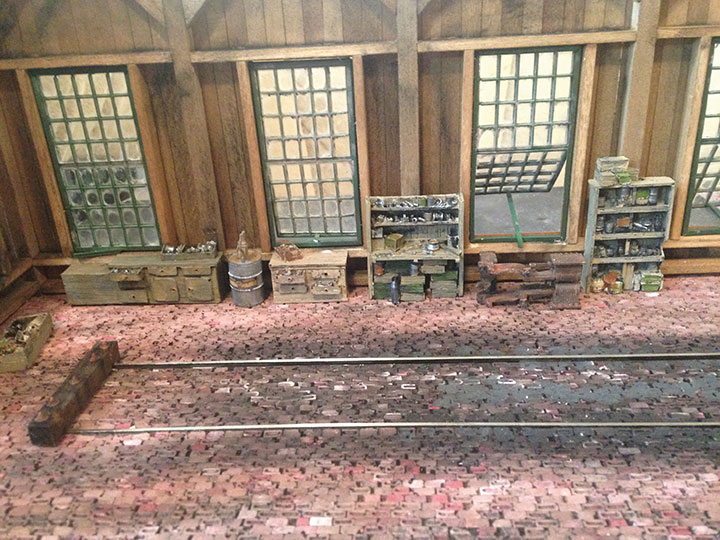
The walls were now glued to the base allowing me to start detailing the interior. I decided to make the area I had planned for a machine shop into a storage area. I had assembled a couple of CHB machine shop kits, but they just didn’t show up well enough for all the work put into assembling them. I found a Sierra West casting of an old disused lathe and placed it under one, then I just started going through all my extra castings, painting, weathering and placing them to fill the space.
Wiring was run through one of the wall posts to supply wiring to the inside (using 3-volt LEDs installed in Grandt Line shop lights). I started playing with some angles for the roof and then made trusses for the roof support. The roof was covered with Stoney Creek corrugated roofing, painted and weathered.
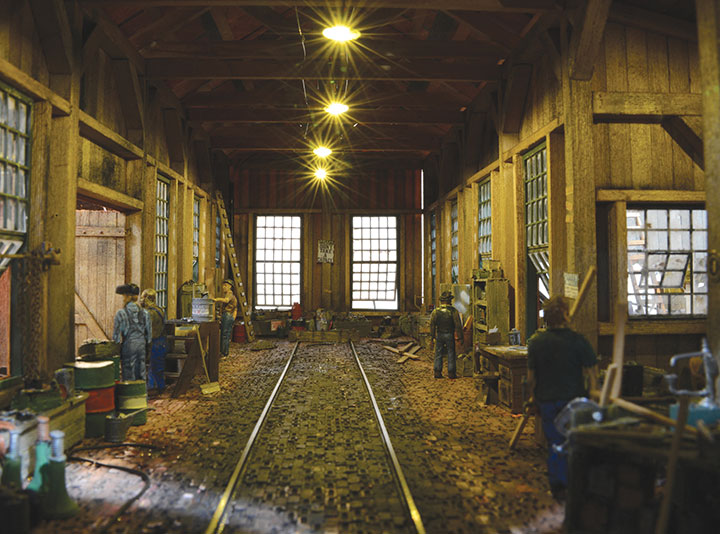
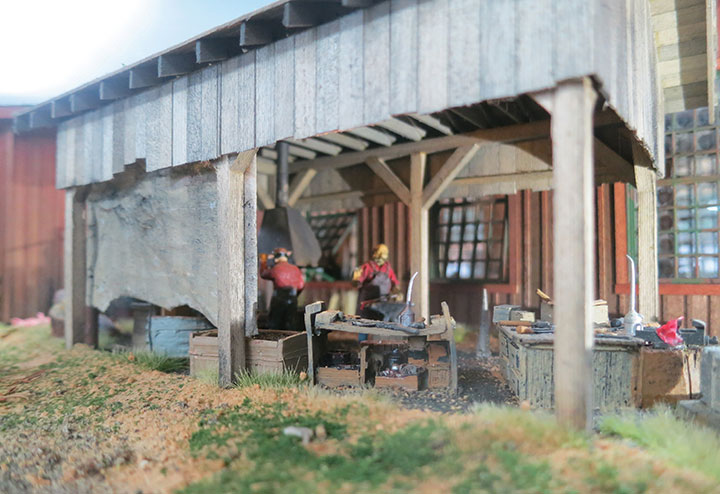
The next part of the engine house would be the blacksmith shop. It was going to be an open-air structure, open on 4 sides, with an old weather-beaten tarp hanging to protect the hearth fire from the wind. I built the framework of the structure and glued it in position. Scenery was added along with lots of detail parts, adding life to the area. From there I worked my way around the building, adding the scenery to plant the building into the scene. A pipe rack was built and covered with an old (tissue paper) tarp, weathered and torn showing its years exposed to the weather. At this point my engine house was basically finished. There is a group of us that share our works in progress by emailing photos for comments. A couple answered back — “looks too clean around the outside.” They were correct, in looking at old photos, and in books, the engine houses had old parts and clutter everywhere. After talking with some old timers in Long Leaf, Louisiana, they told me that they needed to look in the junk pile for what they needed before they spent money. So, each evening for the next couple of weeks, I would search my detail parts, then paint, weather and place additional details around the outside.
With the 2019 Narrow Gauge Convention in Sacramento, California, coming closer, I needed to figure out how to get my engine house there for the contest. A group of narrow gaugers from Texas decided we would ride the California Zephyr out to the convention. The plan was to make it to Denver and catch the train where the good scenery starts. I constructed a box to hold the model, added handles and anchored the model in place. I should have installed larger handles. I didn’t realize that when you arrive in Sacramento, the train drops you off on what seemed to be the main line, a very long walk to the station. My traveling companion (Don Formanek) and I carried the box changing hands often, wishing I had put on larger handles. Another friend, David Fritsche, met us at the station with a very nice cold bottle of water. Winning Third Place Dioramas in the contest made it all worthwhile.