
Monster Model Works
719-494-5330
jimmy@monstermodelworks.com
www.larkspurlaserart.com
Monster Model Works sells kits of the historic Placerville Garage located in Placerville, Colorado, on the RGS. This beautifully designed and produced kit sells in HO for $79.99 and S for $119.99. Designer and marketer Jimmy Simmons has relocated his business to Colorado Springs, and I consider his laser-cutter art to be as good as anyone in the business. I’ve long admired his stone, block, new and old brick, cornices, etc. for building models. His website shows his complete line of kits and scratchbuilding materials. The HO Placerville Garage I assembled was top-notch in every aspect. The dimensions are 6¾-inch long x 8¼-inch wide. The instructions are concise, well organized and include many color photos. Excellent step by step instruction and decoration ideas are included. The packaging is excellent. All of the die-cut walls, corner pieces, basswood window parts, and even the bracing pieces fit perfectly and are fuzz free. The windows are made of several pieces of cut-to-length strip wood, for the jams and sills, and die-cut pieces for the mullions. The window and door pieces fit into the die-cut wall openings perfectly. The unique curved roof is made from lined card stock and die-cut, self-adhesive black strips that look great with weathering. While complete painting and staining recommendations were made, I used my standard mix of acrylic craft paints, India ink and pastel chalks mixed with 91 percent isopropyl (rubbing) alcohol. I’m also trying and liking PanPastels. Since mostly black and white photos exist of the prototype, I did some research and I think my own color representations are very close. Jimmy also gives suggestions for painting and staining blocked and dry-stacked stone for Eastern or Western U.S. structures. I love practicing different color combinations and would have liked more scrap surrounds, but there is a large door opening to work with. Two beautiful 3D printed roof pipe vents, die-cut chimney parts and an optional sign are included. There are varying opinions on whether this prototype had a sign. I really enjoyed building this kit and, as this old timer says, it took about “a week of evenings.” It is suited for modelers of all experience and skill levels. I have a freelanced logging and mining railroad, and I’ll probably convert it to an out-building or something like a shingle mill.
-Mike Engler.
Lunde Studios
37 Country Road 1390
Eureka Springs, AR 72632
www.lundestudios.com
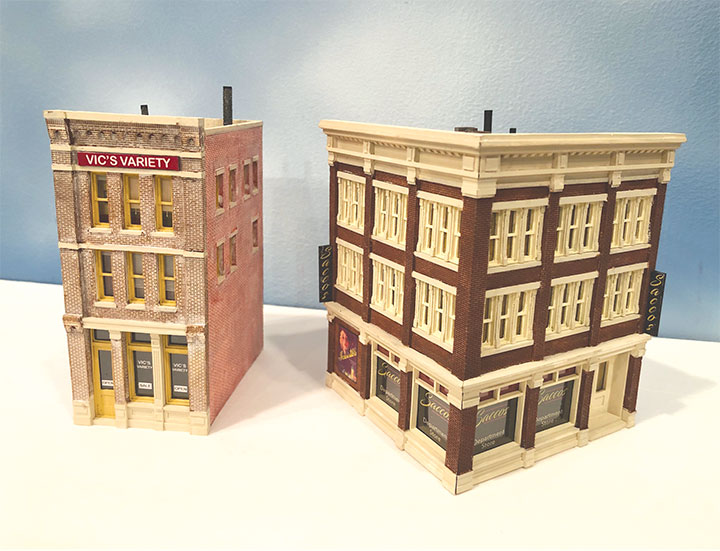
Lunde Studios sells the HO scale Sacco’s Department Store for $64.95, and Vic’s Variety at $54.95. It is always an occasion when Bob and Lynn Lunde release new kits, so I ordered both. As with earlier releases, these are hand cast in Urethane resin from Bob’s RTV molds. They are nearly flash free and cast in stone/brick colors with contrasting colored windows/doors. Literally, one need not paint these kits, though I chose to do so using craft paints. Acetate for window glass, color signs and window inserts, plus illustrated instructions are included. The flat wall castings come taped to cardboard and are best removed with a putty knife. They literally pop off.
I assembled my kits as designed, but added a few features. I added lights and limited interior graphics to the upper floors. I also added shades to the windows and doors to disguise the interior. Each kit has display window graphics with a dark background to hide the lack of interior detail. The roof is pebbled resin to represent gravel. I merely painted mine and added the provided roof details, but decided to use a smaller stack as the tubing provided just seemed too large for me. I added a soil pipe to Vic’s though the Sacco kit included a smaller tube to create three pipes. Sacco’s also features a cast-on ducting system with separately mounted AC unit. I also added a vintage perfume ad to a blank wall. I used different colors for the fronts and sides/back. Robert’s Mortar was applied as needed.
These kits are extremely well designed and as the instructions suggest, read them first!! All parts fit perfectly, and the windows are clever in providing an extension to upper floor windows to support the roof. Oddly, one of my rear upper windows was cast inverted so I was able to cut off the extension, invert the window and replace the extension. A gluing pad is provided to cut apart and place small squares near windows so that glue need not be placed near the window frame and mar the acetate. I elected to save the pads for future conversion and exercised caution with the glue. In addition, each roof was so precise, I did not need to glue it to allow access to the lights. No floors are provided but could easily be added. Each kit took only a few sessions to assemble, and the results are truly museum-quality. As their website demonstrates, a small city scene using just their kits would be truly impressive. I for one cannot wait for future releases. These are superb kits.
-Charlie Getz.
Inter-Action Hobbies
P.O. Box 1021
Chase, British Columbia V0E 1M0
Canada
1-888-850-1742
www.interactionhobbies.com
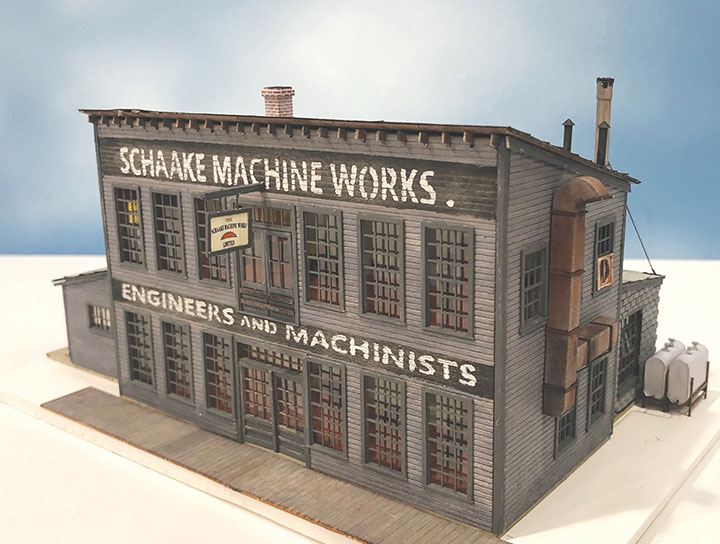
Inter-Action Hobbies produces the HO Schaake Machine Works, for $79.95 (USD). This kit is based on a real machine works built in 1898 and located in Westminster, B.C., Canada. It, amongst other things, built marine machinery for the prototype of the C.R. Lamb, the sternwheeler that is the subject of another Inter-Action kit. Besides the look, I loved the name “Shaake” or “Shakey” and wanted to include the motto, “Home of the Almost Precise Instruments,” but I chose to go with the spelling provided. Next time!
As with other Inter-Action kits, this one consists of Resin Impregnated Board, laser-cut wood/matboard, 3D printed parts, acetate, paper templates, full color graphics and instructions, wire, roofing paper and plastic details. Pre-painting is recommended, and I did so with Hunterline stains and craft paints, followed by bracing of the walls with the wood provided. Note that some bracing shown may need trimming for a close fit. Assembly is precise and flows in a logical order. There are a lot of Tichy windows to paint and I used a spray can gray for mine. I encountered no construction or fit problems. There was one minor issue. The 3D printed smokestack top was malformed, so I just left it off. Otherwise, everything fit like the proverbial glove. The only tricky part was using the stencils for the wall sign title. By carefully following the instructions, I had no problem and found this to be an excellent way to get a painted-on sign. A little touch up and the result was perfect. That sign template was one reason I did not change the name, though one could modify the template.
With the large windows and abundance of details, an interior is really a must. Therefore, I added some interior graphics and lights to each of the provided floors and substituted Tichy outdoor gooseneck lights rather than form my own using the provided wire and lampshade. I could also have added operable lights. Flexibility in design allows the annex and cement block boiler house to be placed in different configurations. I also appreciated the provided roof stacks, chimney and elaborate vents. Two oil tanks made of formers and wrappers plus intricate oil supply line, gears, carts and meters add to the outside detail.
I was very pleased with my Shaake’s and suggest you consider this Inter-Action kit. You will enjoy the experience.
-Charlie Getz.
Wild West Model Builders
P.O. Box 1971
Englewood, CO 80150
https://wildwestmodels.com
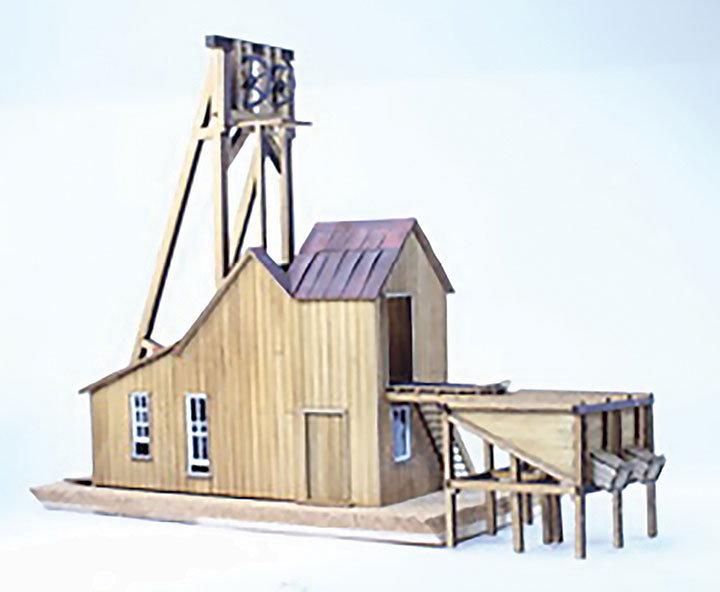
Located in Colorado’s Pioneer Mining District, the Atlantic Cable Mine was a major producer of lead, zinc, copper and silver beginning in 1883 when the headframe and attending structure was constructed. Even with the silver panics of the late 19th century, the mine continued to produce zinc and silver ore well into World War II. During its almost century long life, the mine saw at least three major refits. Wild West’s O scale model captures the mine as it would have appeared from 1883 until the property was sold to new owners in 1919.
The kit is comprised of laser-cut bass wood, clear plastic glazing and laser board components with paper corrugated roofing and strip wood. A comprehensive booklet of easy to follow, step by step instructions assures successfully assembling this detailed model. The only additional items needed, other than glue and finishing products, is a couple of lengths of code 70 rail for the mining tram and one or two of Wild West’s, O scale, 3D printed rotary dump ore cars (Item # DP1-O).
In addition to the detailed head frame and mine house with etched interior and exterior walls, an ore bin and adjustable length tramway trestle is included in the kit. The ore bin can be rotated 90 degrees for a side loading option to better fit its location in the scene. A bundle of strip wood for optional battens is included and the mine house can be built with or without them. Since I was under time constraints to meet another deadline, these were not included on this review model.
Wild West has developed paper corrugated roofing to capture the corrugated tin roof of the prototype. This product is a game changer for model builders since it readily takes paint without chipping, is easy to cut to scale lengths and comes pre-cut to the correct 27-inch width. This material is easy to apply using either PVA glue or double sided tape. The tape was used to attach the main courses and the PVA was used to affix the caps. Once installed, the roof was shaded with a rub of Payne’s Gray oil paint which once dry, was dry brushed with a light tan craft paint.
This review model was finished as it would have appeared shortly after completion without the heavy weathering that would have been seen later in the prototype’s life. Prior to assembly, each of the wood parts was given a coat of MinWax solvent based penetrating stain. The use of this type of stain on basswood sheeting minimizes warping, particularly when both sides are treated.
Once the components were assembled, before adding glazing to the windows, the entire model was given a coat of Testors’ Dullcote to seal the finish. The addition of the glazed window frames completed the model, and the mine was ready to place on the layout.
The footprint of the mine proper was nominally 31/4-inches wide by 85/8-inches long with a 12-inch height. The tramway trestle and ore bin will extend the completed mine scene to slightly over 23 inches, however the tramway can be adjusted to fit the available space. The fit of each component was exact, making assembly of even the most complex subassemblies easily accomplished. The end result being a representative model of a Rico, Colorado, landmark as it appeared at the turn of the twentieth century during the height of the silver boom. Wild West promises additional structure kits to complement the mine. As an expedient, a Banta Model Works blacksmith annex kit was used to house the hoist machinery for the head frame, to complete my mining complex scene.
-George Riley.
Micro-Mark
340 Snyder Ave.
Berkeley Heights, NJ 07922
www.micromark.com
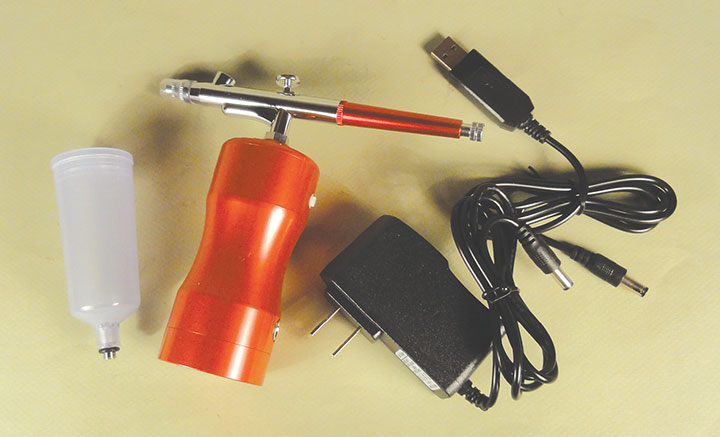
A while back I was watching TV and saw an ad for a portable airbrush designed for applying makeup. Can you imagine? I checked the internet and found several portable airbrushes for sale and ordered one. Just think an airbrush with no compressor, cords or hoses. Great for spraying track and scenery without knocking everything down.
Then I received my latest Micro-Mark catalog and saw they were selling a portable airbrush (part 89747) for $99.95. The portable airbrushes I saw on the internet said they could be used for crafts and models, but to be sure you might consider ordering the Micro-Mark unit. These airbrushes are double acting, and come with a detachable can you hook up to a transformer and plug into the wall. Somehow doing this fills the can with enough compressed air to spray 18 to 25 pounds of air for 30 to 40 minutes.
-Bob Brown.
Toma Model Works
izmoo625@nifty.ne.sp
https://tomamw.miiduu.com/
Available on the Toma web site via Paypal for $209.20 including Fedex shipping. My kit arrived six days after ordering it. The Monson RR, northernmost of Maine’s two-footers, ran from 1883 to 1943. When the slate hauler shut down during WWII, most of the original 1883 equipment was still in use, but the two original Hinkley 0-4-4Ts were worn out. The replacements came from Vulcan Iron Works in 1913 and 1918, numbered 3 and 4. Visually almost identical, #4 was about a ton lighter than #3, and an inch or two smaller here and there.
In 1944, both locomotives were sold to a scrap dealer in Rochester, New York. Rescued in 1946, they went to Ellis Atwood’s cranberry operation in South Carver, Massachusetts, where they ran on his Edaville Railroad until 1990 — much longer than they served their original owner. They returned to Maine in 1992 and have since operated at the Maine Narrow Gauge Museum, the WW&F and SR&RL museums, and even back at Monson.
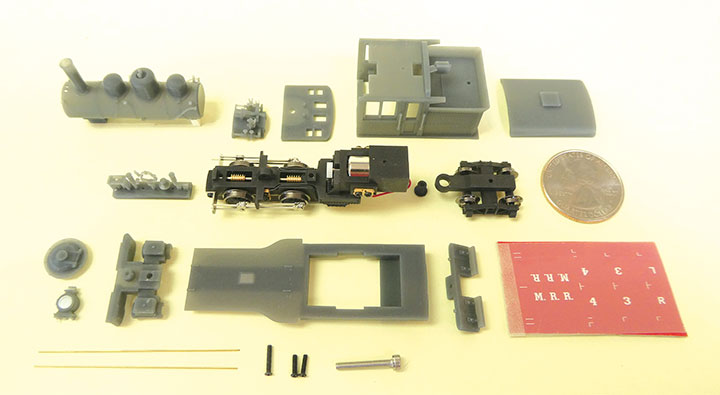
Toma Model Works of Japan makes an HOn30 kit of #4, which consists of a preassembled mechanism and 3D printed plastic super structure parts. The smooth-running mechanism features an 8mm x 16mm coreless motor in the cab and tank, with spur gears and two worms turning the drivers. Pickup is via spring wires behind the drivers.
The 3D parts are the best I’ve seen, with none of the texture common on early 3D printing. The dark gray plastic is not styrene and must be bonded with ACC or epoxy.
The kit includes three 1.4mm screws to attach the frame to the body, and a hex-head cap screw that serves as a wrench for the driver crankpins. Toma provides two pieces of .4mm brass wire for handrails, and a small sheet of dry transfers. There’s also a tiny disk of clear plastic for the headlight glass.
The instructions are available on Toma’s web site; the address is on the kit box. They are pictorial, with captions in Japanese and English. Assembly takes a couple of hours, and the fit of the parts is so precise as to be astonishing.
The instructions show a cylindrical weight in the boiler, but it is not included in the kit. It’s labeled as “Lead Plate,” so I dug out some 1/32-inch sheet lead, cut a strip to the length of the boiler, and rolled, hammered, and cursed it into the required shape. It adds .6 oz. right where it’s needed.
The kit is designed to fit Micro-Trains No. 1015 N couplers. I added them with 00-90 screws.
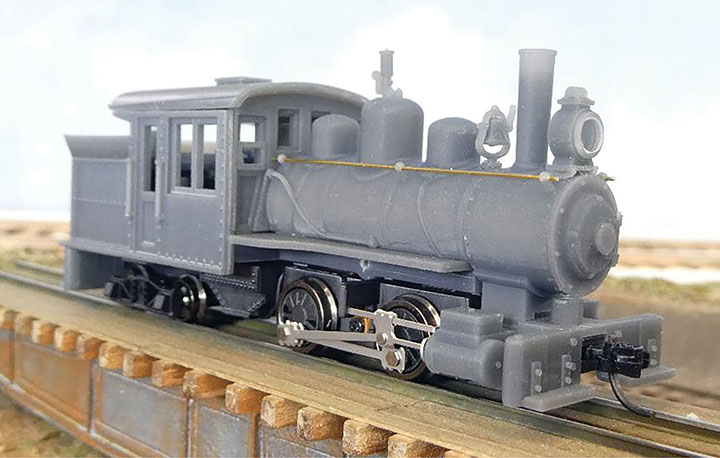
The finished model is tiny, but so is the real thing, which weighs in around 17 tons and is just 24-feet over the buffers (it had link-and-pin couplers until going to Edaville). With my homemade weight in place, the engine tips the scales at just 1.5 oz.
The model is accurate — the only missing details are the stirrup steps for the cab, and a step and handrails on the rear of the tank — all easy to add. I plan to rework the tank truck to pick up from both rails, essential on a locomotive this small.
-Bob Hayden.
Berkshire Valley Models
438 Morgan Woods Dr.
Fenton, MO 63026
www.berkshirevalleymodels.com
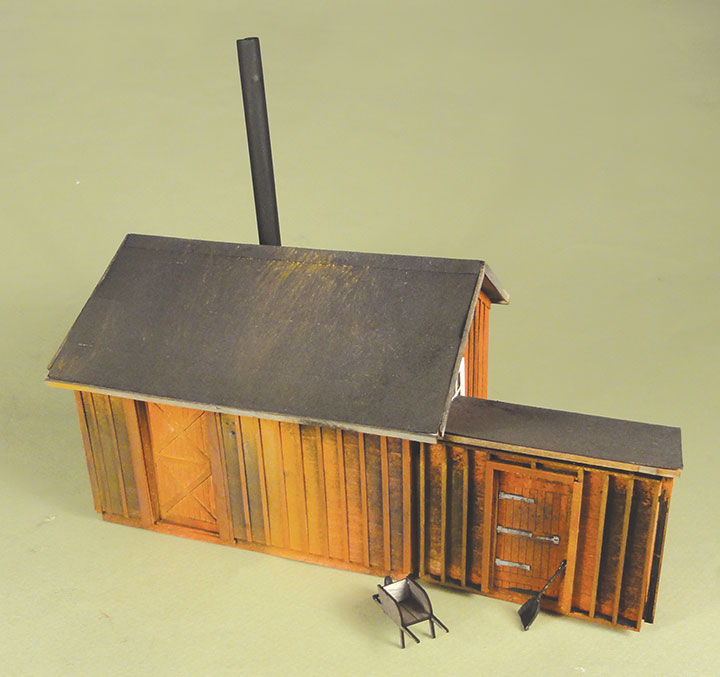
Berkshire Valley Models sells O scale kits for a pump house for $39.95 each. This pump house is based loosely on the Colorado & Southern’s Forks Creek pump house and is designed to go with the Berkshire Valley water tanks reviewed in the March/April 2021 GAZETTE. When you stop to think about it, water had to be pumped into a water tank so a pump house with a boiler and steam pump was needed. These kits are simple and easy to assemble. They have inner and outer walls laser cut from plywood. Laser-cut board and battens are provided for each wall and end in one piece per wall. You glue the battens on and cut the web between them on the bottom for a nice, neat wall. The beams on the coal shed are laser-cut wood.
The roof is also plywood and is to be covered with the provided tar paper roofing. There is a length of styrene tube for the smoke stack that is thoughtfully cut at the correct angle for the roof. A little piece of tar paper with a hole for the stack is also provided. Neat! The windows are laser board and after painting them, you add the laser-cut acetate for a very neat window. The kit also includes a wood wheelbarrow with a white metal wheel, and bearings. There is even a white metal coal shovel.
I wiped my walls while on the flat with boxcar red and painted, and applied the battens for a nice neat looking building. Then I added some weathering to dirty the building up.
The instructions are printed on both sides of one piece of paper and include five photos. This little building could be used as a machine shop, yard shed, and even an engine shed with a door in one end. The possible uses for this neat little building are endless.
-Bob Brown.