Inter-Action Hobbies
P.O. Box 1021
Chase, British Columbia, V0F 1M0
Canada
1-888/850-1742
www.interactionhobbies.com
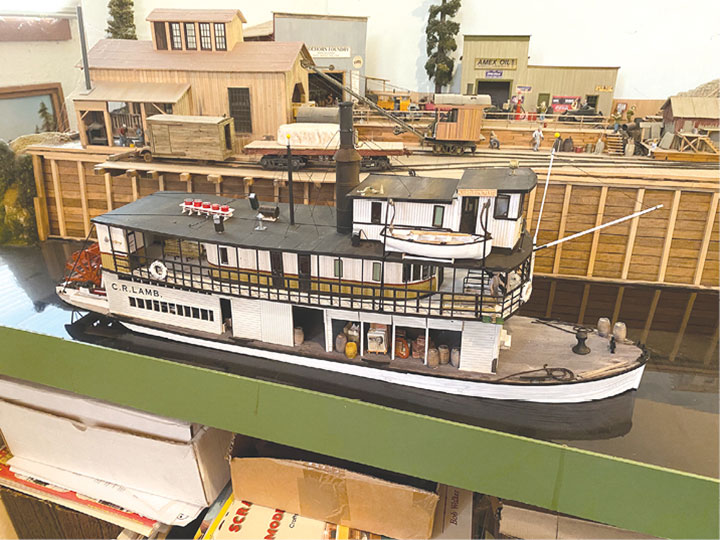
The C.R. Lamb was a paddle wheel steamboat owned by the Arrow Lake Lumber Company. She was built in 1907 for $23,000.00, and plied the rivers of British Columbia hauling passengers, freight, and pulling log rafts. She was 94 feet long and had two 34 h.p. steam engines. The boat was decommissioned in 1936, filled with gravel, and now rests underwater in the Thompson River at the end of 5th Avenue in Kamloops, British Columbia. Inter-Action Hobbies sells kits for the C.R. Lamb in N scale for $79.95, HO scale for $153.95 and O scale for $365.95. I have not seen either an N scale or HO scale kit but have spent the last four months assembling one of the O scale boats.
I found my kit detailed, well-engineered, laser cut, and a challenge, but the results were worth the effort. The folks at I-AH told me, “They had pulled out all the stops” on the O scale kit. The instructions consist of 86, 8½ x 11 pages of beautifully illustrated, step by step photos and diagrams, in two spiral bound books. The first book has a detailed history of the boat with plans and drawings, and color photos of a completed model. I cut the color photo pages out and pinned them above my workbench so I could more easily consult them. There is a list of suggested tools and supplies, a chart of suggested paints, and a link to see the instructions on your computer. There are also painting suggestions and tips, and some suggestions on working with 3D parts. A nice touch is the 3-dimensional images of the 3D part sets. There are also 3 pages showing the frets with each part numbered. So, if the instructions call for part 124, you can find it. I spent a lot of time searching for parts, since there were so many of them. There is also a page of templates for bending wire railings and lifeboat davits, plus a page of drawings for the twin rudders at the stern of the boat. Two more pages are devoted to the LED system included in the kit. There are 15 LEDs, and their wiring is shown. I did not add the LEDs because they complicated the build, and I was not sure if I was going to place my boat on my layout or on the mantle. I choose the layout.
I understand the N scale kit has a cast resin hull. The HO and O scale hulls must be built up. My O scale hull had a two-piece bottom, with three inner hull beams with 11 cross beams or transoms. These parts all fit together perfectly and when glued, formed a ridged egg crate-like hull. A laser-cut scribed basswood deck was glued on, weighted down, and left overnight so the deck slopes properly. Then the fun began. The hull has to be planked with individual strips of scale 2x4s, one at a time. I got used to using tape, clothes pins, clamps, and weights to hold the strips in place. This was time consuming because I had to wait for the glue on one strip to dry before I could glue on the next one. Once planked, the hull was painted with Squadron White putty, sanded, and sprayed white. The resulting hull is beautiful and well worth the effort.
The rear wall, front stairwell, and side walls of the lower deck were next. The curve of the deck is laser cut into the side walls. You have a choice of closed or open shutters on the side walls, or partially closed or open ones. I left mine open so I could see the boiler and freight inside. The 3D steam engines were assembled, painted, and fitted in place with their aluminum piston rods. Unfortunately, once the roof is added, you can’t see them, but you know they are there. The boiler is a casting with 3D detail including a separate firebox door with raised lettering. Again, out of sight. The passenger cabin on the second deck took a week. You start with inner cardboard walls that slot into place, add some laser board walls, and then scribed basswood outer walls. The cabins have printed paper walls with wainscotting, images of paintings, and a clothes rack. At one end, there is a dining room, with table, tea kettle, bottles, couch, and linoleum floor. But, again out of sight, but you know they are there. The passenger cabin has many windows and doors. I wished I had taken more care to fit the window frames with the acetate, so take your time here. The doors even have 3D doorknobs.
The side railings were the hardest part of the kit for me. I understand they come in one piece in the HO kit. In O scale, I had to cut and fit 41, 2x2 vertical braces, and add three horizontal strips with additional vertical braces in between them. Took forever to fit and glue it all together, but the railings really look good.
The top roof is laser cut in one piece with a hole for the smokestack. It is to be covered with a one-piece sheet of black tar paper laser cut, so while the tar paper is in one piece, it looks like it is in individual pieces. I-AH recommends you use Scotch Clear Glue with 2-way Applicator to glue the tar paper down. I found this glue worked well. Just use a lot of it, make sure the edges are glued, and place the roof under weight overnight.
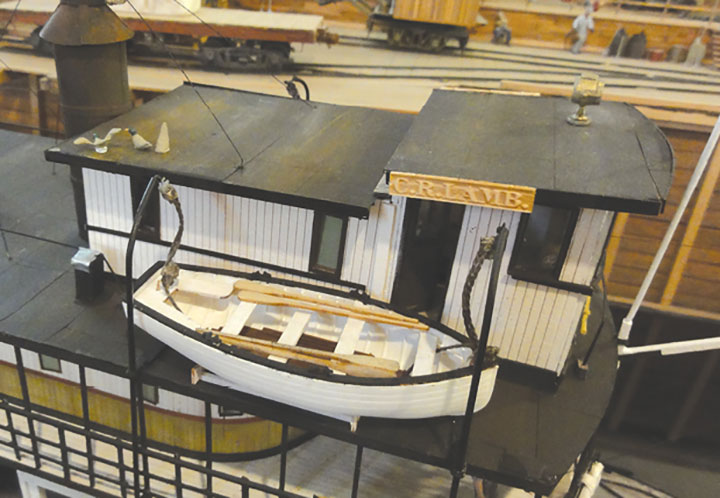
The smokestack was fun, and the pilot house presented no problems. It has a seat for the captain, map on the wall, a magnificent 3D steering wheel, and an engine telegraph complete with a decal for its face. One tricky part was adding all the guy wires on the smokestack, and hog chain post. On a paddle wheel boat, you cannot hook anything to its stern. So, if you want to tow a raft of logs, you run a chain from the hog chain post over the paddle wheel, to the raft of logs. I wonder what happens when you have to stop? There is also a set of truss rods running over the top of the boat, and a nice set of five fire buckets in a rack.
Four cast life rings add detail to the boat. Each needs a rope added, held by four little strips of paper. The rings are then decaled with “C.R. Lamb, Victoria,” and add a nice touch to your boat. The lifeboats are models in themselves. They are also cast, and have laser-cut floor grates, seats, oars, and 3D oar locks. You form the davits from aluminum tubes. One more interesting detail is the spar jutting out over the foredeck. This is not for loading the boat, it was used to line the boat up to help navigate it.
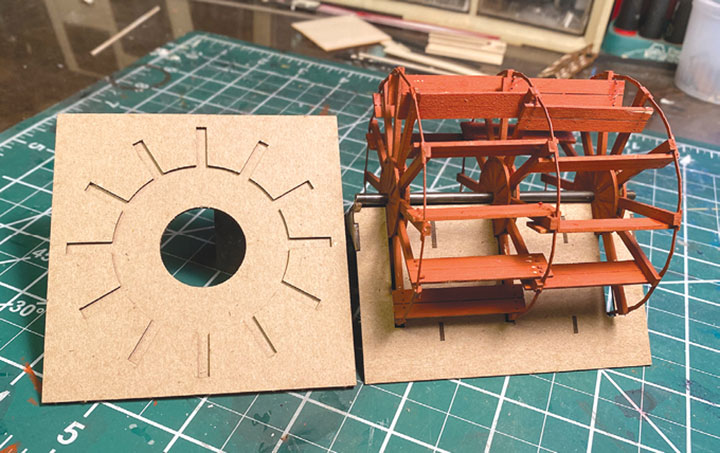
I saved the paddle wheel for last. It intimidated me and I kept putting it off. But once I started, I found I-AH had made it easy. They provide two cardboard jigs you must assemble. They are shown in one of the photos here. You assemble the three wheels from laser cut parts and paint them. Then you slip the wheels on a shaft and mount them on a second jig, making it easy to add the paddles after painting them.
The kit also comes with decals for the life rings, boat hull, steam gauge, engine telegraph, and U.S. and Canadian flags.
I really enjoyed assembling this model with its high level of detail, and challenge of assembly. I also enjoyed seeing the boat come together. In the end, I experienced what I love most in the hobby, the feeling, as I pushed back from my workbench, of having assembled a fine model. And my C.R. Lamb looks perfect in the harbor of my Shoehorn Tram (see March/April 2002 GAZETTE).
-Bob Brown.
Berkshire Valley Models
438 Morgan Woods Dr.
Fenton MO 63026
314-401-4005
www.berkshirevalleymodels.com
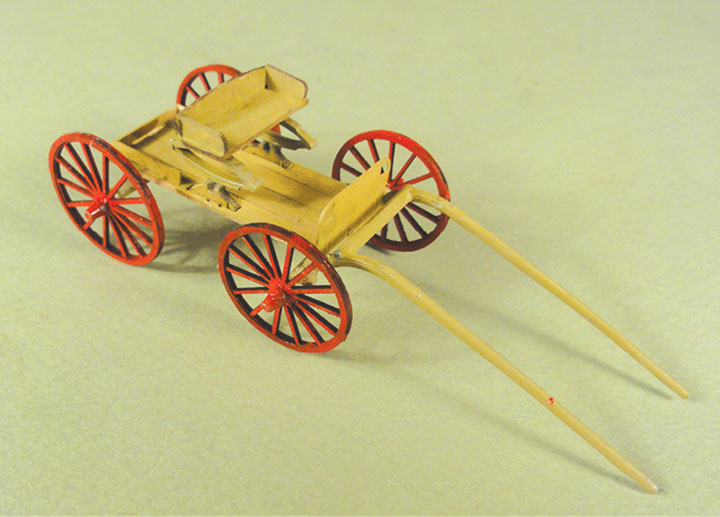
Berkshire Valley Models has a new O scale Buckboard kit available that sells for $19.95. This is an easy to assemble kit. I had mine complete in two modeling sessions. I had to wait for the paint to dry. All the parts are either laser-cut wood or white metal castings. The wheels are laser cut and have extra wooden rings to widen the tires. They attach to white metal axles that mount on the wood floor, connected by a wooden yoke. The seat mounts on two white metal leaf springs. Since there are no springs on the axles, the ride must have been bouncy, hence the name buckboard? Each leaf spring has a nib projecting from it. The bottom nibs stick into holes in a laser-cut bracket on the floor. But how to get the top nibs into the seat? Not to worry, BV provides a piece of wood with two holes cut into it. You center and glue it to the bottom the seat, and the nibs fit perfectly into their holes. The horse shafts are white metal and are mounted with thin wire. You do have to drill for the wire. Horses are available for $7.50. Since I was not going to hitch-up a horse, I ACC’d my shafts in place. There are two pages of instructions with photos of the parts and completed models. This is a delightful kit, easy to assemble, and builds into a tiny, detailed model. I wonder if buckboards were horse drawn Model Ts?
-Bob Brown.
IntuiSwitch Turnout Control by ESELCO
9054 Mullen Rd.
Lenexa, KS 66215
913/489-9033
info@intuiswitch.com
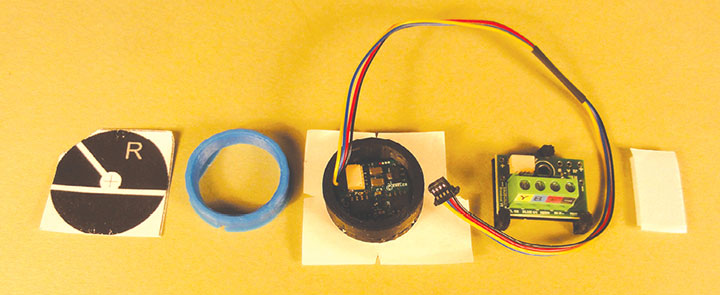
Intuiswitch.com sells innovative turnout controllers designed for stall motors such as Tortoise or Switch Master. The power source can be 12-24v DC, 10-16v AC, or DCC track power. Each controller sells for $15.95 and includes a template, bevel test ring, the controller with cable, breakout board, mounting tape, and instructions. You can see these controllers in action on IntuiSwitch’s web site.
To mount a controller, you drill a 1-inch diameter hole in your fascia or control panel with a hole saw, line the hole with the included test ring, plug in the controller, run the attached cable to the breakout board, where you attach two wires from your power supply, and run two wires to your switch motor. To throw a turnout, you press the little button on the face of the controller. A green light indicates which way the turnout is thrown. You can also buy a controller with a little built-in control panel that only requires a small hole in your fascia. The web site also shows a controller mounted on the surface of a layout controlling a wye. The photo here shows, from left to right, the template, beveled test ring, controller that fits into your fascia or panel with attached cable, breakout board that you attach the power and run two wires to your turnout motor, and mounting tape.
-Bob Brown.
Raggs-to-Riches
499 Davis Hill Road
Middlebury Center, PA 16935
570/643-6605
www.raggstoriches.biz
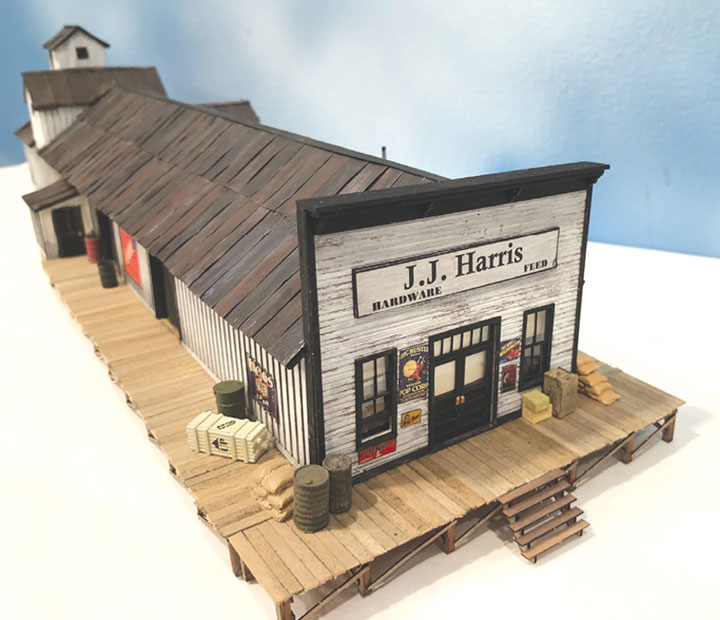
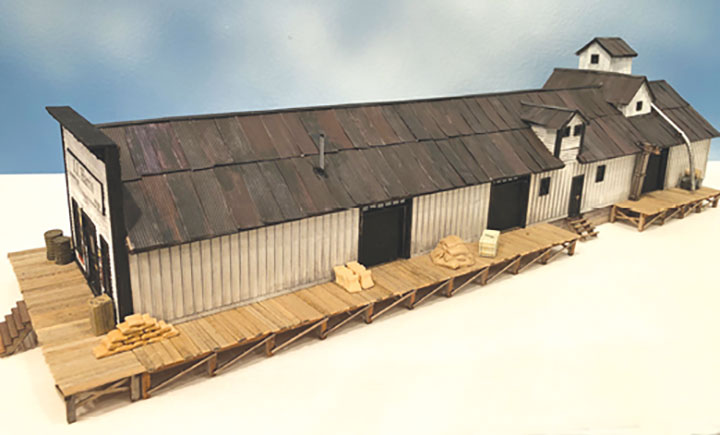
Raggs-to-Riches sells the J.J. Harris Warehouse in HO for $210.00, and in S scale for $225.00. This warehouse is one large and impressive building at 17½-inches long in HO. It authentically recreates this Dolores, Colorado, landmark on the RGS. The first part of the 46-page instruction booklet describes the variations in appearance over the years, and the kit allows modelers to create different versions depending upon the era modeled, and their own research. Apparently, the building still exists as an apartment building, of all things.
The kit is also impressive. It is one of the best fitting and most precisely engineered kits I have ever assembled. As owner, Joe Fuss, admonishes, “take your time to do a good job.” I did, and a month later was rewarded with an outstanding model. I chose to assemble my kit with all the gables, but without the loading dock skirting of its latter years. Because of deadlines, I elected not do the research on its appearance in 1949, the year I hope to model, but am pleased with the configuration selected. As with other Raggs kits, this one utilizes a laser-cut plywood core over which peel and stick components are added. This siding is followed by delicate, but strong laser-cut, self-adhesive battens. Windows and doors are laser cut as are most parts, and a parts diagram eases identification. Acetate for windows, pre-formed aluminum piping/stacks, and even a glue syringe are included, as is a large bundle of scale 2- x 10-inch lumber for skirting. Corrugated, which needs cutting, forms the roofing. Joe warns the cutting and painting of this roofing will be tedious, but by using a mini-paper cutter I found at a craft store, made this chore easier. Using the provided width jig, I had all my corrugated cut in 45 minutes. I appreciated the extra parts provided for some smaller pieces, almost guaranteed to launch into the ether. If you wish to follow the prototype, the stark black-white color scheme may seem unusual, but is prototypical.
Raggs recommends specific spray can paints which I tried and enthusiastically recommend along with Raggs’ own brand of double-sided tape. (Great for the roofing.) Although many parts are self-adhesive, a little glue using the provided syringe, on the longer or larger parts will help, especially in humid climates. I encountered absolutely no problems in assembly, but cannot emphasize enough the need to proceed slowly and test-fit parts. The fit is precise, so if a part does not fit, you have done something wrong. The well-illustrated instructions are also superb. I enjoyed every part of the assembly process despite some tedious steps such as cutting the corrugated. The use of jigs and sub-assemblies really makes this kit approachable for all skill levels. I will use some of these jigs for future projects.
I added some freight behind slightly opened freight doors, and the provided scribed floor allows you to add even more interior detail. I also added interior lights, a few extra signs, some freight on the docks and front window displays. An unusual feature is the roof-mounted grain pipe and a boxy grain unloading tube on the rail side. A little light weathering and applying my own Colorado Purple color to the corrugated roof, and the Harris warehouse was ready to place on my future version of Dolores.
If you are not modeling Dolores or the RGS, do not overlook this kit. It can easily be modified, or bashed into any number of different configurations. Raggs-to-Riches has released a number of new kits along with many of their older releases. Check their web site for availability and pricing. I am very pleased with this kit.
-Charlie Getz.
Leadville Designs
5 Stapledon Cr.
Ottawa ON, K2H 9L1
Canada
www.leadvilledesigns.com
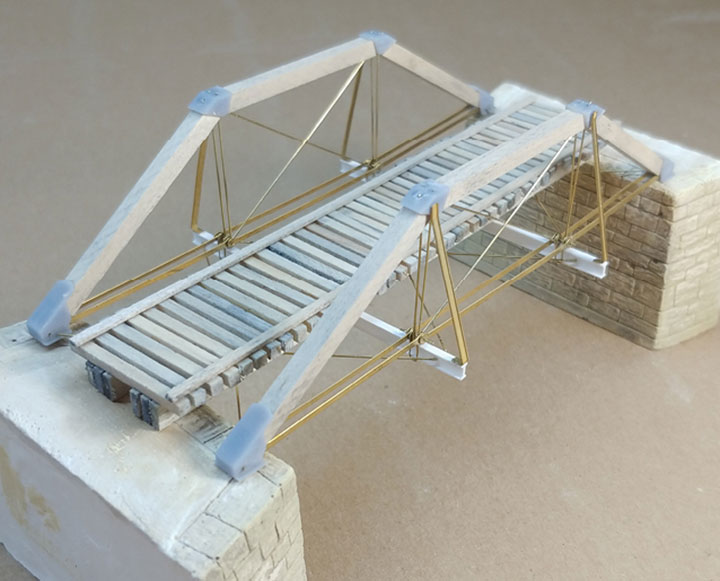
Leadville Designs offers an HO scale 45-foot Strain Beam Truss Bridge for $49.95 including tax but less shipping. This kit represents a design used by the DSP&P, and later the C&S, narrow gauge in Colorado. It can be used for both HOn3 and HOn30. The kit consists of pre-cut wood, wire, 3D printed parts, etched brass components, plastic I beams, cast plaster abutments and complete instructions. This is not a beginner’s kit, and a fair amount of prior knowledge about bridge construction is assumed. Their web site has excellent photos of the finished bridge and I found myself studying them to understand the complex nature of this design. While the instructions are complete, covering all steps in construction, they rely on your knowledge of bridge terms more than on diagrams or illustrations.
Still, with some careful study and analysis, a lovely and delicate-appearing bridge can be built. I started by impressing wood grain on the larger wood members and staining them a darker wood color. Later, I stained and painted the bridge oxide red. The photo, provided by Leadville Designs, shows an unpainted assembled bridge to illustrate the different components used. The parts come mostly cut to size, and the only precise work involved is cutting the wire to fit the various tension points and adding NBW castings. The 3D printed parts are superb and take paint well. Similarly, the cast plaster abutments are impressive. Mine suffered a few chips in shipping which were easily glued back in place with white glue. Per the instructions, I first sealed the plaster, and then used craft paints to achieve a stone color.
Plastic I beams are added under the wooden deck, which is the first part constructed. Etched brass rods are then added, joined by short sections of wire. The wood superstructure is built next. Additional wire is then added as tension rods. Templates are provided for part of this work, and it was satisfying to watch the delicate-appearing assembly come together. The result is a complex-appearing bridge sure to garner attention.
-Charlie Getz.
Stoney Creek Designs
4100 Hunters Run Blvd.
Reading, PA 19606
484/709-8132
roger@stoneycreekdesigns.com
Stoney Creek Designs sells several useful CA items. I have been using them for over a year and find them valuable.
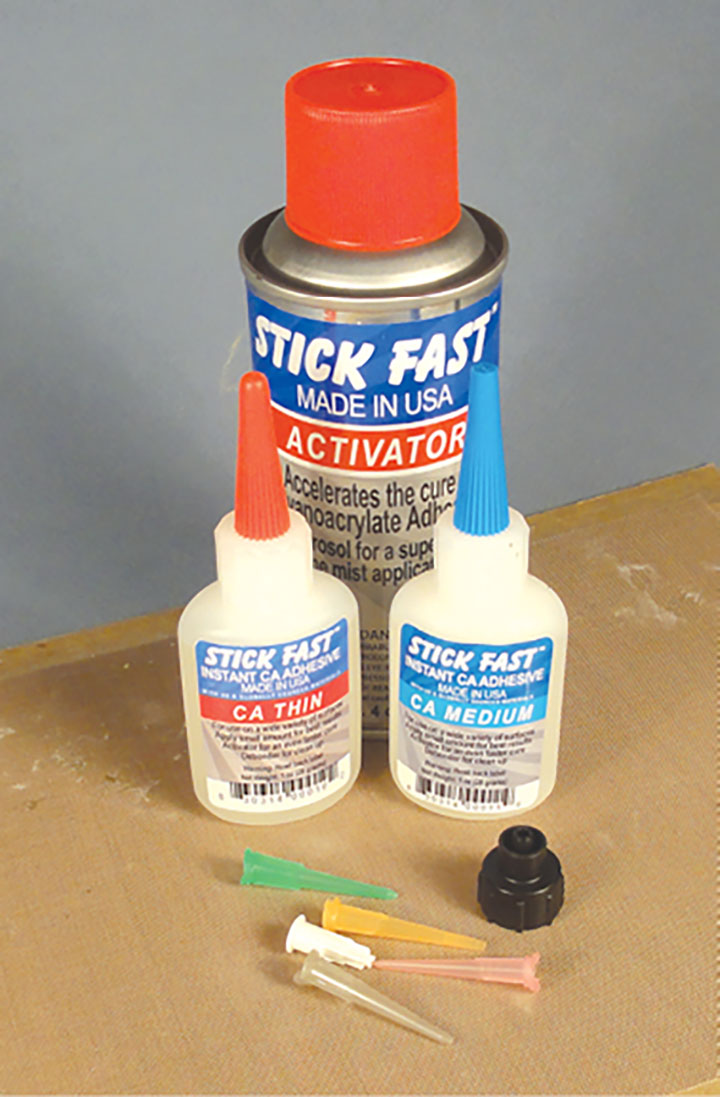
The first is Stick Fast CA. It comes in thin and medium and sells for $4.00 a bottle. This is the best CA I have used, but the thin version is like water and gets everywhere. I have actually glued my fingers together and to tools. The medium version is easier to control. SCD also sells a set of six tips to help you control your CA. A set sells for $2.00. A spray can of Stick Fast Activator is $6.00, and will speed up any CA. The last item is a sheet of Teflon for $7.50. I taped a piece of this material to cardboard and work on it when gluing with CA. CA will not stick to Teflon and eases assembly.
Postage is extra. Only priority is available, but you get your products in a few days.
-Bob Brown.
Berkshire Valley Models
438 Morgan Woods Dr.
enton, MO 63026
berkshirevalleymodels.com
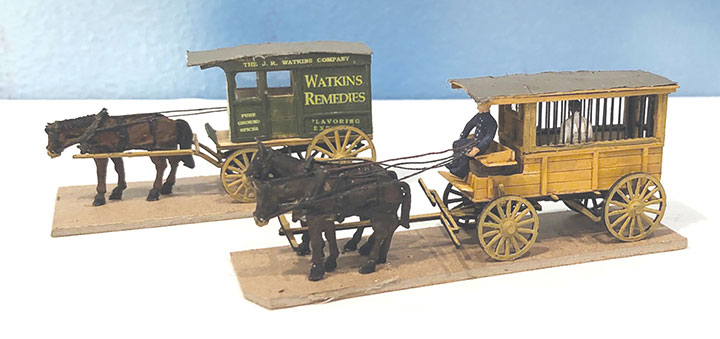
Berkshire Valley Models has produced two more wagon kits in HO. Kit #2107, the Watkins Delivery Wagon is $12.95, and Kit #2109, the Paddy Wagon is $14.95. The kit components are similar to Berkshire Valley’s earlier HO offerings, and consist of laser-cut wood parts with cast metal wheels. The assembly process is well covered by the illustrated instructions, and I encountered no problem with either kit. The only fussy step was ensuring straight bars in the Paddy Wagon using the wire included, but the instructions and pre-drilled frame members made this step easier. The resulting cage came out well. The Delivery Wagon comes with a decal, and I added a white metal horse from the optional Harnessed Horse Team ($6.00) to this wagon. I also added the new Harnessed Mule Team ($6.00) to the Paddy Wagon along with a guard/driver and a prisoner in the caged part of the wagon. These figures came from my collection of seated figures which I modified. Both wagons are charming, and the Paddy Wagon is a first. The Mule Team is also a welcomed addition to the line and very typical of the era. Mule teams such as the famous 20 Mule Team used by Borax for their heavy freight wagons were quite common as these sturdy animals could out-pull even larger horses.
For those modeling the pre-automotive era, or those who wish to include a few wagons in a more modern scene, these wagons and teams are a delight to build and fill a need. I am tempted to build a 19th century Western scene just to use these wagons, and maybe some frontier town buildings from past reviews.
-Charlie Getz.