Occasionally, column topics arise from the strangest places. Some time back, my friend, Ted Stephens, asked if I would assemble a Master Creations’ Cooley’s Old Rose Mine kit for him. Ted is building a beautiful layout featuring a number of craftsman kits (See the February 2021 NMRA Magazine) and it has been my honor to build an occasional craft kit for him. In this case however, I hesitated because I have built MC kits before. They are not always fun. I believe Master Creations was started by David Spence in the early 1980s, and if memory serves, was one of the first companies featuring the then-new technology of laser cutting. I believe David’s father-in-law had an early computer-controlled laser cutter and Dave quickly saw the possibilities for model railroading. The result was a line of laser-cut kits that grew in complexity and sophistication as the new tool was mastered. In 1998, BTS, owned by Bill and Diane Wade, obtained the rights to the MC line. They have not yet produced the Master Creations line, but use the name for some of their own kits. So, none of my MC personal opinions applies to the current BTS line!
My column in the November/December 2019 GAZETTE on my modified Bar Mills’ Queen City Coal Company incorporated an early MC non-laser kit, The Office, into one of the Bar Mills’ buildings. Despite that positive experience, let me explain one basis for my hesitancy on this project. Many years ago, an NMRA member with terminal cancer contacted me. He wanted to leave his entire model railroad collection to the NMRA. Having previously visited his home, I was aware this was no ordinary collection. This fellow lived in a posh area of Orange County, California, and actually owned two homes. One in which he lived and one with his multiple model railroads! And I do mean multiple. From a stunning large-scale garden railroad with scenery courtesy of moonlighting Disney artists, to a series of HO and HOn3 layouts in every room, the achievement was overwhelming. And he built it all in 10 years, including many complex craft kits. My formidable task was to salvage what I could after his death. Bob Brown and I oversaw the process, and this was the first estate I have ever handled with no unbuilt kits. They had all been built. It seems this fellow hired two non-modeler high school students, trained them in model building and ten years later, the three had built a half-dozen quality layouts using all of the kits of every description and complexity in their inventory. This was in addition to his 20+ custom oak display cases filled with his 1300+ piece fancifully painted brass.
Anyway, although we found no kits, we discovered a trove of MC instruction books from assembled kits, heavily annotated. They started out with comments like, “No way.” Then some pages later, “H---- No!!!” and finally, a series of expletives to make anyone blush! Frankly, that matched my experience in building MC kits to a T. Though laser cut, with all due respect to the Spences, in my opinion, they were a handful. The instructions were sometimes abysmal; there was no parts diagram, and often, there were whole assemblies omitted from the instructions. Add extra mystery parts on the laser-cut frets, neither used nor identified, and you have one frustrating experience!
So, against my better judgment, I agreed to assemble an MC mine kit in large part because I also had an unbuilt MC mine, which ironically, I obtained from Ted as payment for an earlier kit I had built for him. Consequently, I reasoned I could assemble the two mines simultaneously, which I promptly informally labeled Awl Mine and Knott Mine. Awl Mine turned out to be the practice kit for Knott Mine. As I feared, the instruction booklet was a disaster with sub-assemblies omitted and others mentioned in passing, often with cryptic photographs. In addition, I rebelled at the design of the mine, which featured a weird hoist house more resembling a country store than a utilitarian hoist house. Yet the complex headframe and offset ore bin were appealing. So was the stone (metal) storage building, very similar in construction to that office I had used for the Queen City Coal complex.
This will not be a blow-by-blow description of the highlights and pitfalls of building an MC kit since they are now on the secondary collectibles market, but does illustrate the value of tackling challenges and not accepting how even a complex laser-cut kit is designed. I have given clinics on modifying laser-cut kits because they are usually enjoyable to build and also satisfying to modify. However, they do take thought to modify given the precision and often the fine interlocking tabs/slots used. So, the lesson in this column is to set aside your fears about a kit or project and dive in. You will find as I have, that those fears are unjustified, or at worst, can be handled with some positive modifications as needed. For example, I would rate my Awl Mine MC kit as one-third scratchbuilt since I modified it and abandoned any hope of following the muddled messages that constituted the instruction book. At least I did not annotate the instructions!
My Awl Mine headframe was rebuilt four times as I struggled to decipher both the instructions and the parts. The former was murky, and the latter did not fit. I literally glued and unglued the same assemblies in different ways until the light bulb went on and I understood that what I thought was a wall was in fact, the conveyor floor. And by cutting some bracing, the support assemblies did fit together. After literally spending two weeks butchering, modifying, undoing and redoing my headframe, Ted’s mine was assembled easily in two days. Complicating Ted’s kit was the fact that his was the super-deluxe SE version with computer chips for sound and lights. Mine was the standard production run. I had to figure out how to add the circa-1984 electronics to Ted’s version, though not installed in its final location. It turns out you cannot really add the electronics until the mine is placed in situ. Consequently, I had to figure out the best way to build it off-site and have the electronics installed post-facto. If the instructions are any indicator, good luck with the 1980-ish computer show! At least it did not require use of a Radio Shack TRS-80 computer.
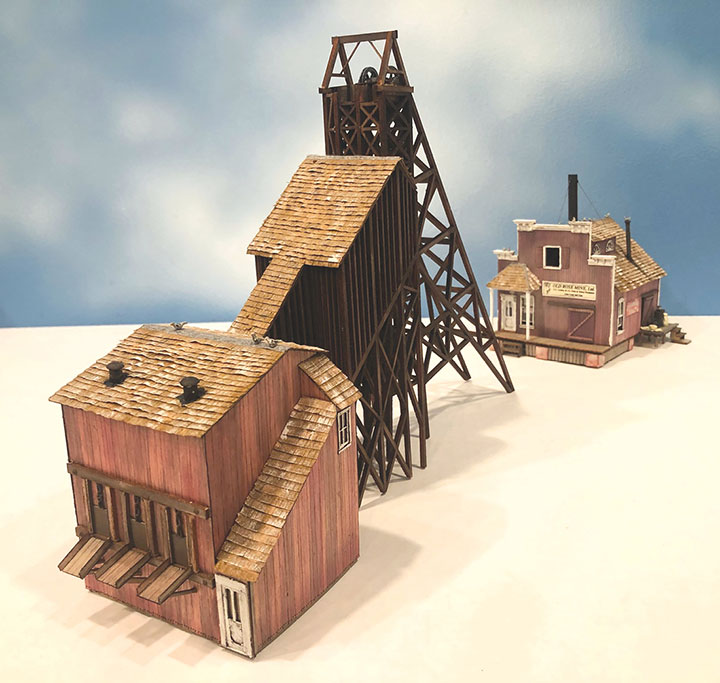
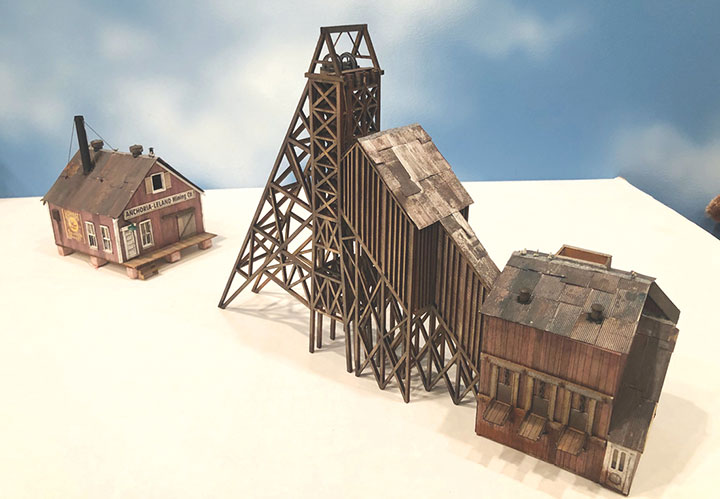
I built Ted’s kit stock. Both headframes were built as intended. Both are quite handsome, though I chose to weather mine a bit and add some NBW details. The ore bin is intended to be placed at an angle to the headframe chute, a feature I liked. But the rear windows on the ore bin bothered me, having never seen that particular feature on a prototype. I scratched a new windowless rear wall for my kit and added a large, maybe too large, skylight. I assume the door/staircase leads to a platform overlooking the bins so that large clunker chunks can be broken up. Yes, you would need light. Works for me! I changed the NBW castings on my version, also increasing the number. I did make one additional change. The MC kit used peel and stick thick shingles for roofing and while I have seen shingles on mines, I do not find that typical, and certainly not on ore bins. I decided to use Campbell corrugated siding on my model, and Campbell shingles rather than MC’s thicker version on Ted’s. It could have been worse. The MC instructions show scalloped shingles!
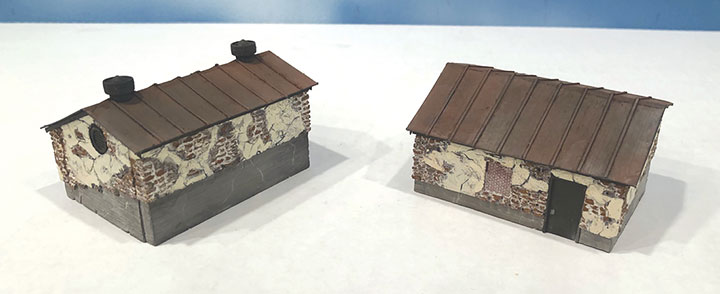
The stone storage room is a large all metal structure of unclear purpose. Generally, mines feature small stone or brick powder rooms, often built into a hill, to store the blasting caps and explosives needed. This structure seems far too large for that. And building a fancy stone structure for storage makes no sense. At Awl Mine, this structure will be saved for some future use. That left the Hoist House, and my original plan was to build my version as a country store and completely scratchbuild a new, more modest, hoist house. That was the plan until I realized my kit was missing an essential fret that just happened to have all of the gingerbread and front wall façade for the hoist house. Fortunately, Ted’s kit was intact. So, a change in plans. I used the sides and rear of the original hoist house with a scratched front façade, more resembling a barn. Hoist houses were strictly utilitarian, holding the hoist and power source. On that point, I attended a wonderful clinic on mine modeling at the 2017 Denver National Narrow Gauge Convention that confirmed what I thought. Electricity replaced steam power for mine hoist operation very early on and certainly by the 1920s. So those lovely steam powered hoists and mills we slave over are at best anachronistic if we model post 1920s.
This kit features a large stack for such a power plant, but no interior detail, so no worries. By the way, that same clinic pointed out mines use copious amounts of water, but rarely (including the MC kit) is a water source modeled. The last requirement is air, so a compressor and piping are needed — also rarely modeled. In any event, I elected to use the stack on my model as well, but not the fancy clerestory roof. I also applied corrugated to my roof and shingles to Ted’s. The corrugated was painted with my version of Colorado Corrugated Purple. The technique is not original and uses Humbrol matt colors #73 (red) and #104 (blue) mixed on application to taste, resulting in a deep rich reddish purple, very commonly found in high country weathered corrugated. If you cannot locate these classic Humbrol colors, or do not trust your artistic inner self, Wild West Models recently offered a new Colorado purple color, although I have not had the chance to try it.
By the way, the hoist house features a small storeroom with interior walls and loading dock. Makes you wonder what the stone storeroom is all about. I suspect a padding of the kit to include modified office kit walls. Mines also almost always included a changing house with lockers for miners to stow their hard hats, rebreathing gear and work clothes. These sometimes included showers, especially in coal country. Then there would be an office. You can see that mine modeling is not really that simple, and many vintage mine photos show a series of small buildings serving these functions for larger mine complexes.
But as is, the MC mine kit is impressive, and that headframe/ore bin combination is pretty cool looking. At least MC included an outhouse, although a single-holer for this sized mine might slow ore production.
The relatively modest changes made to my design did not unduly complicate assembly, and in some cases ironically simplified it. I also ended up with some nice extra parts such as doors/windows for future use. As for Ted, he seemed pleased with his assembled kit, although I left that pesky electronics installation to Ted and fellow modeler, Earl Girbovan, to complete once the mine is installed on Ted’s layout. I hope the electronics work because I would love to hear how the mine sounds with the thump of the hoist and occasional muffled explosion after the customary “Fire in the hole” warning yell. That is almost worth those darned instructions! And I am encouraged to try another MC kit.
Well, that’s all for now: until next time — write, if the mood strikes.