In the July/August 2014 Gazette I wrote about kit-bashing the four short cabooses (0400, 0401, 0402, 0403) that operated on the Rio Grande Southern Railroad. In the July/August 2021 Gazette, I wrote about kit-bashing the shortest of the cabeese — #0409. In this issue, I’ll share how I kit-bashed an HOn3 model of the only long caboose of the RGS, #0404. With #0404, I will have equipped my model railroad with every caboose the RGS had in its later years.
Caboose #0404 is the most iconic of the RGS cabeese. It is the only long caboose the RGS owned and was later saved from scrapping by Bob Richardson. In preservation, it’s been enjoyed by countless visitors to the Colorado Railroad Museum in Golden, Colorado. Being arguably the most popular RGS caboose, I’m not sure why I left modelling it to last.
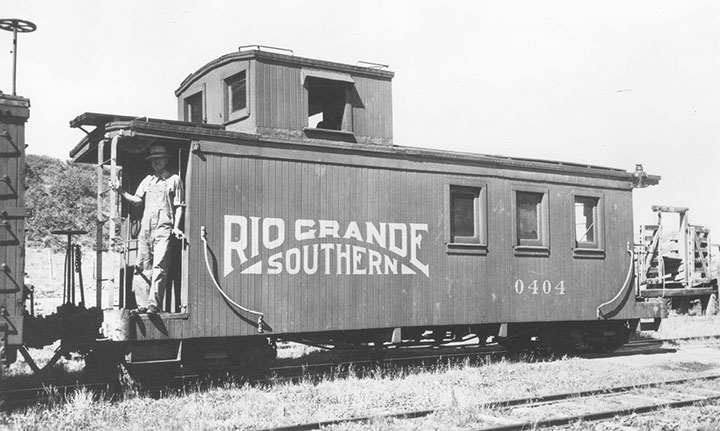
-Photo courtesy Friends of the Cumbres & Toltec Scenic Railroad, Richard L. Dorman Collection.
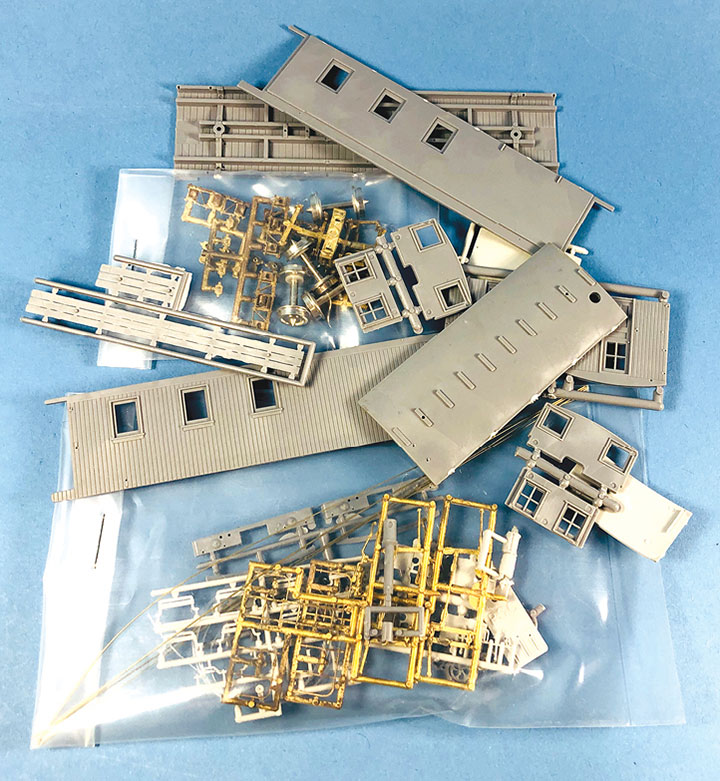
In HOn3, there have been many brass models of this caboose produced. There is also the very popular Model Railroad General Store (MRGS) kit for #0404. Because of the grades on my model railroad, brass cabeese have been outlawed because they are too heavy. I’ve built many MRGS caboose kits over the years, but I wanted my model of #0404 to have the finer details that match the other cabeese that I’ve built. For those reasons I had bought and saved a Precision Scale Company (PSC) #10682-1 D&RGW long caboose kit as the base for this kit-bash. The RGS built #0404 in their shops following D&RGW long caboose plans, so it seemed fitting that this kit would be a good starting point for #0404.
With the base model for this project confirmed, I consulted my research materials to see what details #0404 exhibited in my 1941 timeframe. At various times, it had a cupola marker light, tar paper on the cupola and other changes. My research found these spotting features for my era:
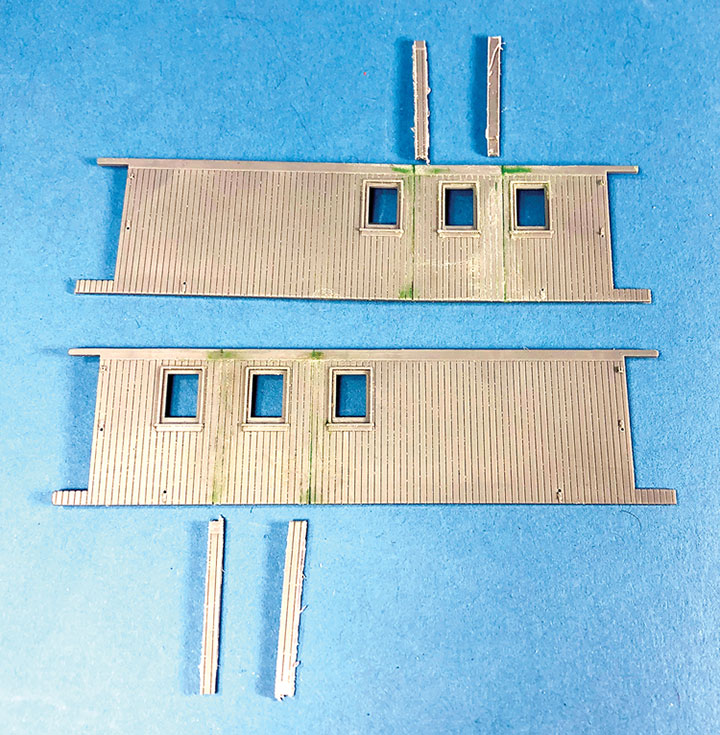
When comparing the D&RGW long caboose kit to RGS #0404, there are two glaring differences. The RGS caboose is two feet shorter and has a single cupola side window. I do not know why the RGS built their long caboose shorter than the D&RGW. When I studied a copy of John Maxwell’s plans for #0404, the two-foot difference became fairly obvious. All of the dimensions between the long caboose model and #0404 plans matched except for the space between the three side windows. Between each pair of windows, it was exactly one foot narrower on #0404. With that I found where the missing two feet came from.
With the mystery of the missing two feet figured out, I set about cutting a foot from between both pairs of windows on both side castings in the kit. I made these cuts with a razor saw in a mitre box. With the sides cut into 5 pieces, I took the three pieces that I was keeping and glued the caboose sides back together. I used some scrap styrene on the inside of the walls to brace the joints. Squadron putty and scribing tools were used to hide the joints.
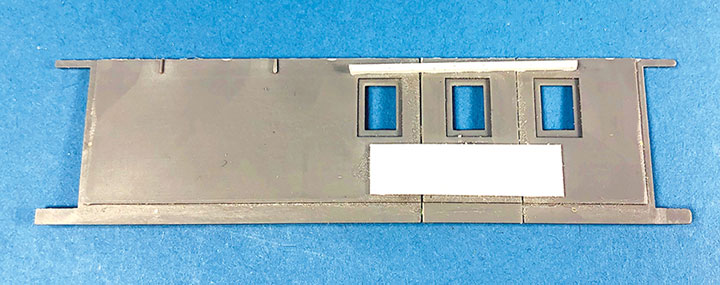
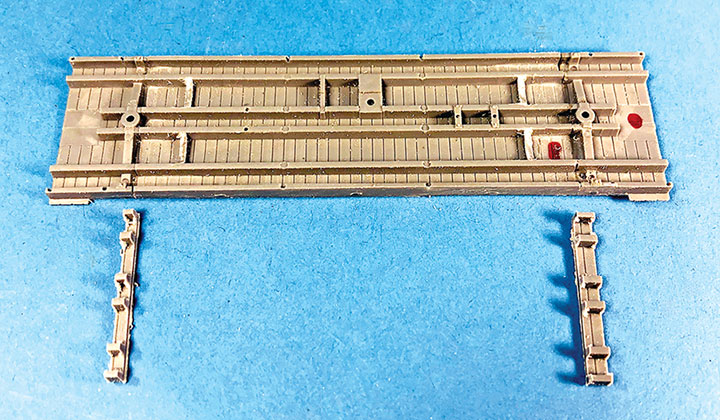
With the walls now two feet shorter, I focused on shortening the frame in the kit. In order to keep all of the brake and queen post mounting locations intact, I cut a foot off the frame from just inside both bolsters. I then squared up the joints, confirmed the length matched the sides and glued the underframe assembly back together.
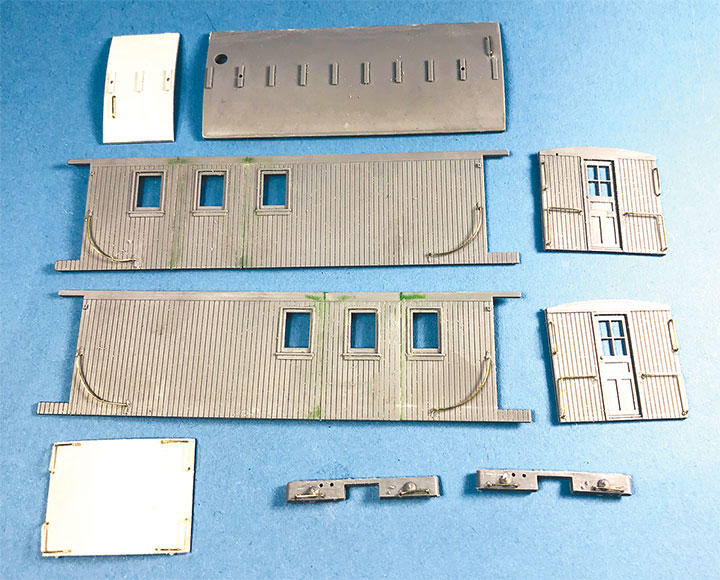
With the major components shortened, I set about building the kit following the instructions. I started by adding all of the grab irons to the various castings and then filed away the protruding wires from their backs. I built the brake system following the instructions. I substituted Grandt Line #5039 turnbuckles because they were less fragile than what was in the kit. Since the windows in the side walls of the kit are inset on the inside of the casting, I decided to cut clear plastic for them while the walls were flat. The door castings in the end walls were changed from 4-pane windows to 2-pane by clipping the horizontal mullions. I then glued all four sides to the frame to complete the basic construction of my caboose.
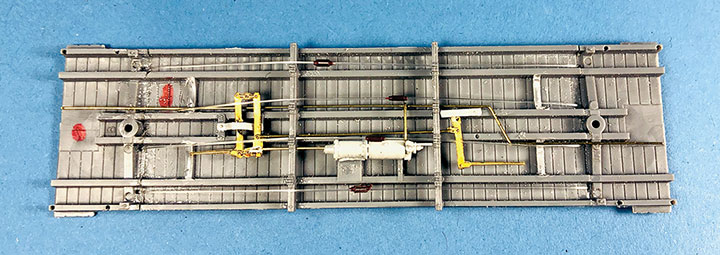
Weighing my caboose showed that it was a little too light. I added a ½ oz. weight to the inside to bring the total weight up to an ideal 1.4oz. I installed Kadee #714 couplers in the coupler boxes provided in the kit. The kit’s instructions recommend assembling the couplers as a sub-assembly and attaching the box, coupler, and all to the caboose. I found that I squished the coupler centering spring using this method. Instead, I chose to add the couplers after the boxes were already glued to the caboose underside.
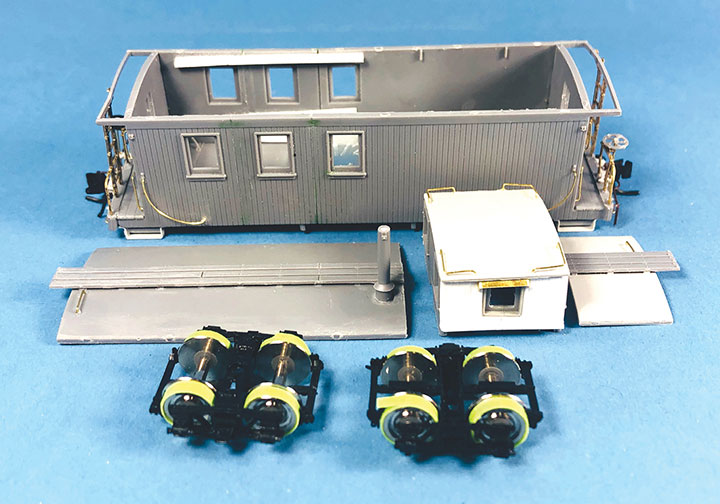
I would have liked to have used Blackstone caboose trucks on this model like I did for all my other cabeese, but I didn’t have any on hand and they are long sold out. The trucks that come with the PSC kits are notoriously fussy. Luckily, I found a smooth rolling set in my parts bin from another PSC caboose kit and used them. I shimmed the trucks by using a pair of NWSL #108-4 .010-inch washers on each bolster, which brought the couplers to the correct height.
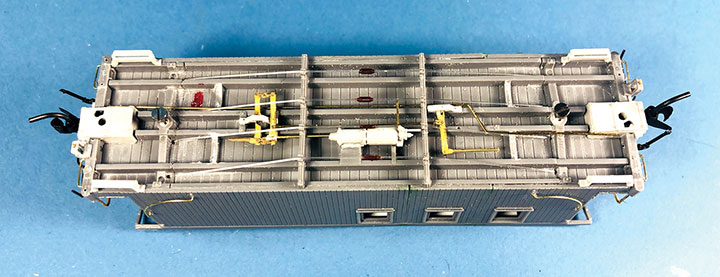
The kit I used had brass railings and ladders for the ends. I’ve tried to use the PSC caboose kits with plastic ladders, but found they were too fragile. The brass castings are a lot more robust and forgiving. I installed the railings and ladders following the kit’s instructions. I also installed the brake wheels and air hoses that are provided in the kit. For the coupler lift bars, I substituted Grandt Line #5185 uncoupling levers because they better matched the prototype caboose.
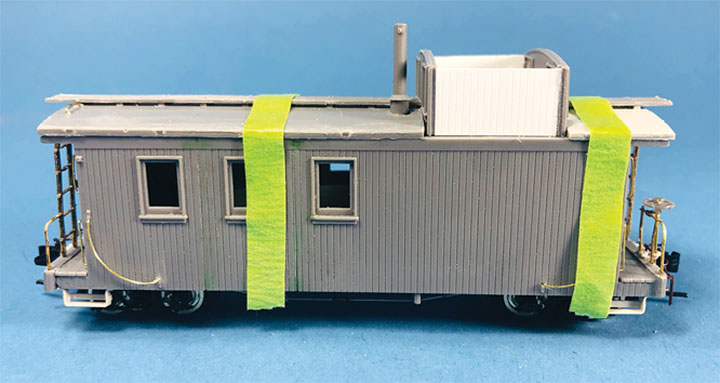
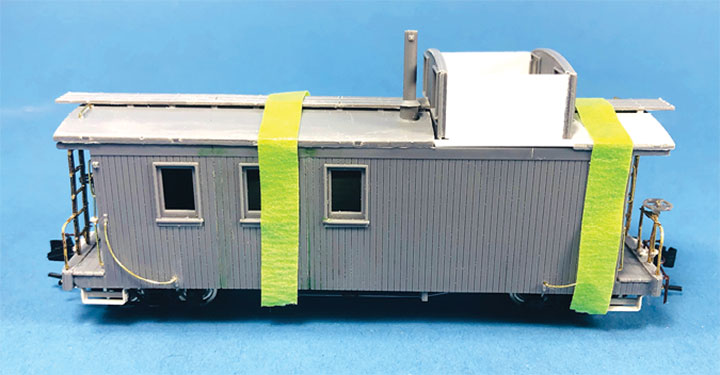
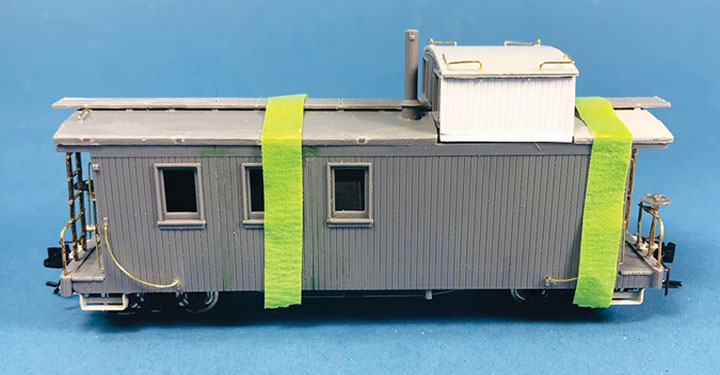
I then worked on the caboose roof sections. The long end roof panel needed to be shortened by two scale feet. I removed that much material from the cupola end of the casting as well as shortening its matching roof walk. This actually turned out to be quite easy. I simply installed the roof walk on the short roof panel since it didn’t need any modifications. The roof panels were left loose to make it easier to paint the model and glaze the windows.
The final step was to modify the kit’s cupola. I wanted to keep it removable so I could add electronics at a later date. While building the cupola for #0409, I came up with a good way to simulate the single window cupola sides. I started by taping the roof panels in place to determine the width of the cupola opening. The width of the opening between the roof panels subtracting the width of the end wall castings determined that I needed a piece of styrene .700-inch long and the height of the kit’s side casting. I cut this out of .020-inch styrene and glued it in place as the substructure for the cupola side. This created a flimsy four-sided cupola. Gluing a pair of 2- x 3-inch styrene strips to create a 4- x 3-inch strip, I simulated the edge of the roof along the cupola side walls. This was glued in place. I then sheathed the side wall with Evergreen #2040 V-Groove siding while being careful to center the grooves. Next, I installed the roof, and this created a very strong assembly.

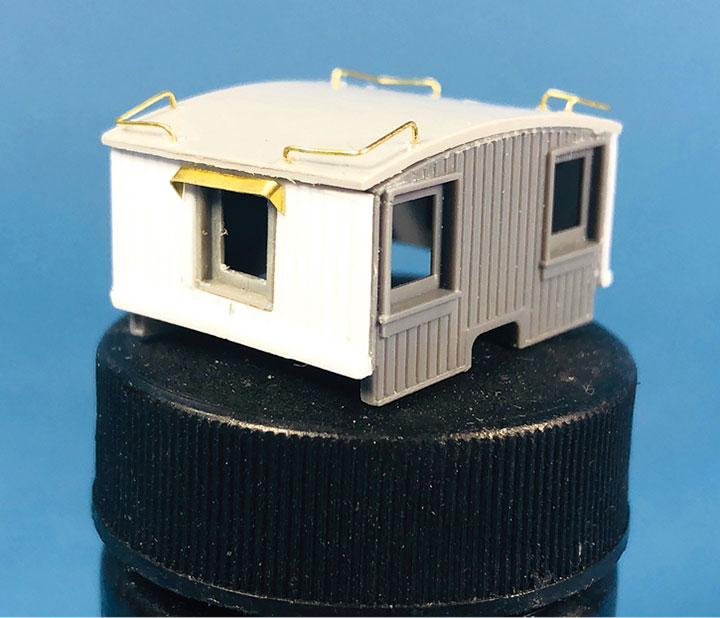
I found that a Grandt Line #5241 Shed/Attic window slightly trimmed and installed inside out makes for a good representation of an RGS caboose side window. In the cupola side wall, I marked and carved out the opening for the window casting. I then made awnings for the new side windows. This turned out to be pretty easy by folding and cutting small pieces of Simpson Models 926-HO .006- x .046-inch brass stock. With that, the cupola was ready to paint.
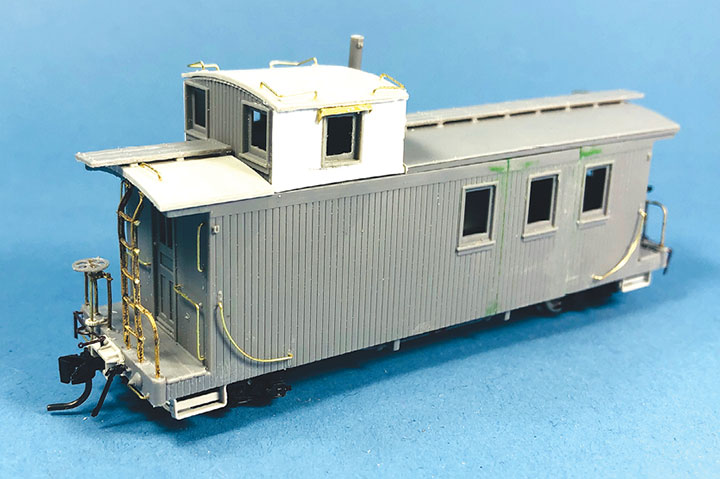
I broke the model down into its separate components in order to paint them. After priming, I airbrushed the the entire model with different browns and grays. Between coats I used a P-B-L scratch tool to remove some of the paint to simulate weathered wood. I then masked the roof walks and walkways. The roof panels were painted grimy black. The caboose body and trucks were painted boxcar red. The roof trim, grab irons, railings, ladders, and steps I brush painted white. Thin Film HOn111 RGS white decals were used for the lettering.
With the painting done, I put the cupola in place to use as a guide for gluing the roof panels. I left the cupola a friction fit so it could be removed if necessary. The walkway end braces were added, and #0404 was complete.
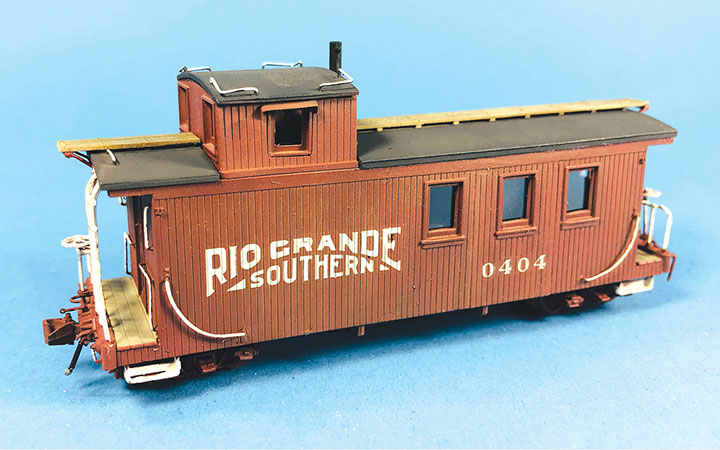
I’m very happy to have finally finished my caboose fleet. I really enjoy these relatively easy kit-bashing projects that result in unique and custom models. I hope this project has inspired you to start that long lost kit-bashing project too.
I’d like to thank John Bauer for providing research materials for this project.
Good news!
Craig has contacted Precision Scale Company and they are going to put back on the market the HOn3 short and long caboose kits he used in his RGS caboose articles.