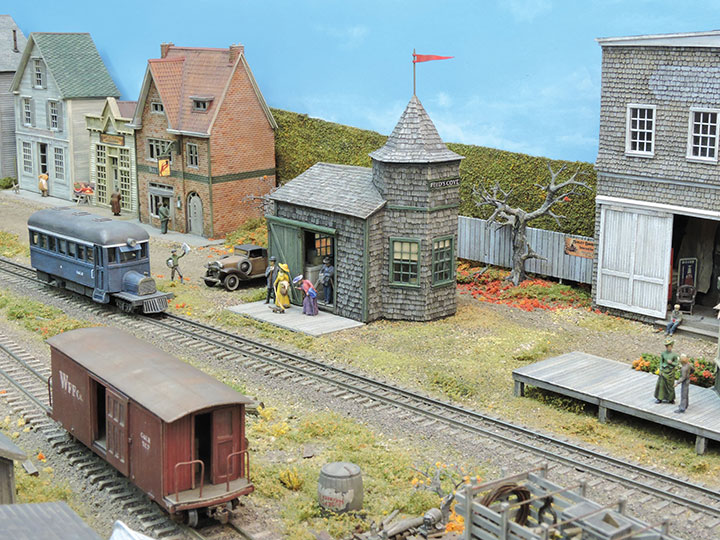
The prototype for this small station with hexagonal tower has inspired models in several scales, and I wanted to add an HO version to my HOn30 Maine coastal module as well. The prototype is the Pier Station in Wiscasset, Maine. My model will serve as a freight and passenger station near a railroad wharf. I modeled the station closer to its original version, as framing in one of the prototype photos indicate it was substantially lengthened at some point.
As the railbus approaches, there’s just enough time for the passengers to obtain today’s extra edition of the Lost River Raritan.
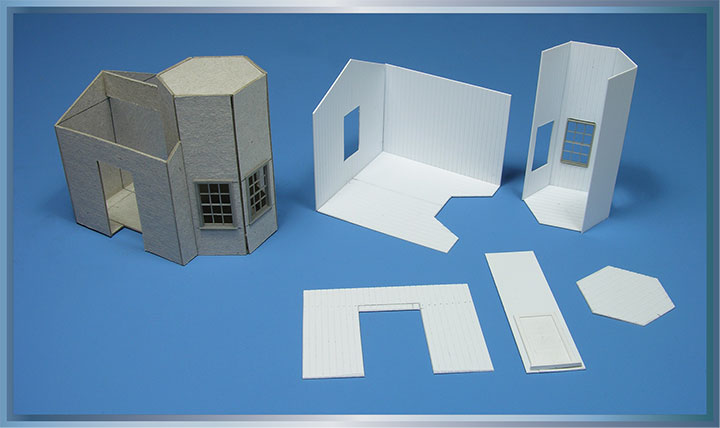
After seeing Pete Leach’s, MMR, On30 construction article in the November/December 2019 GAZETTE shown again in the finished harbor scenes in the November/December 2020 issue, he emailed me some material on the prototype and other’s model versions, and I developed my own with a cardboard mockup.
Specific steps in assembling my styrene and cast urethane plastic structure, along with detailing and lighting the interior, along with finishing the exterior to look like weathered shakes and trim are illustrated in the following photos and captions.
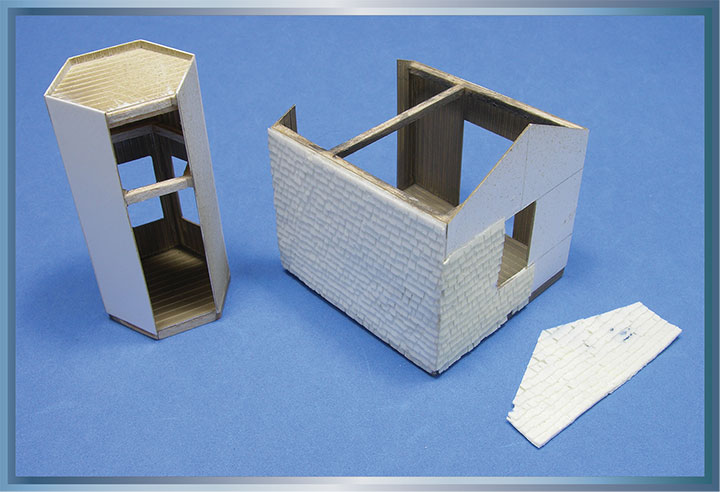
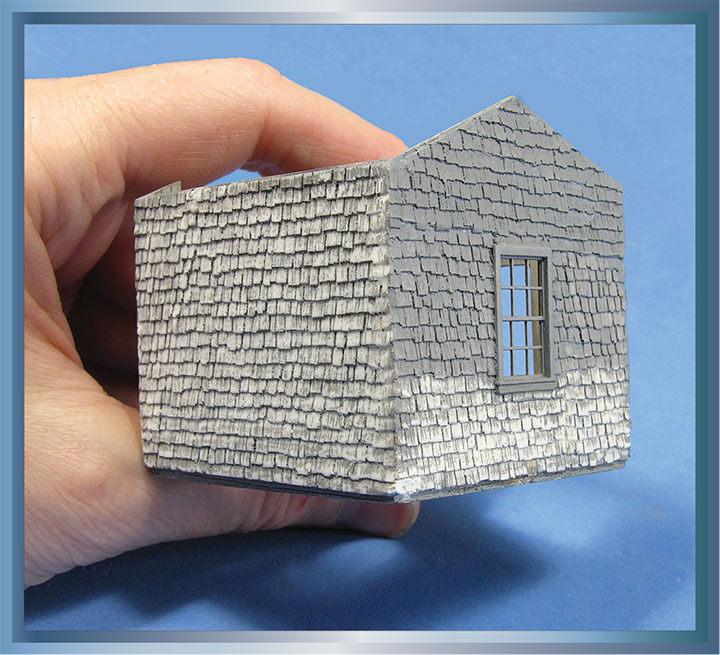
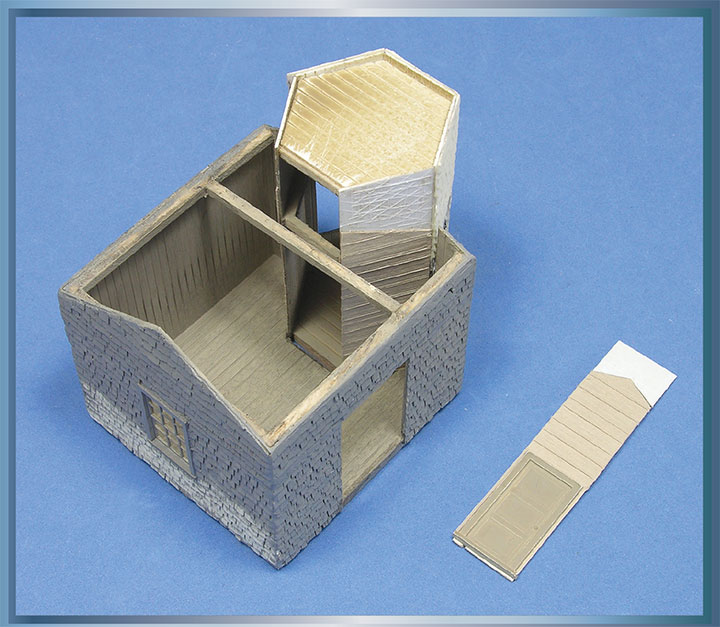
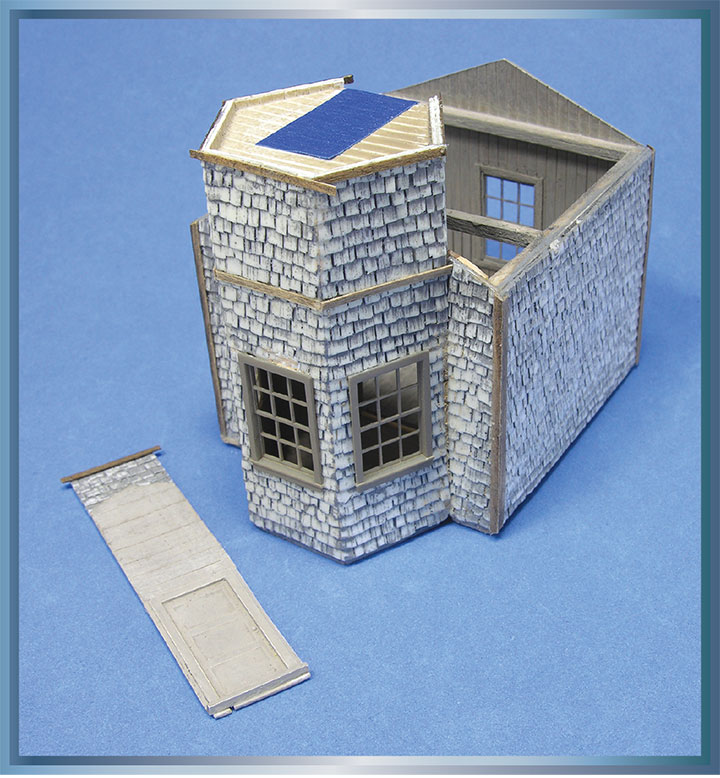
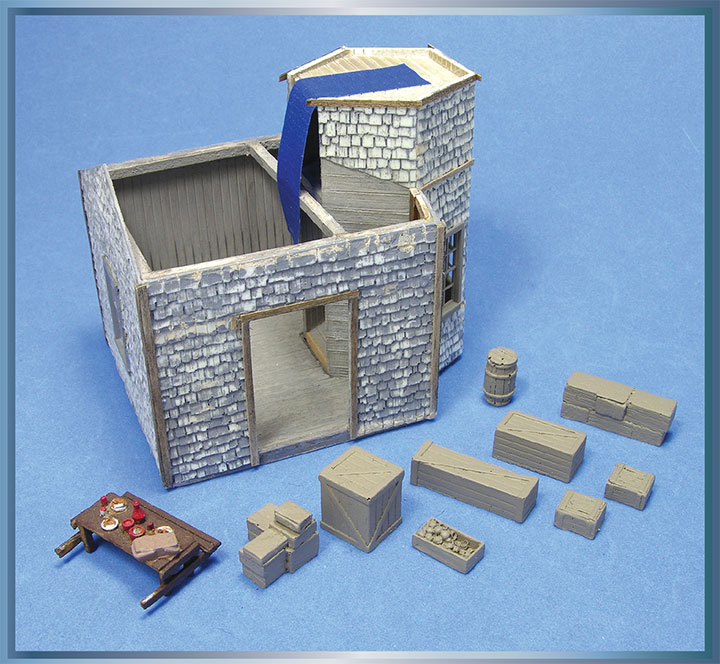
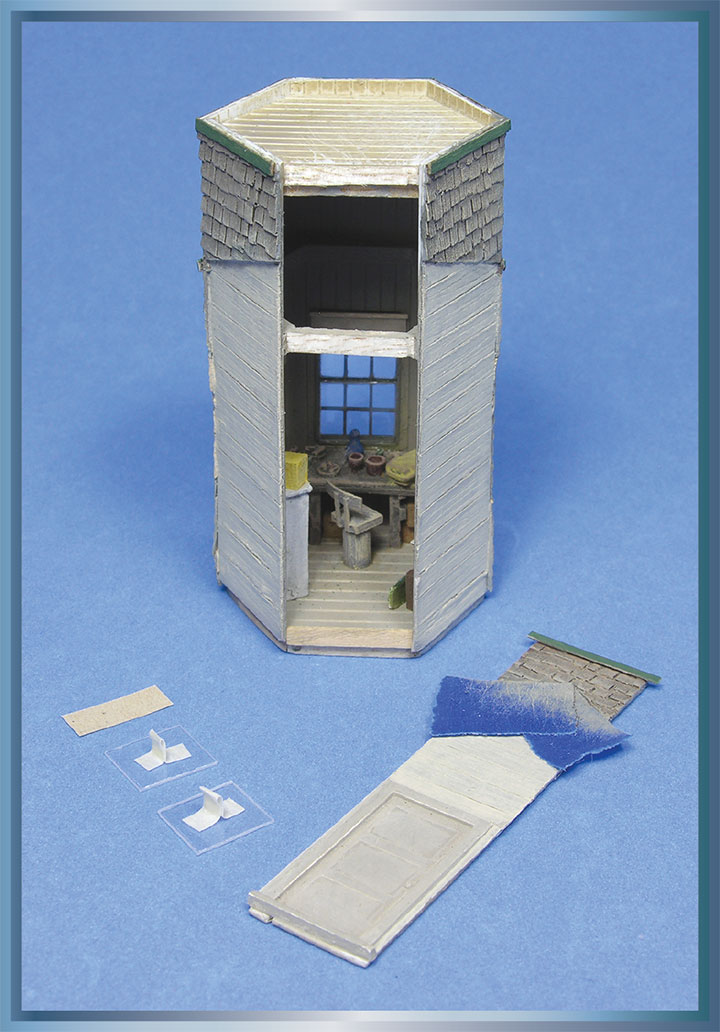
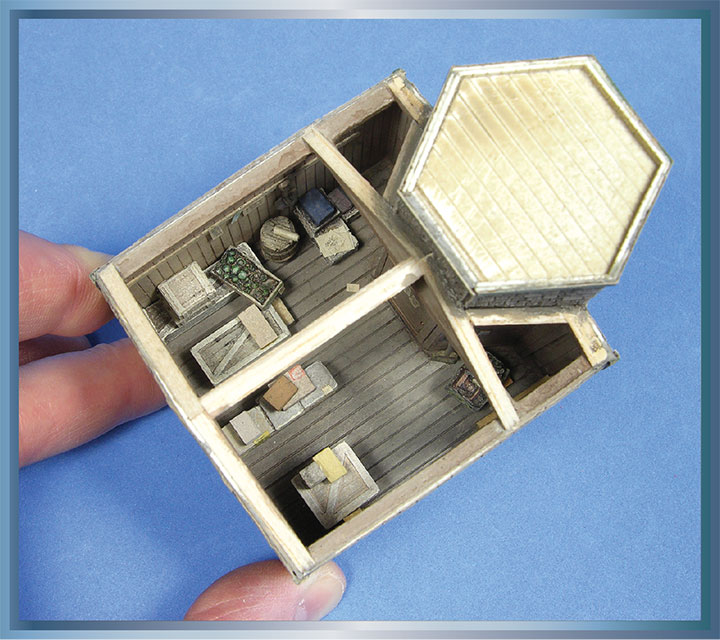
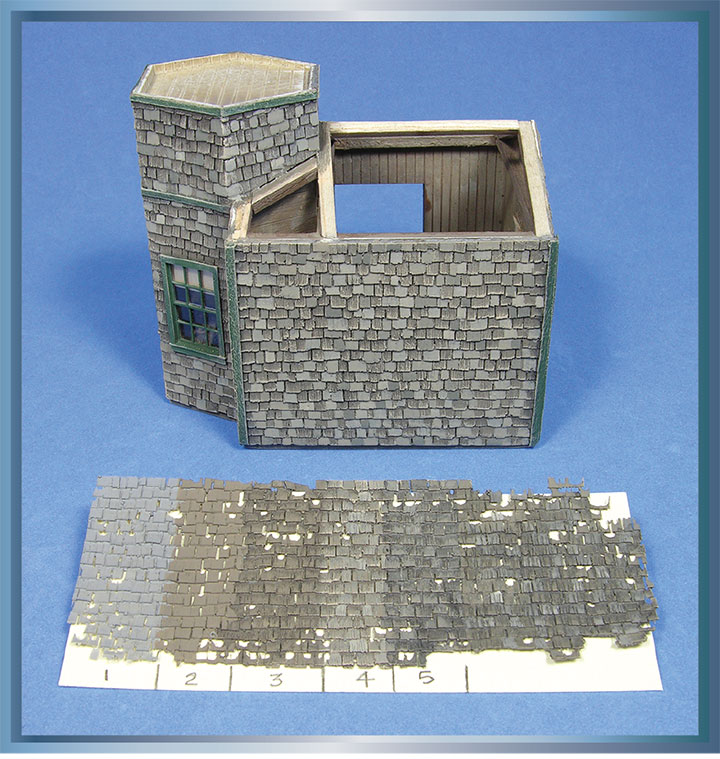
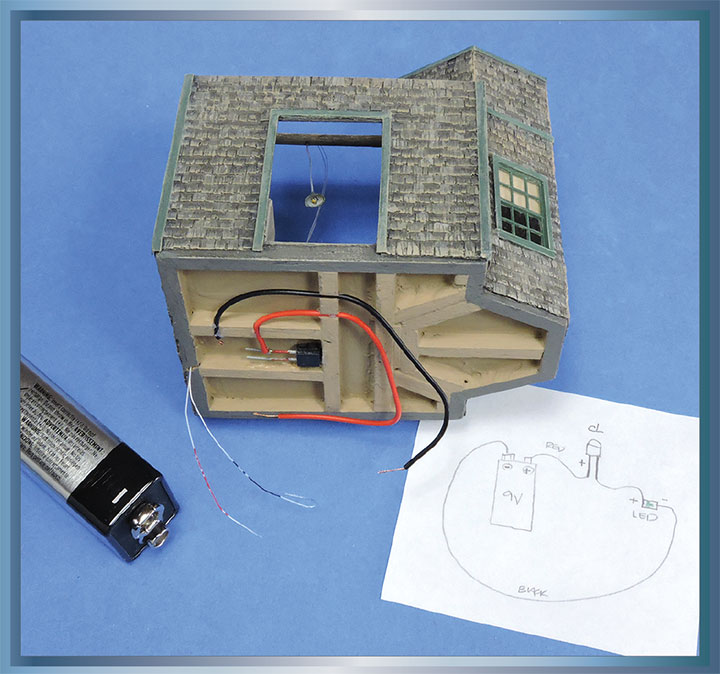
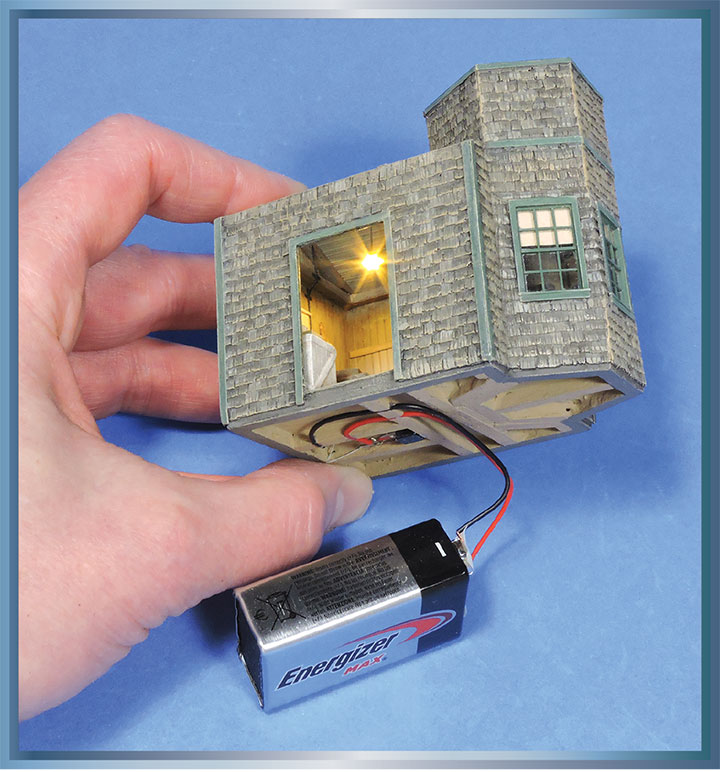
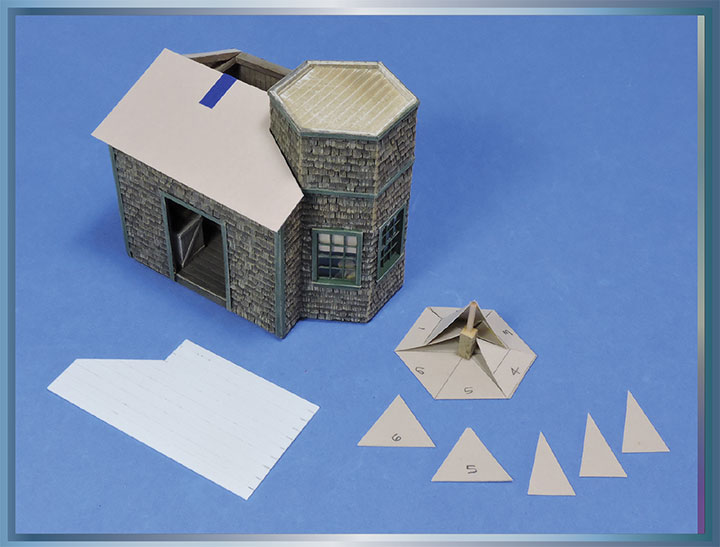
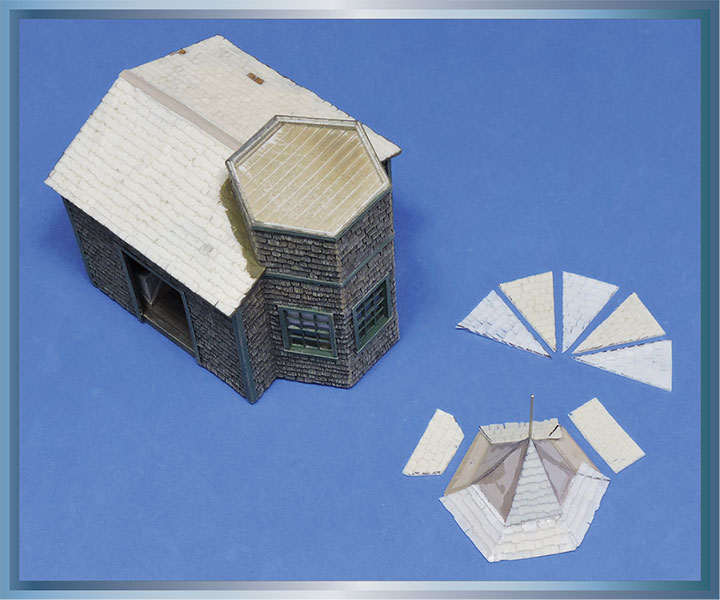
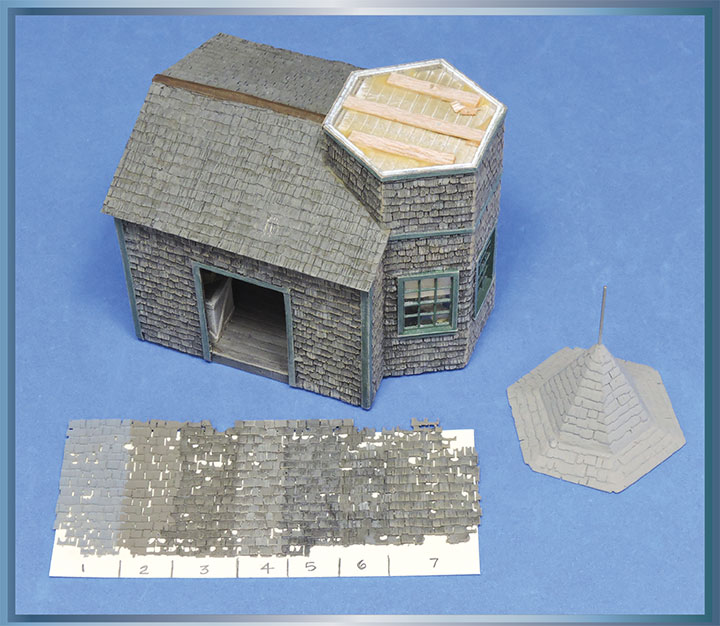
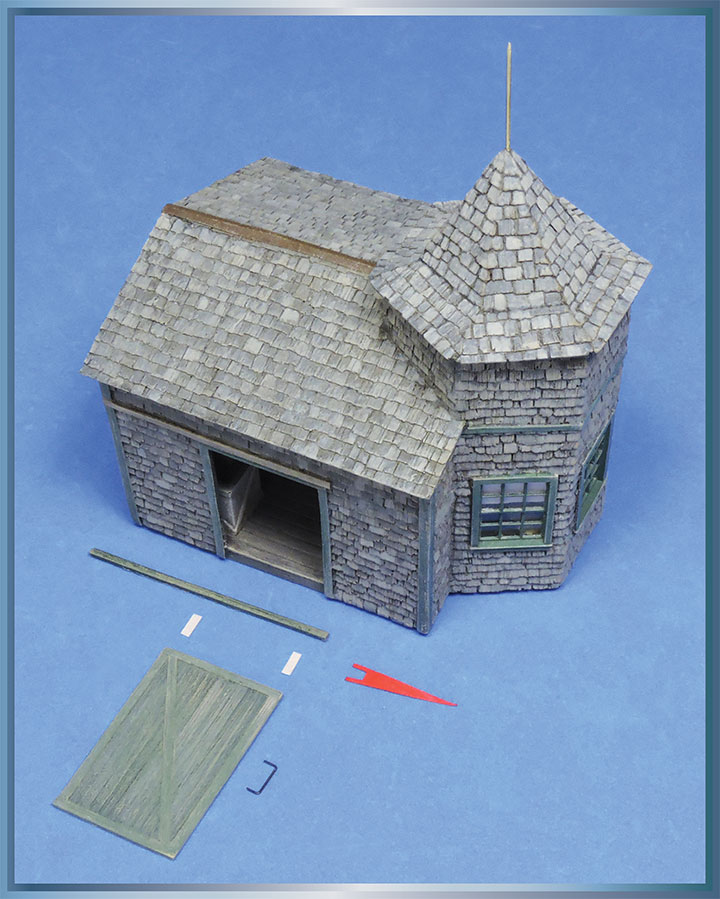
Based on one model photo and one prototype photo, I used cardboard to mockup the proportions of the station I felt best for my HOn30 module. Once I was satisfied with the proportions, I cut the walls from 0.02-inch-thick scribed styrene (Evergreen 2080).I lightly coated the interior of the tower and shed subassemblies with Rustoleum’s Sand spray paint (from their camouflage line). I then used CA (Loctite brand works well) to affix cast urethane shingle panels to the styrene panel exterior. I home cast the panels using Micro-Mark’s Rubber and Urethane system. Sometimes full-side panels were used, whereas other walls were piecemeal (based on shapes left over from past projects).After filling corner gaps and other imperfections with Elmer’s Carpenter’s Wood Filler and letting it dry, I brush-painted the exterior with a solvent-based flat grey. The primer was slowly scraped and sanded away as imperfections and gaps between shakes were defined, along with woodgrain added with a sharp #11 hobby knife blade.I checked the fit of the tower and shed subassemblies as I sheathed the exterior and detailed the interior tower walls (inside the shed) by scribing horizontal boards and adding a door (which is a styrene casting from my scrap box).I added corner and horizontal tower trim with scale 1x4 basswood stained brown. Then I test fitted the windows (San Juan Details 5031) and painted the tower and shed interior light grey.Commercial metal and cast urethane details were used to detail the tower room as an office and the shed for freight storage. The metal picnic table casting was cut into a half-hexagon shape to simulate a desk with plenty of clutter (including a lunch box that appears much like a picnic basket).I trimmed the picnic table to a half-hexagonal shape and attached basswood legs to make its surface flush with the windowsill. Some wooden shapes to represent cabinets and a chair rounded out the room. Prior to interior detailing, I painted the three windows, and glazed them, before securing them to the walls. Elmer’s Glue-All applied to the perimeter of each glazing panel works well to secure them, and any excess on the exterior can be scraped away with a toothpick when dry.Following adding the tower’s interior detail and its back wall, the tower was glued into place against the shed. I then washed the shed’s interior wall and floor surfaces with a light application of thinned dark brown acrylic and when dry, yellow-glued its interior details into place.To add variation to the shingle coloring, I tried a variety of grey shades, tinted with both black and dark brown. A practice panel helped define the steps and include priming (1), base coloring (2), washing with thin black acrylic (3), varying shingle colors (4), and selectively distressing with a #11 hobby knife blade and black acrylic washing shingles (5).A single 0402 LED is all that’s necessary to light the shed interior. I threaded the conductors through a San Juan Details plastic lamp reflector (5062), along the top beam, down the wall, and through a hole in the foundation to the current limiter. In this case, the conductor insulation was a slippery grey material that could only be colored with solvent based paint.I tested the interior lighting before gluing on the roof panels. I painted the conductors flat black, and then tacked them into place along the roof beam and wall interior with dots of yellow glue (which were then covered with rectangles of painted paper (visible in the upper left of the door opening).For the shed’s panels, I cut a template from cardstock to insure a uniform overhang and snug fit against the tower sides. I cut the roof panels from 0.02-inch sheet styrene using the template. I scribed the underside of each panel with scale 12-inch width boards, and lightly sanded the interior before painting it tan and securing with yellow glue and Loctite CA. The hexagonal “witch’s hat” roof was mocked-up with cardstock to determine the proper proportions for slopes and height. It took several iterations and three layers of cardstock assembled with yellow glue and stiffened with CA.The two styrene shed roof panels were covered with corresponding cast urethane shingle panels using the cardstock templates. I used the same approach for the tower roof, where rectangles and triangles of urethane shingle panels were cut using cardstock templates, and then trimmed and sanded to fit the roof geometry. Prior to adding the triangular panels, a hole was drilled into the dowel supporting the roof apex, and a 0.025-inch brass wire a scale 8-feet long was secured with CA, so the flagpole is about a scale 6-feet long.The shed roof shakes were primed, painted, and distressed in the same fashion as those on the sides. I lightened the roof with additional grey washes, and selective staining of shakes light or dark grey, along with the gaps between them with black. At this point, the tower roof has been primed, and was ready to be sanded, scribed, and textured.The final building details to be added include the basswood door and hanger along with cardstock hinges and brass wire handles. I painted notebook paper acrylic red before bending and fashioning a pair of loops on the banner ends so the flag is friction fit atop the pole. Allowing the flag to rotate may save it from breaking off and will also allow the inland breeze indicated to vary from setup to setup. The flag was installed after the roof shingle painting was completed, including greying the roof shingles slightly lighter than the sides, and painting the shed’s ridge plate and pole which was tapered at its top through filing, and painted pastel green to simulate copper with a patina coat.