
Inter-Action Hobbies
P.O. Box 1021
Chase, British Columbia, VOE 1MO
Canada
1-888-850-1742
www.interactionhobbies.com
Inter-Action Hobbies has an O scale kit for the Keeger’s Garage & Repair for $72.95. This building is also available in HO scale (see Charlie Getz’s review in January/February 2021 GAZETTE.) The building is based on a prototype photo of a confectionery store that was converted into a garage. It has a main building with a garage annex and a storeroom. The kit is not a difficult build. The instructions are excellent and consist of 20 double sided 8½ x 11-inch pages printed with photos and sketches. Along with painting and gluing suggestions there is a page of color photos that I pinned above my workbench for easy reference, and a page showing the parts on their frets. There are also two pages showing where to put reinforcing strips on the inside of the inner wall, but these locations were also laser cut into the backs of the inner walls. The kit has laser-cut wood inner walls that you cover with laser-cut clapboard siding. Make sure the window openings align perfectly. The windows are laser-cut laser board. Some have wood sills. Laser-cut acetate is provided. I found fitting the windows into their openings took care. I bought a bottle of canopy glue to glue in the acetate. I made my garage door in the open position so I can add either an automobile or detailed interior later.
The kit also includes an LED lighting strip, 3D chimney, plastic smokestack, and printed interior details consisting of a wall, and two window displays. There are three awnings. One blank, one with confectionery lettered on it, and one lettered Garage & Repair Shop. You have to glue the colored stripes onto each awning.
This is Inter-Action Hobbies second O scale building. The first was their tool shed also reviewed in the January/February 2021 issue. I hope they bring out more. I really enjoyed assembling this garage and look forward to more kits from Inter-Action.
-Bob Brown.
Bollinger Edgerly Scale Trains
375 Bean Hill Road
Belmont, NH 03220
602-267-1818
www.besttrains.com
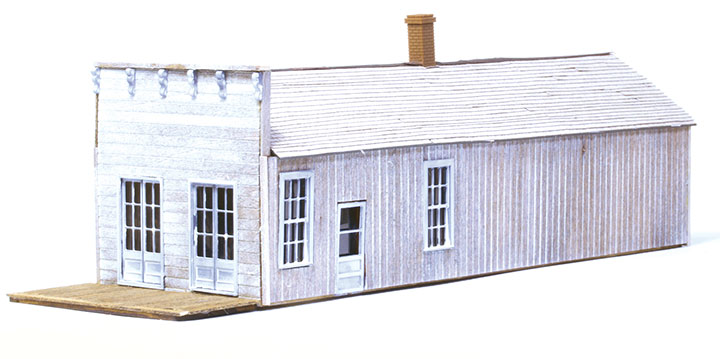
Bodie, California was built up to support gold mining on the eastern slope of the Sierras, the town in its heyday had roughly a thousand structures and a population of upwards of 7000 persons. The Standard Mill was the central industry that processed ore from several surrounding mines, while the town provided businesses and housing.
Neil Pfafman’s ongoing series of drawings in the Gazette has documented many of the structures in Bodie with drawings and descriptive text. Based on these drawings, Brian Bollinger of Bollinger Edgerly Scale Trains has produced several of these buildings easily assembled HO scale laser cut kits.
The Post Office sells for $54.95 and represents Bodie’s original post office. Milled basswood sheet side and rear walls represent the commonly used board and batten siding that clad many balloon framed timber structures. The basswood false front represents a fancier tongue and groove style cladding. Both injection molded and laser-cut laser board windows and doors along with clear glazing are used to fill the precision cut window and door openings. The card stock roof caps the model and is covered with peel-and-stick strips of laser-cut shingles. A paintable strip of copper peel-and-stick completes the ridge course on the roof. The finishing touch is provided by a 3D printed brick chimney. Strip wood is provided for the corner posts and trim with a sprue of plastic corbels adds a bit of interest to an otherwise austere front façade.
I pre-stained the wood and card parts prior to assembly, first with a medium wood stain which was followed by a white pickling stain. This combination mimics failing and chalking linseed-based paint of the type common at the turn of the twentieth century. A board walk consisting of individually cut basswood strips glued to a sheet of basswood and attached to the building’s front completed the kit. While no lettering or signage is included with this kit, you could easily provide your own signs.
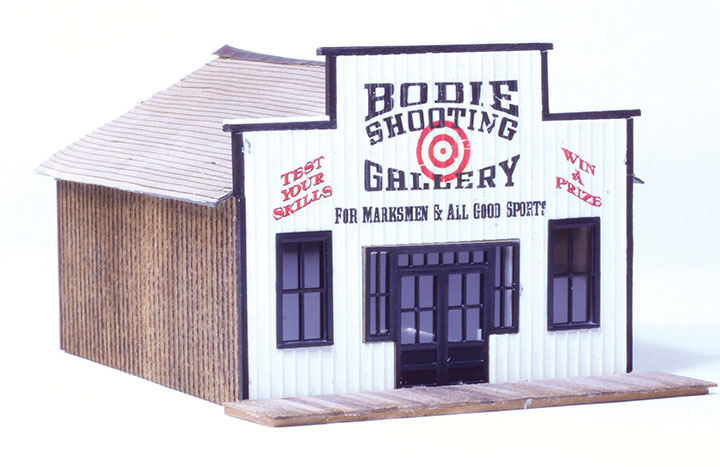
The Shooting Gallery kit sells for $79.95 and was not used for the practice of firearms and marksmanship; it was only one of the 65 drinking and gaming establishments that graced the mile long main street of Bodie. In 1877 it was constructed as the lobby of the Standard Hotel. While it is not clear what happened to the hotel itself, by the 1890s the building was repurposed as a saloon and gaming house. In this capacity it served until destroyed by fire around 1930.
The model uses similar materials and techniques for its construction as the Post Office kit. However, a large two-color decal is included to decorate the building’s front façade. To provide a suitable surface for decaling, I sealed the front walls with sanding sealer, then primed and painted them white. A coat of Testor’s GlossCote was then applied to provide a smooth surface for the decal to adhere.
The decal was first loosened from its backing by dipping in water, and a coat of MicroScale decal set applied both to it and the wall where the decal was to be placed as a wetting agent. The decal was then slid onto the wall, positioned, and pressed down over the battens, pressing out any air bubbles. Following this step, MicroSol was applied over the decal to soften it so that it would more easily conform to the surface and the entire wall was set aside to dry. A spray of GlossCote followed by a coat of DullCote sealed the decal, finishing the process. The decal really makes an otherwise plain building stand out and will inevitably draw comment.
Both kits were easy to assemble making them a great first build for those who have not yet tried their hand at building laser-cut models. Since much of the fun of modeling is researching and recreating the past in miniature, these kits fit the bill, demonstrating that a model does not have to be complicated to be an accurate representation of a given prototype.
-George Riley.
Leadville Designs
5 Stapledon Cr.
Ottawa ON, K2H 9L1
Canada
www.leadvilledesigns.com
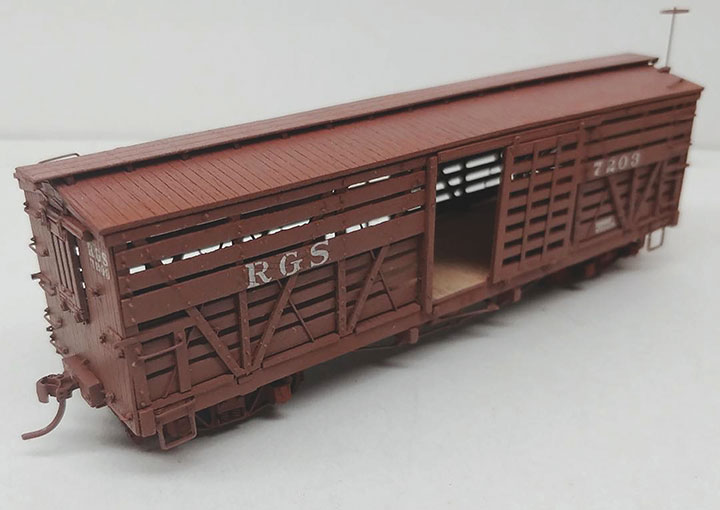
Leadville Designs offers two new freight cars in HOn3, Sn3 and On3. In this issue, I review the Type 1 RGS/C&S Stock Car and brass trucks in HOn3. In a future issue, I will review their new D&RGW MOW bunk car 04965.
The HOn3 stock car lists for $34.95 U.S. with correct all brass trucks/scale wheels available separately for $24.95. Leadville Designs refers to itself as a boutique supplier, and that is very accurate. This kit contains a wealth of intricate detail, much of which you will never see when built, but it is there. The kit consists of first-rate laser-cut wood, wire, nylon for truss rods, Tichy or Grandt Line styrene components, custom decals, and beautifully etched brass parts. The instructions, while complete, assume a knowledge of terms and fine car construction. The parts diagram, and excellent plans helped immeasurably, as did the clever sidewall construction with pre-formed slats laser-marked for placement.
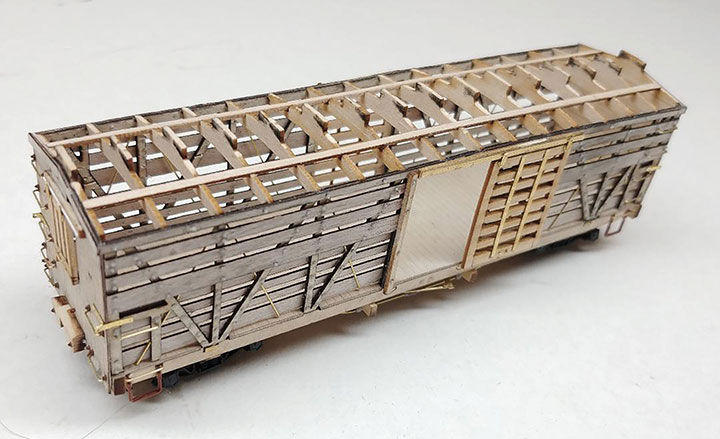
Almost every detail is replicated, and I woefully underestimated the amount of time required for assembly. Leadville Designs was kind enough to provide the photos used for the review as I could not complete my car by deadline, nor did I wish to rush it. This is taxing and very fine work, so a strong light source and magnification is required, as is a very steady hand. As the photos show, the result is a highly accurate model of the prototype. You will have a decision to make when you start. Do you want to build a contest quality model with every brake line, detail, and multitude of individually applied nut-bolt-washer castings, or do you want a simplified layout quality model? If the former, you will need to bend your own grab irons using the provided jig, and add hundreds of tiny NBW castings. The result of this effort will be spectacular, but is no easy task. However, nothing is beyond your ability if you take your time and all the kit parts fit precisely. Or you could choose to cut corners, forego brake lines and other subtle details to end up with a serviceable car as accurate as anything on the market. I am slowly building mine to be a focus piece, and given the level of detail, the process does take time. Either way, this is an impressive kit and one to challenge your skills. By the way, I had to replace a few disappearing turnbuckles and a broken queen post from my scrap box due to my assembly ineptitude and a lack of extras in the kit. I painted my model a boxcar red but the RGS stockcars were painted a mineral red color. The truck kit is made of brass with fine scale metal wheelsets. They can be soldered or superglued and are easily assembled. I chemically blackened mine before painting them boxcar red.
I am glad Leadville Designs continues to produce interesting prototypes. They have recently announced an AC&F 30-foot truss rod boxcar, also used by the C&S/RGS and NCNG.
-Charlie Getz.
Crescent Creek Models
P.O. Box 238
Clarkdale, AZ 86324
www.thundermesa.studio/crescent-creek-models/
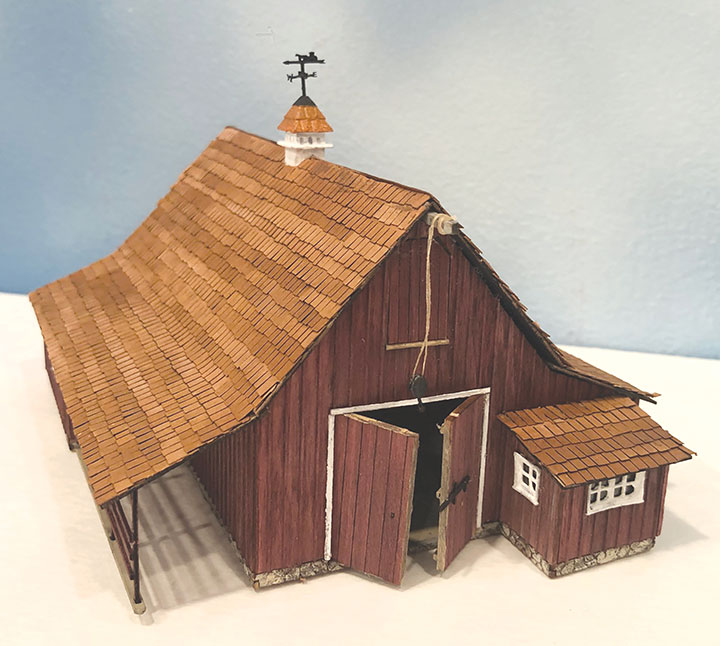
Crescent Creek Models offers the Disney Carolwood Barn in HO as a limited production kit for $110.00. The first run sold out in 36 hours and another run is scheduled about the time of this review. Carolwood Barn, named for the street upon which Walt Disney lived for many years in the Holmby Hills area of Los Angeles, is where some argue Disneyland was born. For years, Disney operated a 1/8-scale live steam railroad on his property giving rides to neighbor kids. The barn built in 1950, was the machine shop and engine house. Here the concept of a theme park with a miniature railroad was born. Although Disney abruptly ended his live steam operations after a neighbor girl was slightly burned by the engine, the concept stuck. After Disney’s death in 1966, the barn was saved and moved to Travel Town in Griffith Park where it can be visited today.
Crescent Creek co-founder, Jack Johnson, is a former Disney Imagineering employee, so this model is his tribute to the Disney Barn. As with other Crescent Creek models, this one is a joy to build and very precise. The kit contains laser-cut birch plywood and MDF, basswood, 3-D printed parts, cotton thread, pre-cut acetate, and unique paper shake shingles. A color illustrated booklet makes assembly easy and quick. I finished mine in two sessions and the clever design of a sturdy core, overlaid with siding, means an interior could be added, as there is no bracing required. Though based upon Disney’s memories of similar barns in Marceline, Missouri, you could very well use the barn as an engine house for an HOn30 line, which would be perfect. As is, it is also a delightful barn.
I used Hunterline Barn Red stain and Cedar for the paper shakes. Note the windows are all resin printed and are soft. I’d recommend use of a thicker acetate to ensure the frames stay even. I used double-sided tape for the shingles and assembly was straightforward. The 3-D printed weathervane/cupola and block/tackle really add to the effect. I am delighted by my barn and think you will be also.
-Charlie Getz.
Berkshire Valley Models
438 Morgan Woods Dr.
Fenton, MO 63026
www.berkshirevalleymodels.com
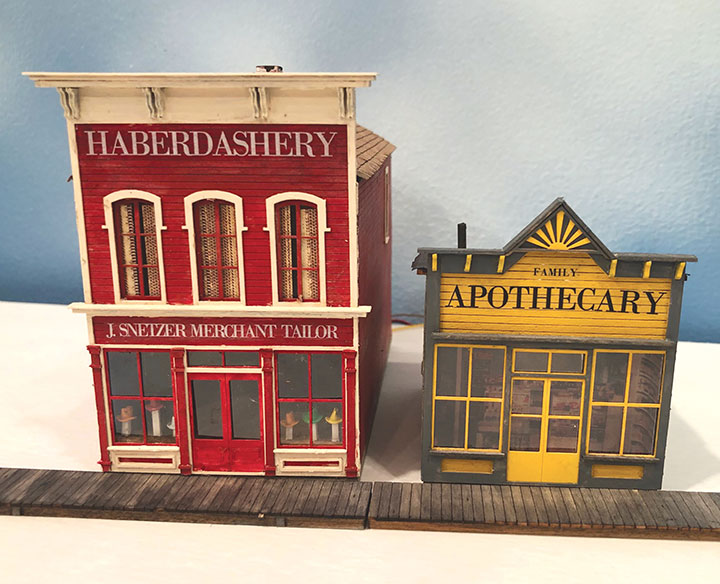
Berkshire Valley Models has released two new false front Western-style buildings in HO. Kit #2030 is the Apothecary at $21.95, and kit #2032 the Haberdashery at $29.95. The components include good quality laser-cut wood and laser board parts, acetate, white metal castings and decals/signs. Full color illustrated instructions cover all phases of construction. Everything fit perfectly and these kits were a delight to assemble. Each could be assembled in a one evening session, but take your time and take advantage of the layered construction to recreate the complex paint scheme often used on such structures.
The one-story Apothecary front was fancy painted using the instruction color picture as a guide, with back and rear stained as unpainted weathered wood. The laser board took Hunterline stains very well. The two-story Haberdashery was painted a more uniform scheme on all walls. For each kit, I added interior graphics and lighting. For the Haberdashery, I included a Roomettes bathroom graphic and LED light. I also added fedora hats in an added window display, using sewing eyelets from a fabric store which come in different colors. As I mentioned in the September/October Pigeon Hole, they resemble top hats with an added paper “top” but if crimped at the top, they become fedoras. Eyelets are available in different sizes, hence scales.
The clever kit engineering allows the buildings to be press-fitted on the foundation base and/or the roofs to be removeable if desired for access to interiors and lighting. Wooden sub walls are overlayed with laser board and windows/doors before assembly to the base. Floors are provided, as are interior wall partitions and interior doors. The front facades feature multi-layer elements to create gingerbread details easily, and result in an impressively complex model without complex effort. Roofs are tarpaper or shingles, and, in both cases, I used Wild West double-sided tape to attach the roofing. I also added lead flashing for the shingle roof chimney. The Apothecary roof includes a smokestack with flashing.
Matching boardwalk sections are also available, kit #2029, at $5.00 for 3 sections. Two sections are shown which match the height of the front doors perfectly. I enjoyed building these structures and look forward to new releases in the series.
-Charlie Getz.
Berkshire Valley Models
438 Morgan Woods Dr.
Fenton, MO 63026
www.berkshirevalleymodels.com
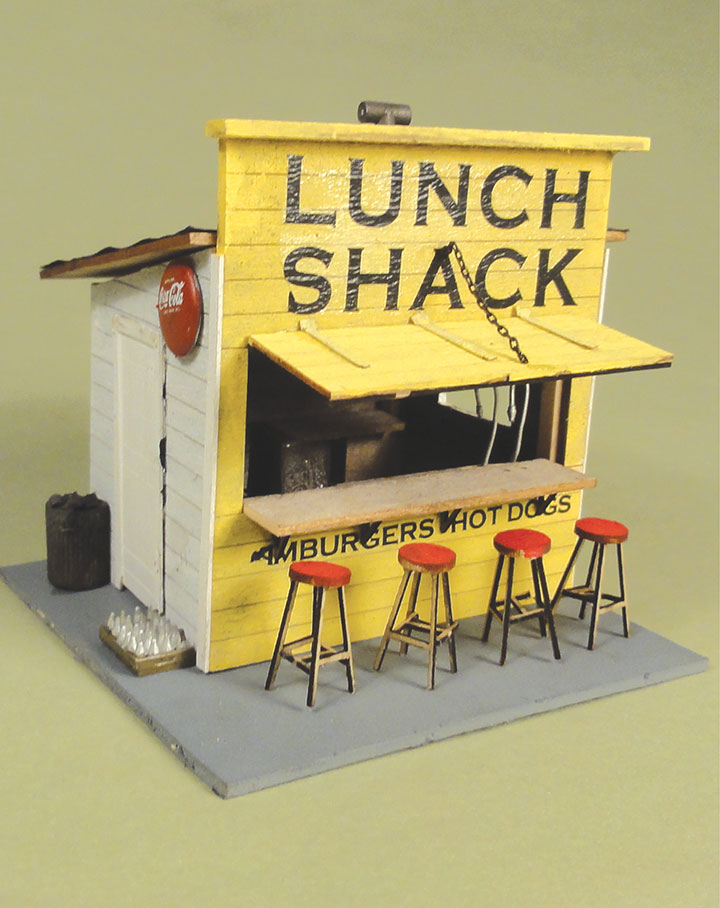
Berkshire Valley Models sells a charming O scale kit called the Lunch Shack. This little building represents a roadside lunch stand complete with little stools. The kit is simple to assemble and consists of laser-cut basswood walls, roof, counters, and shutters. There is a laser board door with trim and several decals. The kit also includes a white metal cash register, soda pop faucets, case of soda pop bottles, garbage can, stove pipe, round Coke-a-Cola sign that must be painted and decaled, and a latch for the door. Laser board hinges are provided for the shutters along with chain to hold them up. I painted my walls with acrylic paints and blackened the metal parts (except for the Coke sign) including the chain. I decided to add some 1/8-inch-square bracing to the inside corners of the building. The little stools have laser-cut parts that are tricky to assemble but look wonderful waiting for customers. The roof is covered with laser-cut tar paper. The instructions include four photos of this little structure. There is one problem covered in the instructions. When I added the large Lunch Shack decal and flooded it with Solvaset, the top ¾-inch of the front wall warped. The instructions tell you to wet the back of the wall and set it under a weight. I decided to add three 1/8-inch-square pieces of wood to the back of the wall and use clothespins to hold them to the wall overnight. I made sure the decal was protected. This pulled the wall up nice and straight. I really enjoyed this little model, and it will add a nice touch to my layout.
-Bob Brown.