Satisfaction
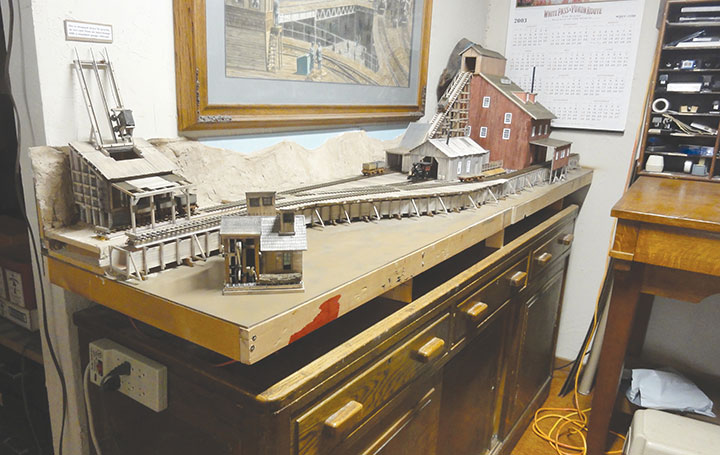
After completing the assembly of the Inter-Action Hobbies C.R. Lamb paddle wheeler, I reviewed in the September/October issue, I was able to get back to building the Eureka stamp mill on my Eureka Mill Railroad diorama. Building this mill was a challenge and I had three false starts. I had several 1870s photos of the prototype to guide me. It was one of some nine or so mills along the Carson River near the Comstock Lode in Nevada. The mining folks had dammed the river to create a powerful water flow through a flume down the river. The mills were water powered and some photos show large water wheels. Maybe some mills had Pelton wheels. The flume was used as a right of way for the Eureka Mill Railroad.
As usual, my biggest problem was lack of space. I only had 19-inches between the backdrop and the flume and had to squeeze my mill in between them.
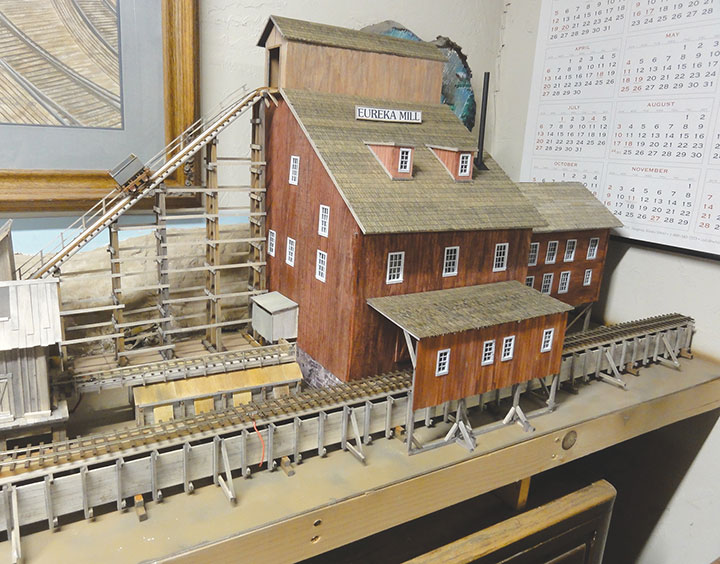
I also had to make the mill tall enough to accommodate the inclined track used to haul ore to the top of the mill so gravity could do its job.
I normally do not work from plans unless someone else has drawn them. I prefer to use sketches. Since my diorama is portable, I needed a light easily removed mill, so I decided to use a Gator Board floor laid on a frame of 1x2s. I also made a foundation for the stamp battery from Gator Board and covered the floor and foundation with stripwood. The rear wall was also a piece of Gator Board with sheets of scribed basswood and an intricate framework of scale 12x12s glued onto it. I drew a full-size drawing for one side wall and glued down a framework of scale 12x12s over it. Then I laid a second framework on top of the first wall. When all was unstuck, I stained the framework with Hunterline Gray stain and glued on pieces of scribed sheet basswood scribed every ¼-inch. After cutting out the window holes for the Tichy windows, I stained the outside of the walls Hunterline Barn Red. This made a garish looking mill that bothered me. But since the flume and deck, ore bin, sawmill, and engine shed are all grey I wanted to add some color to my scene.
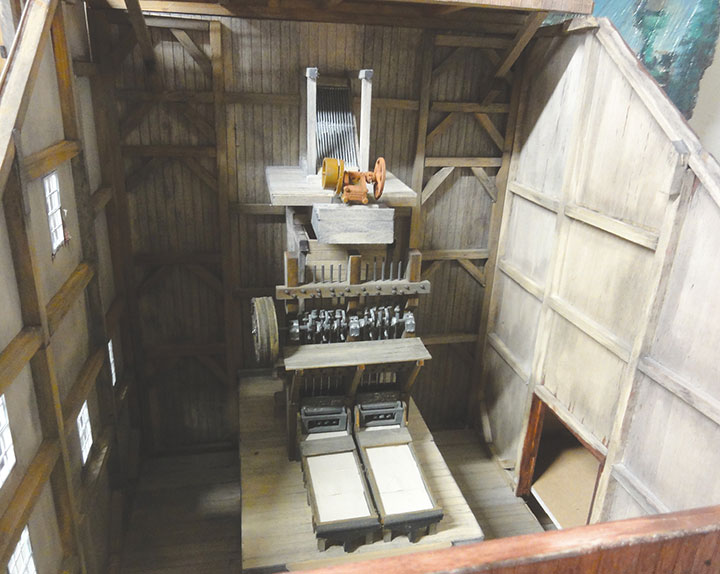
After adding interior ore bunkers, a grizzly and breaker, my stamp battery and Wilfley tables, I closed the mill with its roof. But first I made sure the front wall of the mill was pinned, so I could remove it to work on additional interior details in the future. The roof is another sheet of Gator Board with strip wood added around its edges. I added two little dormers and a sign to break up the large surface of the roof and covered it with Wild West Scale Model Builders shingles. These are excellent, easy to use and look terrific. As soon as I finished the shingling and added the roof, my mill really came together. The garish Barn Red seemed to soften, and those shingles really added some realistic texture to my model.
But what to do with the 1x2 frame that showed under the mill? I looked up sheet stone on Amazon and ordered some doll house stone sheets that did the job.
There was still about 15 inches of space to the right of my mill. The diorama is close to an antique drawing table in our office. No one can squeeze between the diorama and the drawing table, so I did not want too detailed a scene. So, I made a two-story Gator Board annex that could house a dormitory, assay office, foundry, machine shop or office. I only finished the front wall by covering it with clapboard siding and sprayed the end walls and back wall with primer. The roof is covered with Wild West shingles and the annex looks great and fills the space.
One last comment, I wanted the flume to run through the mill building like the prototype, but just could not do it. So, I made the little shed on the front of the mill. I framed it and added individual strips of 1/16 x 1/4-inch stripwood, stained Barn Red. Once done, I could not tell the difference between the strip wood and that scribed wood.
When Charlie Getz first saw the mill he commented, “impressive.” Every time I cross our office and see the mill, it makes me feel good. After all, that feeling of satisfaction — whether it be a model, a gab fest with friends, or a smooth switching move, is why we do this. I experience that satisfaction every time I see my Eureka Mill.
Oops…
Sharp eyed readers will have noticed that Johnny Graybeal mentioned at the end of his November/December 2021 ET&WNC article that it was his last. Not so. It seems that part 9 was eaten by our production computer. When Johnny mentioned this, I asked him to resend the article and it is in this issue. My apologies, to Johnny, and you the reader, for the confusion. Sometimes things just get out of hand!