Berkshire Valley Models
438 Morgan Woods Dr.
Fenton, MO 63026
www.berkshirevalleymodels.com
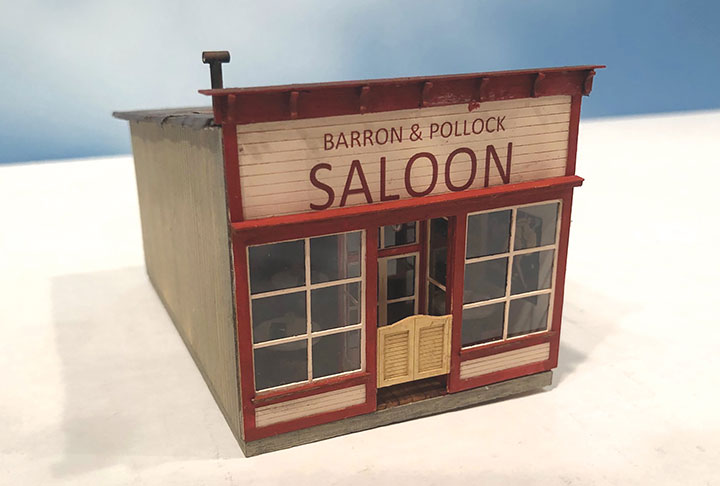
Berkshire Valley Models has released another in its HO scale false front building in their western series, #2034, the Saloon for $27.95. As with previous releases, this one is composed of primarily laser-cut wood and laser-board components, acetate, white metal castings, decals for the Barron & Pollock Saloon and full instructions. As with previous kits, this one is well engineered, and everything fit perfectly. The large windows call for an interior and I added one, partly created from castings from my scrap box along with some figures and partly from a saloon graphic found on the internet. An interior wall and door are included but because of the graphic that extends across the back, I saved those for another project. I added one light for the interior and another over the recessed front door. The engineering allows the building to be press-fitted upon the foundation and/or the roof to be made removeable. I opted for removal of the building from the foundation to allow the interior light to be mounted on the ceiling.
Assembly was straightforward and well covered by the instructions. I was able to complete assembly, even with an interior, in two sessions. The windows/doors are from laser-board and assemble easily. A couple of notes. Watch the amount of tarpaper used, as just enough is provided for the job. Judicious splicing will do the trick. Paint as you go and take advantage of the layered construction to use different colors for a clean delineation. I used craft paints with a buff-colored front, iron oxide red trim and a neutral wood color for the side/back walls. Often only the front wall received fancy paint and gingerbread trim. One last note: The Barron & Pollock Saloon is named after the late Jim Barron, and Allen Pollock, former NMRA President, renowned narrow-gauger and owner of Missouri Locomotive Co., who is still very much with us. Both are known for the occasional drink. By any measure, BV is to be commended for a very nice kit, but also for a fun christening. I enjoyed building the Barron & Pollock Saloon and look forward to new releases in the series.
-Charlie Getz.
Crow River Products
P.O. Box 2092
Pawtucket, RI 02851
www.crowriverproducts.com
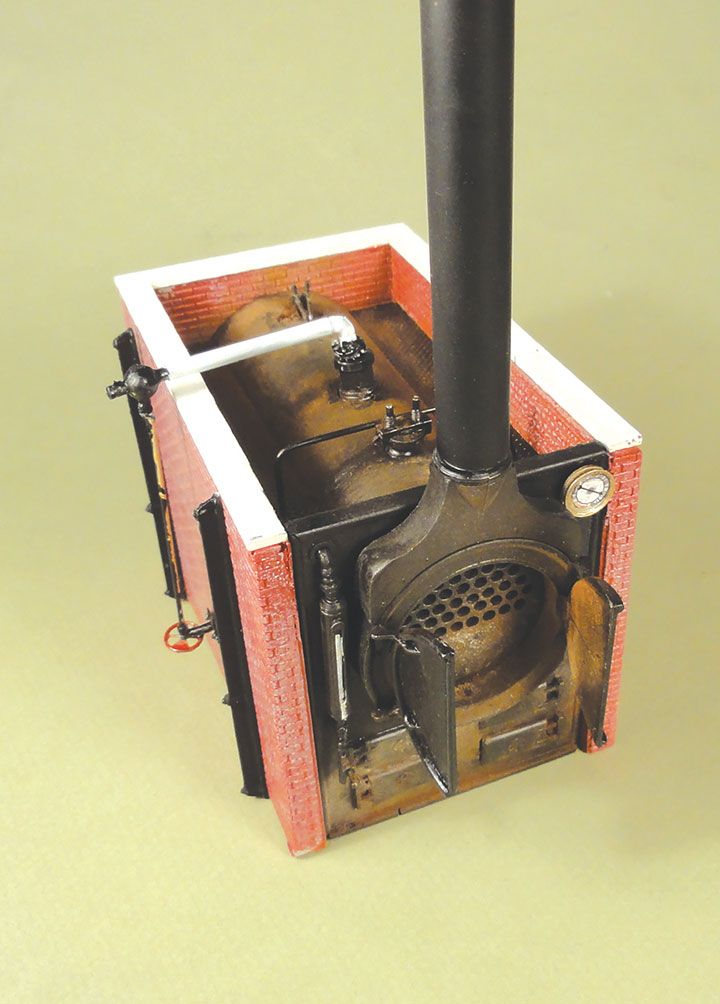
Crow River Products sells an extensive line of detail parts and industrial machines in HO and O scale. When I mentioned in the January/February Robert’s Ramblings that I needed a boiler for my Eureka Mill stamp mill, GAZETTE author, Lind Wickersham, emailed to remind me of the boiler kit sold by Crow River Products. So, I checked their web site and ordered a kit for a Return Flue Industrial Boiler. It sells for $95.00, and I received my kit in just four days. The kit consists of cast resin and white metal parts, strip wood, aluminum tubing, wire, a styrene tube for the smokestack, and printed steam gauge fronts. The brick enclosure is a one-piece resin casting with excellent brick detail. The boiler top and front are also resin castings and have very little flash. The details such as a flue tube sheet, fire doors, steam dome, valves, faucets, pipe flanges, sight glass, and various braces are cast in white metal. There are four pages of instructions, and another four pages of drawings showing where all the details go.
I used Model Master Honduras Maroon (I had it on hand) to spray the bricks. Then after the bricks dried, spotted some Microlux white on them and quickly wiped the white away with a cloth dipped in water. The boiler parts were sprayed Testors Black, and I brushed the details with Floquil Engine Black. When I was through assembling the kit, I dusted it with rust and black powders to blend it all together. I am pleased with my boiler and now must make sure that tall smokestack fits through my roof in the right place in my mill.
-Bob Brown.
Bollinger Edgerly Scale Trains
375 Bean Hill Rd.
Belmont, NH 03220
603/267-1818
www.besttrains.com
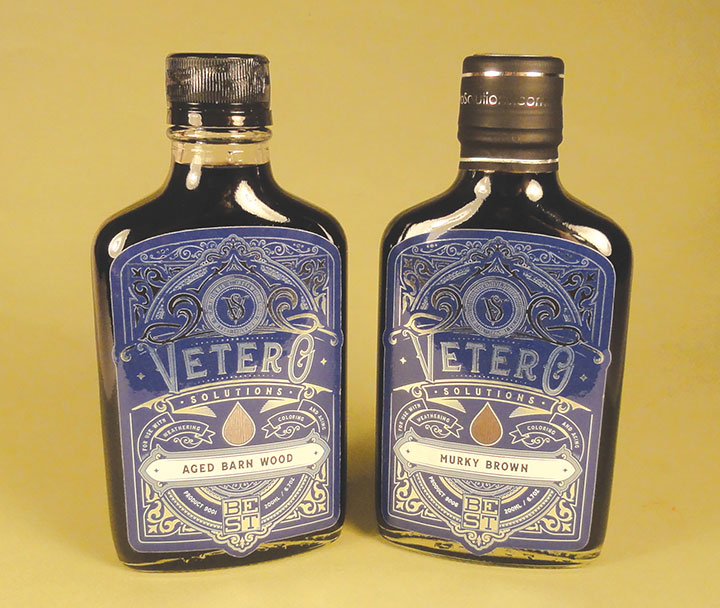
Bollinger Edgerly Scale Trains sells alcohol-based stains called Vetero Solutions. They come in 6.7-ounce bottles for $14.95 a bottle and can only be shipped within the United States. BEST lists 18 colors on their web site along with several videos of modelers using them. The stains come in colors such as Caribbean Pink, Glacier Bay, Fog, and Light Rust. I chose to buy a bottle of Aged Barn Wood, and Murky Brown. Both stains worked perfectly on my basswood sample and the color can be built up with additional applications. The stain can be used on many materials such as wood, paper, cardstock, plastic, plaster and hydrocal. It cleans up with soap and water, or rubbing alcohol, has no odor, and each bottle comes in a nice cardboard box great for storing stuff.
-Bob Brown.
Evergreen Scale Models
65 East Bradrock Drive
Des Plaines, IL 60018
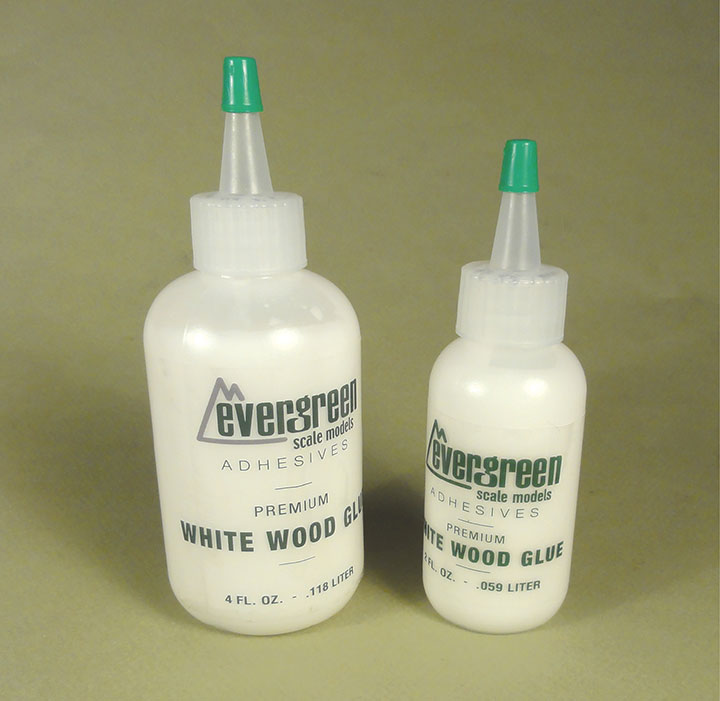
Evergreen Scale Models sells, in addition to their extensive line of sheet and shaped styrene, CA adhesives, and styrene adhesive, but also Yellow Carpenter’s Glue, White Glue and Canopy Glue. The Carpenter’s Glue, White Glue, and Canopy Glue are available in 2-ounce bottles for $4.15 or in 4-ounce bottles for $5.56.
-Bob Brown.
Inter-Action Hobbies
P.O. Box 1021
Chase, British Columbia, V0E 1M0
Canada
1-888-850-1742
www.interactionhobbies.com
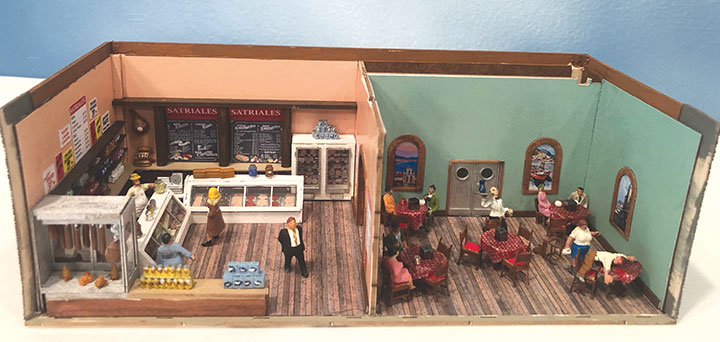
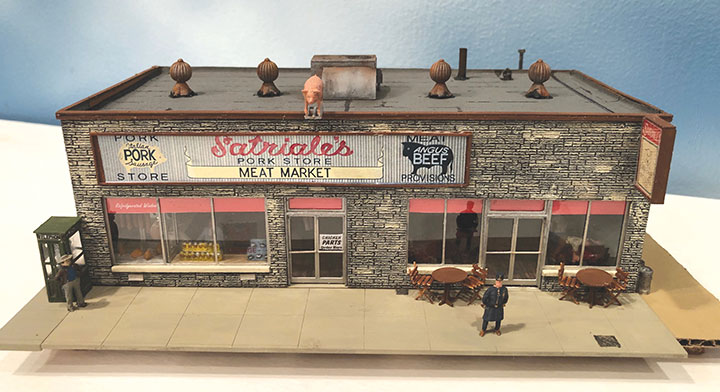
Inter-Action Hobbies offers the HO scale Pork Store for $58.95 (U.S.) with optional interior details/lights for $24.95.
If the name Satriales and the look seem vaguely familiar, it is because this kit is based upon the fictional New Jersey store/restaurant of the same name featured in the HBO TV series, The Sopranos. Though I was not a viewer of this series, I believe this was the store owned by the mob, won in a card game. It was not the site where Tony got whacked; that was a fictional diner, but no doubt violent things happened here as well. Fortunately, nothing violent happened as I assembled this highly detailed and well-engineered kit. All the parts fit perfectly, though the instructions were a bit off on some parts identifications, an error owner Darryl Jacobs notes will be corrected. Wall “12” is really wall “21,” for example, and the rear canopy roof is mis-identified. The rest sort themselves out, however. Study the instructions and pictures so you can tell what to do if not covered by the instructions, such as where to place the interior restaurant divider wall graphics (toward the front). Again, no problem, just pay attention.
The interior sets this kit apart and is worth the extra investment. 3D printed parts, an LED light bar, and additional laser-cut parts allow both the meat market and restaurant sections to be fully detailed. There is a fair amount of very demanding detail assembly/painting involved. The instruction photos show every can with a full color label, and every detail is similarly decorated. By the way, Part 11 is located with this detail set though the instructions refer to it as if it’s part of the main kit. The fit of the detail parts is exact. Work slowly, making sure you understand what goes where. The light bar requires soldering, and mine is mounted on a craft stick glued to a notch in the walls so the removeable roof does not interfere. I was intrigued by the two layer checked tablecloths; a decal placed on tissue paper and draped over the laser-cut table with copious amounts of white glue. Very effective, though fussy. I also created a jig to ease the assembly of the chairs. I even added a wood plank floor made from Paper Creek wood siding (out of production) and some table-top items from my scrap box. A few figures complete the scene. By the way, I could not resist modifying a seated figure and adding some red paint to represent a customer just after getting whacked. The rest of the customers and beat cop don’t even notice. Macabre but different.
Though the instructions suggest this store represents a recent prototype, even with the aluminum storefront windows/doors, it could date from the late 1940s, the era I model. In that era, often older storefronts were modernized with a sleeker new aluminum storefront. I left off the contemporary satellite dish antenna, parking bumpers and trash dumpster, and painted the rear windows/doors a more traditional color. I also substituted scratchbuilt roof Globe ventilators for the very nice, more modern ventilators provided. I added a few kitchen stacks and garbage cans as well. And I used my favorite CC Crow seamed tarpaper rather than the recommended tar/gravel roofing. I also took the lovely 3D printed pay phone detail and added it to an older kit for a wooden phone booth. These steps backdated the building sufficiently.
The exterior signage adds a lot also. A provided double-sided hanging sign can be illuminated by adding a bulb or LED into the sign box with wiring routed through the aluminum tube/hanger provided. I did so, though I modified the box by making it a bit thicker for the light and by using a slightly larger aluminum tube for the wiring. Satriales will add a different look to your Main Street and surely elicit comments from visitors when lit, though perhaps not the ones you intended if they spot the whacked customer. The interior is stunning with the counters, freezers, and level of detail. I now need to add one of Inter-Action’s new cigarette machines to the provided front sidewalk.
-Charlie Getz.