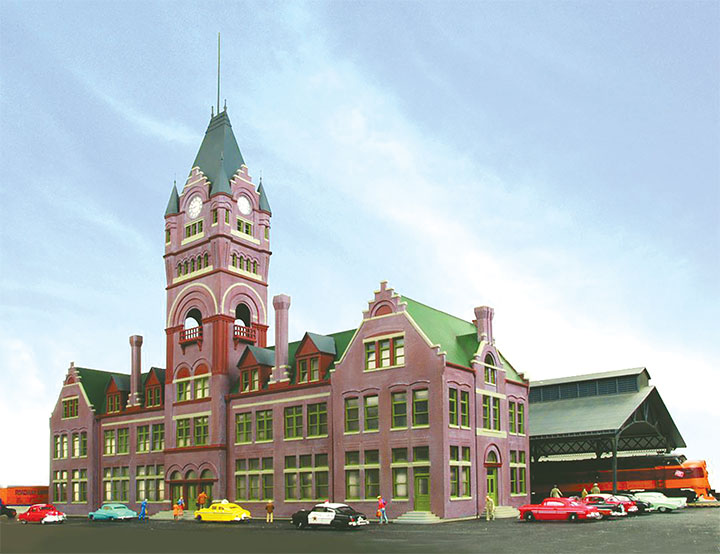
In the January/February 2022 GAZETTE, I discussed the concept of creating a major urban station as the terminal for a free-lance narrow gauge line and interchange point with a standard gauge railroad. I mentioned the possible use of the HO scale Walthers’ Everett Street Station and Train Shed kit to serve that purpose. In this column I will describe the planning and process I used to modify that kit and make it less recognizable as a particular prototype. The techniques described and modifications made need not be copied but can also be applied to other kits. I thank Walthers not only for the kit, but for the photo of the stock model, used here.
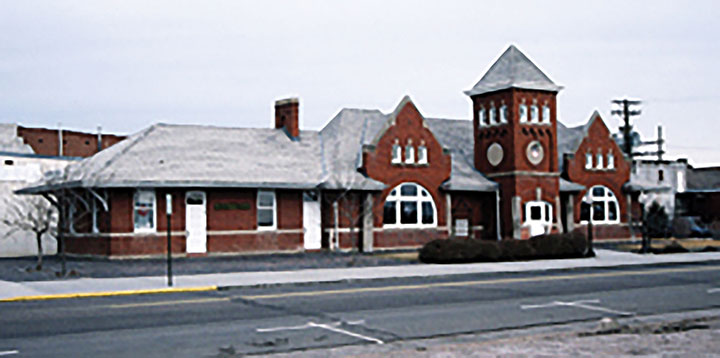
The Walthers kit is huge, packed in the largest kit box I have ever seen. Impressively designed, tackling modifications is not for the faint of heart. Actually, I very much like the design as presented incorporating all of the fancy Victorian era brick features of the prototype. The ornate chimneys alone are outstanding. Initially, I gravitated toward downsizing the model to loosely follow a proto-type Union Station in Sterling, Colorado. Sterling is located on the plains east of Denver, served by both the Union Pacific and the Chicago, Burlington & Quincy railroads. Though not served by narrow gauge, Sterling’s compact yard, interesting mix of industries and stellar engine facilities make it a natural for modeling. SS Ltd. offers a series of HO kits based on Sterling’s engine facilities including its distinctive roundhouse. Sundance Publications’ out of print Sterling Colorado: Crossroads of the Prairie by James Jones and Russ Collman, 2000, is an excellent source of information on this fascinating place. Sterling’s Union Station serving both the UP and CB&Q, is an impressive brick structure, shown here in a recent photo courtesy of History Colorado. However, while it would be feasible to create a fair representation of the depot using the Walthers kit, much of that kit would be discarded. For that reason, I rejected that possibility. Just hated to lose those chimneys!
Then I received the February 2021 NMRA Magazine, with a writeup of new MMR #665, Brook Qualman. She included a photo of herself pointing proudly to her major rebuild of the same Walthers kit she had used to model the Potter Street station in Saginaw, Michigan. Equally impressive, Potter Street was actually larger than the Everett Street station. Thus, she not only created an even larger station but, paraphrasing Ms. Qualman, not using a single piece from the Walthers kit as it came “out of the box.” Though drawn to that modification, I felt making that many changes were too ambitious and that such a massive rebuild would take months.
I decided instead to make some simple adjustments by moving the distinctive tower toward the street and raising the trackside center section to match the end gables. Also, installing large skylights and other roof details to the flat roof sections and new canopies to the front and trackside walls. These changes may not completely disguise the station’s heritage, but they do alter its appearance. Normally, I strongly recommend sketching any modifications but, in this case, I decided to modify on the fly as assembly proceeded. Were I modifying the kit as much as Brook Qualman did, I would draw a plan to document all of the needed changes. Here only a few changes were made, although some proved complicated.
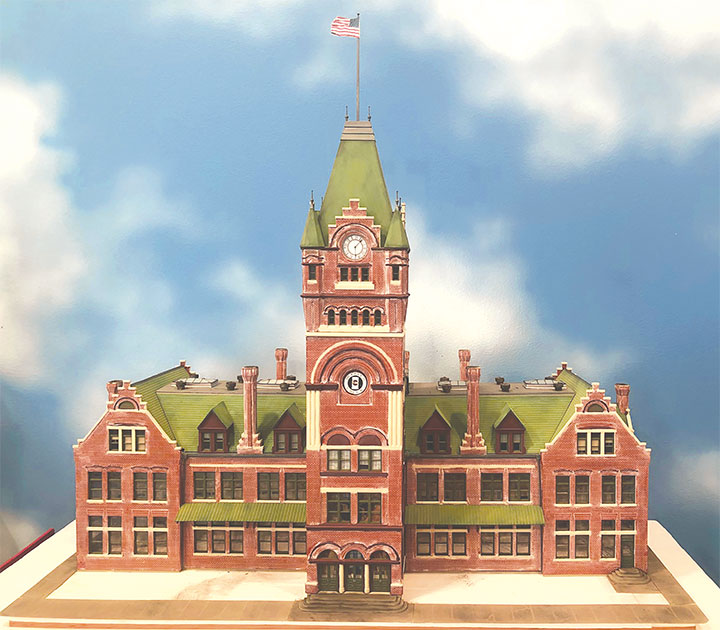
The biggest change was extending the tower forward. As it comes, the kit’s tower is part of the main roof with minimal protrusion on the street side. By extending it forward, the impressive tower was accentuated becoming more of a focal point. It reminds me of downtown Denver’s Daniels & Fisher tower in the LoDo district that remains a local landmark. The D&F tower was once part of a major department store of the same name, long-since razed. The tower however remains. The modifications to accomplish this change were fairly straightforward requiring modifying and adding new tower side walls and an extended foundation. I discovered that Holgate and Reynolds HO brick sheet #101 was a close match to the kit’s brickwork and I cut new sub-side walls for the tower from styrene to fit into the small side walls provided. I preserved the original angled trim, designed to fit the roof, as an architectural feature with the new walls grafted on. I added a few SS Ltd. window castings to these new walls, plus three unexpected extra windows provided in the kit. Serendipity as for some unknown reason, the kit included an extra pair of matching larger windows and one medium size. These extra windows fit the new tower walls perfectly, making it seem part of the original design. The SS Ltd. arched upper windows are consistent with the architecture and fit the space. Extending the foundation was as simple as cutting the existing foundation and pulling it forward to support the new tower, then splicing some matching styrene shapes in the newly created gap, hidden from view.
I also found (serendipity #2) that Delta Ceramcoat’s craft paint Forest Green color exactly matched the Walthers’ cast window/door plastic color. Those castings were simply Dullcoted and the SS Ltd. windows were painted, thereby matching the Walthers’ plastic ones. I treated the brick with a craft paint Heritage Brick color, followed by Robert’s Mortar and used the Walthers’ kit cover picture as a guide for the overall paint scheme. Wood trim was painted maroon, and the stone features, a craft paint sandstone color. I also opened the upper tower clock face insets to allow them to be lit from behind using thin styrene as a backing. The kit is designed to allow modification of the tower to either its original tall configuration or the shorter version of the 1950s. If modeling the shorter version, extra inserts are provided to convert the open porches of the lower tower base into clock faces. I discovered these inserts were a perfect fit for my standard gauge line’s herald. My proposed HO line is the Buffalo Creek Railway (not to be confused with New York’s Buffalo Creek Railroad) but using the same distinctive round herald featuring a flour sack. For a Colorado line where agriculture covers half the state, this was a perfect herald as is the western-sounding name. (The New York short line was named Buffalo Creek due to its location near Buffalo, New York.) Well, that herald fit not only perfectly into the extra clock face inserts provided for the short tower option, but added a distinctive look to the tower. Again, serendipity.
Before tackling the roof modifications, I elected to add interior graphics and lights. To do this kit justice, given the large windows, a full interior should be added. This would be a major scratchbuilding project in its own right. If I had another few months of time, I would add the terrazzo tile floors, ticket and lunch counters, benches and chandeliers the interior would warrant. Not to mention the dozens of figures to represent passengers. One could literally spend more effort on an interior than on the kit itself. But since I am not sure how visible this station will be when placed on a future layout and facing deadlines, I elected to cheat by using graphics instead. The internet is marvelous for finding images of terminal station interiors in color and scaling them to whatever size is needed. My wife, Margaret, helped size, edit and print a perfect interior with tile floors and large benches. We essentially used this same two-story interior picture, cropped and edited to logically fit each window section while maintaining a uniform interior look. The graphics were curved from the window base to an interior scratched post/beam support system to create the illusion of a large space with tiled floor. Back lit, it is fairly effective. Placed in a layout setting with many models competing for attention, such an interior can pass muster whereas it would not be as successful in a focused examination of a single model. LED Christmas lights were installed from below as most model lights are frankly too wimpy for such a large space. This meant painting the interior of the walls black to prevent light bleed and plugging any light leaks. I also used sheets of dark construction paper for a ceiling as a light block for the unlit upper stories.
I raised the gabled center section on the rear center wall as it was not as tall as the gabled annexes on each end which featured peaked roofs. To accomplish this, I separated the gable portion from the rest of the wall, added a few brick courses to the top of that wall to raise its height and recombined the pieces. The kit’s angled gable roof section was used but modified for the new height by adding new side walls to convert the middle rear section from a gable to a wing. Again, this was accomplished with styrene sub-walls and brick overlay. I angled the new raised center flat roof to slope back to the tower base on one end, adding brick trim overlays on the side for interest. A new gutter and downspouts disguised the new tower base wall joints where they met the new center walls. This all required a bit of head scratching but nothing difficult. I painted all of the shingled/gabled roofs a dark craft green with a compatible weathering powder overlay to improve the texture of the roofs. I added CC Crow gray-seamed tarpaper to the flat roofs and installed large skylights from my stash, along with vintage Suydam vents and a roof access covered staircase.
The front tower extension provided space for a new canopy on each side. I also noticed that the track side had no covering, so I added a canopy along that flat wall to protect passengers from the elements and add interest. These canopies were made from joined board and batten styrene sheets to represent seamed metal, painted to match the roofs. Brackets were fabricated from wood and styrene using home-made jigs. I also created sidewalks from styrene, placed around the station to disguise the base when added to a layout. I’ll add a lawn and flower beds to the tower side front later.
Although this kit is well engineered with excellent instructions, it is no snap-together kit. It requires careful and attentive assembly. For example, on the track side, the large wall sections interlock but are difficult to glue evenly to create an even plane. I used a combination of styrene cement and ACC to hold them firmly. The chimneys are fussy, fitting only one way, but precisely. This is also true of the complex roof and gables. It helps to dry-fit each part before gluing. They all fit well, but take your time.

The changes I made were sufficient to make the Everett Street station look a little different from the stock kit, satisfying my phobia against using easily recognizable kits. Its heritage is still evident but perhaps, just modified enough to appear distinct. The kit also includes two train sheds which when joined are almost 4-feet in length, shown in the Walthers’ photo. I will build those later when I am ready to install the station. The result is a very impressive terminal station complex that makes a statement. Adding three-rail track will allow narrow gauge varnish to use the station alongside standard gauge trains. And as I have hopefully demonstrated, this station is subject to any number of kit-bashing possibilities that can truly transform it into your own concept of a Terminal Station. You could easily do the same to a number of available kits. I hope I have shown that with some effort, you too can have an impressive Union Station terminal for your layout. I look forward to placing it on a layout one day as a centerpiece of my big city.
Well, that’s all for now. Until next time, write, if the mood strikes.