I model in 1:32 scale, about 3 times bigger than HO so walls and/or material for walls can be heavy. Foamcore as a base, or even as the wall itself, is light weight. But what sets foamcore apart for me is the ability to modify the structures easily, with just an x-Acto knife as they are being constructed. Here, I use my completed aerial tramway discharge building as an example of just how I use foamcore.
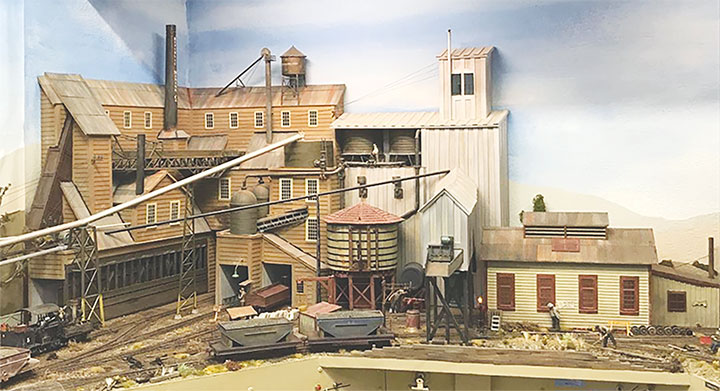
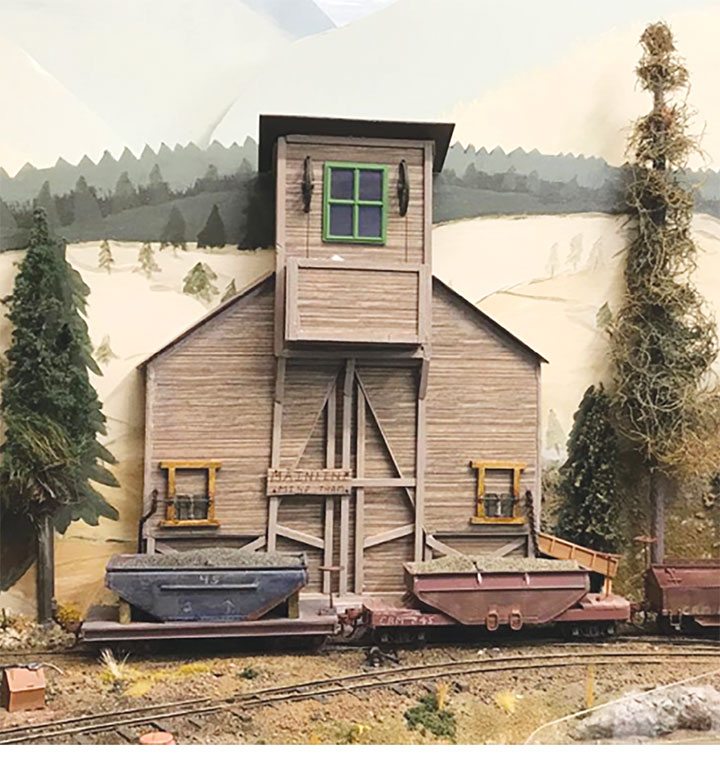
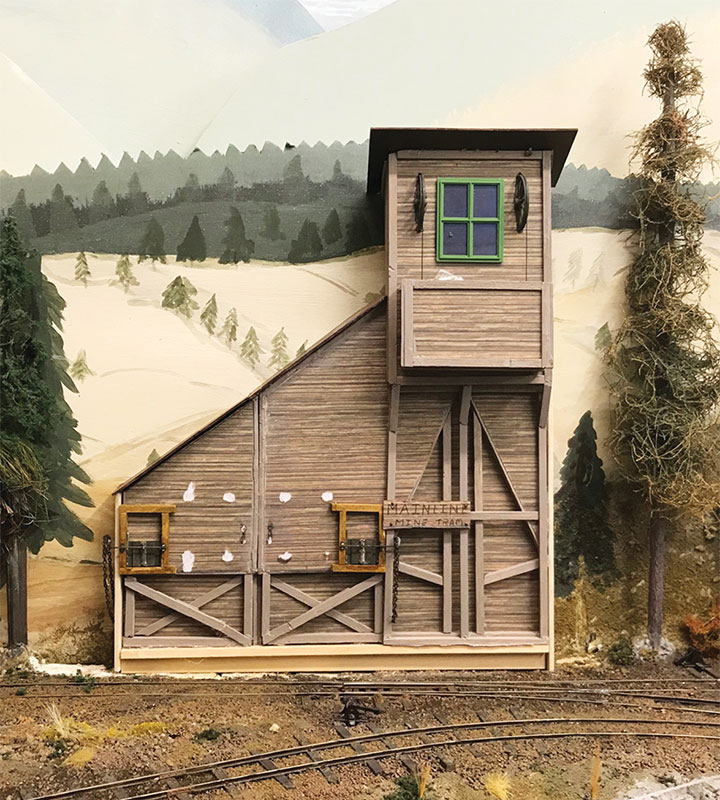
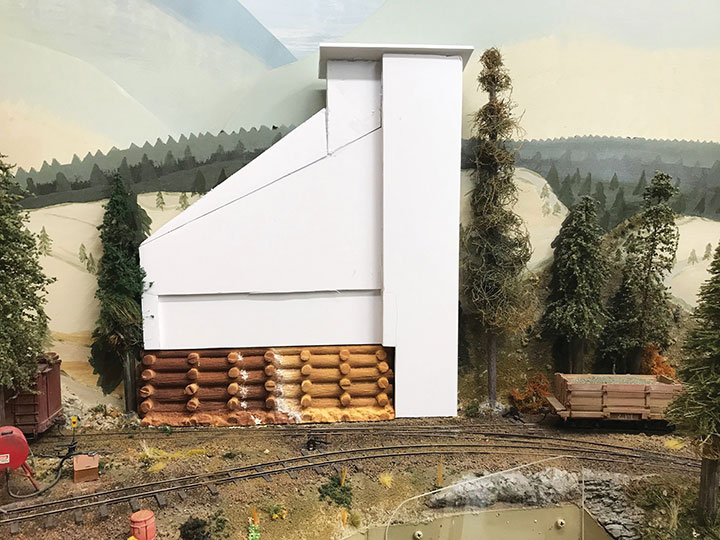
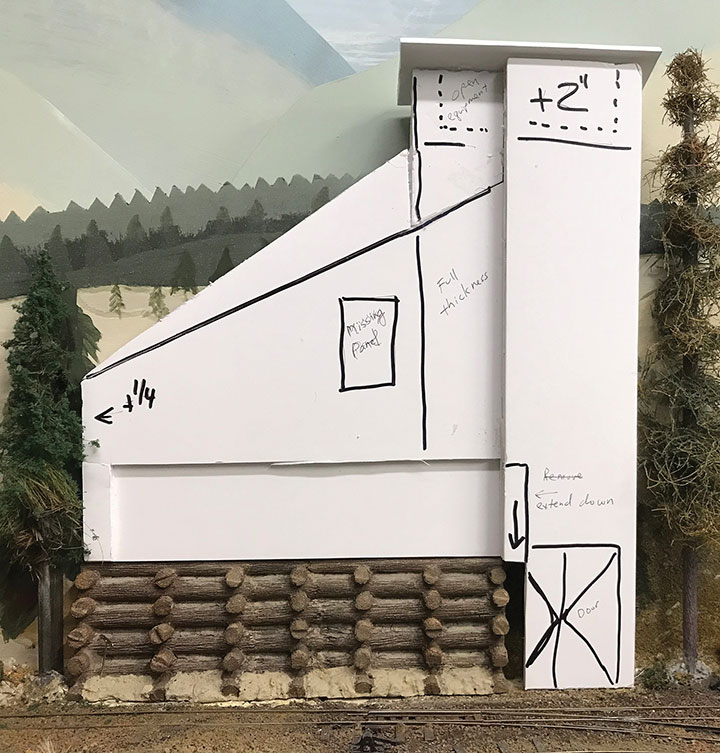
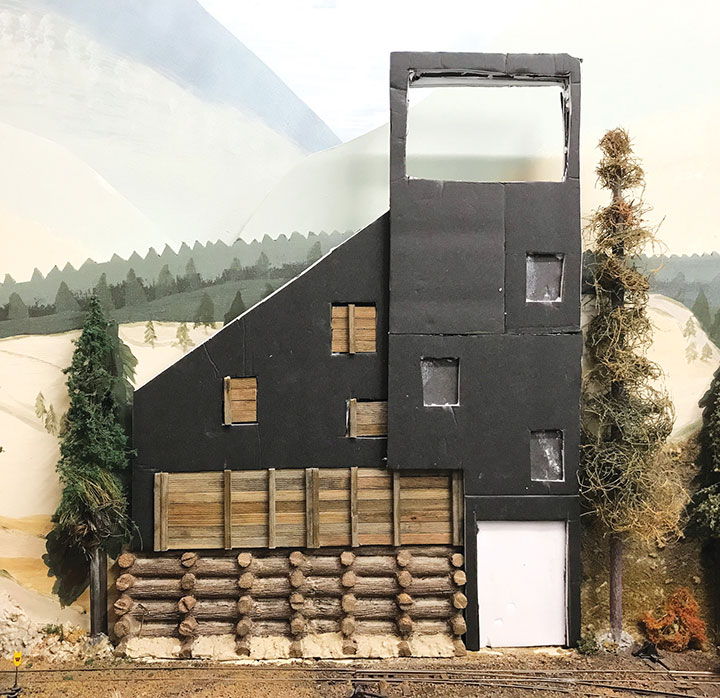
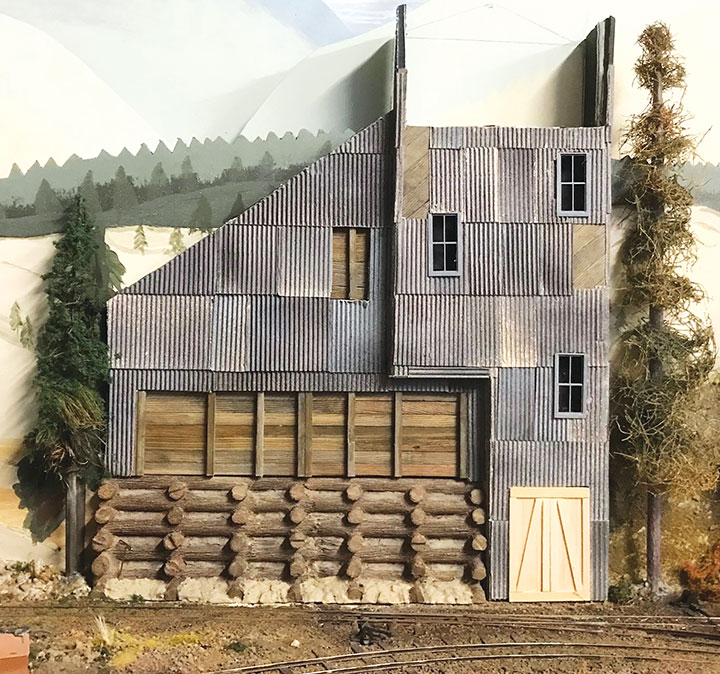
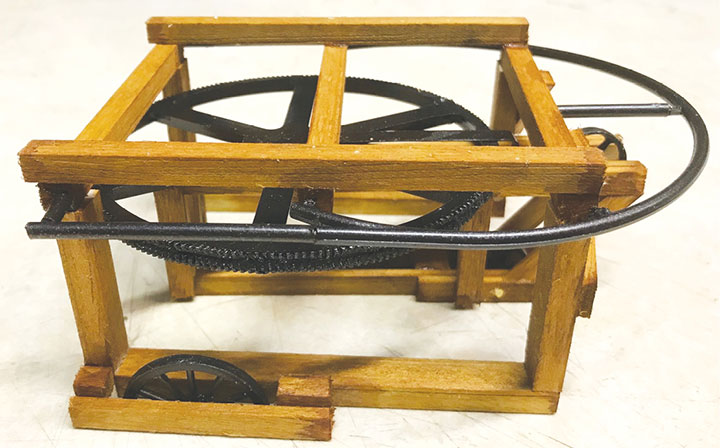
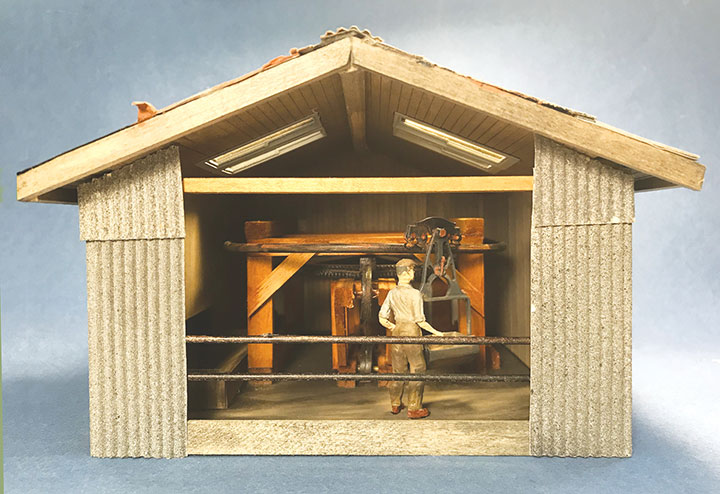
The author’s 1:32 scale Aerial Tramway Discharge Terminal — weathered, completed and on his layout.This photo shows a large mill built in a corner of my layout room. The original foamcore building on the left was covered with horizontal wood siding. When I wanted to expand the mill, I built the addition on the right from more foamcore using vertical wood strips with beveled edges separated by about 3/8 of an inch. Silver spray paint gave the addition a newer sheet metal look, reinforcing that this section was an addition built when more milling capacity was needed.A temporary foamcore flat of a mine/aerial tram terminal that filled the space, but didn’t really capture the look I was trying to achieve. Knowing that it was going to stay on the layout for a while, I covered it with some printed paper siding and added a few three-dimensional boards. It worked for a time, but when I had an opportunity to work on that area of the layout, I used an x-Acto knife to reconfigure it to a more pleasing shape.The building has a new shape with a sloped roof that draws the eye up to the window and aerial tram mechanism. Even with that change, it was still too small for its location.This photo shows the first “draft” of the new structure cut from a fresh piece of white foamcore. I had an old Mountains in Minutes foam retaining wall I wanted to use, so I modified the white foamcore to key into the retaining wall. I also wanted to have loading chutes above the retaining wall, so I layered the foamcore to have several different thicknesses in the bunker area, and used even more layers of foamcore for the tower portion.Felt pen notes made directly on the mock-up show that I still wasn’t completely happy with the size of the building. You can see the notes of how I wanted the final structure to appear drawn right on the mock-up. I was also able to draw doors and windows to see how they would fit into the building’s tower section. Note also the black line that defined the early roof of the bunker, which was too low. Another handy feature of foamcore is the ability to hot glue additional sections onto the mistake area. The final roof slope was finally much more to my liking.Here is the black foamcore profile I cut out based on the previous work. I used several layers of foamcore in most places, but a layer less where I wanted the wooden structure of the bunker to show behind the corrugated siding that would be added next. Actual window and door openings were cut out in the tower portion based off the notes from the white foamcore mock-up. I then switched to using all black foamcore, just to be sure no white edges would show in my finished building. I used a little black craft paint on many of the cut edges. I also noticed that my bunker section was too thick, sticking out over the retaining wall, not really being supported by the cribbing. No problem, I peeled off one layer of foamcore from the back of the structure resulting in a much better alignment of the bunker and the cribbing. I added another layer of foamcore to the front of the tower section to get that part of the building back to the desired thickness. The corrugated siding was painted with spray can paint before being glued to the foamcore. In 1:32 scale, I found that the corrugated paper in older light bulb boxes makes great corrugated metal siding once painted. I collected a large supply of this material before light bulb packaging changed. I start the painting with a base coat of textured metallic dark gray spray paint, then over sprayed it with some light blue and light gray. Once it is applied to the foamcore substructure, thin washes of rust will be added to give a more weathered and panelized look.Here is how the corrugated siding looks on the bunker with the wood portion of the bunker showing through where the loading chutes will be located and where a piece of the siding has blown off. I pre-stained all my strip wood with India ink and alcohol (the door will get white paint later), then glued horizontal strip wood into voids cut in the top layer of foamcore to simulate the wooden bunker underneath. I liked the look of the wood showing through so much that I cut out a layer of foamcore in two places on the tower and filled in the openings with more wooden pieces so the wooden substructure would show through. Again, changes like this are easy with foamcore. I had also created openings for windows and doors in the tower section. It turned out that the openings I cut were not quite right for the doors and windows I decided to use, so larger openings were easily cut from the foamcore substructure. At this point I had to make a decision. This structure is the discharge terminal of the aerial tram bringing ore to the railhead from a mine far in the background on my backdrop. The aerial buckets dump their ore into the bunker, then turn around a large bull wheel and head back to the mine. I wanted to build some of the mechanism for that aerial bucket tram. I needed to do more research before I could complete the mechanism.Here is the bull wheel I built for the discharge terminal. I built it after completing my aerial tram research. I was able to construct the mechanism at the workbench with parts from my scrap box and substantial strip wood pieces. I placed the mechanism inside a box built with more foamcore and some matt board. I worked out the mating of mechanism sub-assembly to the rest of the structure by cutting and trimming their respective foamcore walls until everything fit level, plumb and had no gaps where it adjoined the backdrop. With heavy construction completed, I took the bunker and tower section back to the workbench to finish detailing the bunker section with ore dump doors, chutes and associated hardware. I added rust to some of the corrugated siding to enhance the illusion of multiple individual panels that were weathering differently.This photo shows the completed aerial tram mechanism, the bucket and a worker, all within the box that would become the top of the structure. The mechanism and bucket were painted metallic gray/brown with areas of grease and grime to contrast with the wooden interior of the tram house. An empty bucket (an O scale casting) is on the track just in front of the worker.
Finishing Up
The doors and windows were finished to look like painted and weathered wood. The heavy retaining wall timbers got a darker brown, while anything metallic got rust. Windows were glazed before being glued in place and more corrugated metal was added for roofing. One piece of roofing metal was left off to show the worn tar paper underneath.
After the bunker and tower section were in place on the railroad, I mated the completed aerial tram mechanism box to the top of the already built tower and bunker section and then clad the new section with corrugated material to match the lower section. To finish up, the construction area was spruced up and the scenery around the base refreshed. An extra bucket, a broken pulley wheel and some discarded corrugated siding were added to the ground on either side of the building.
Finally, the aerial lines, towers and buckets were drawn on the backdrop to the side and behind the structure. The aerial tram goes through a gap in the background hills and out of sight suggesting the presence of another mine in the distance.
I really enjoyed researching and building this structure. Foamcore for the planning, construction and multiple modifications turned out to be the best possible material for this project. Give foamcore a try!
Stop by for a visit! My layout is open during the 42nd National Narrow Gauge Convention in Seattle/Tacoma, Washington, September 1–4, 2022.