Foggy Mountain Models
623 Strawbridge Lane
West Grove, PA 19390
610/368-9590
info@foggymountainmodels.com
https://foggymountainmodels.com
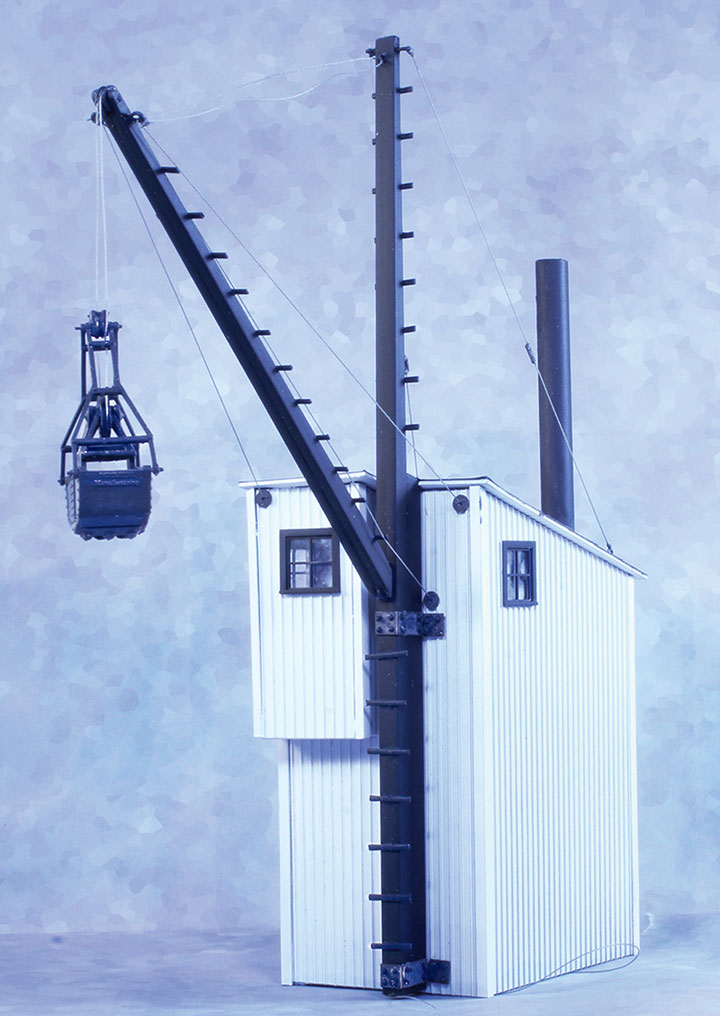
Foggy Mountain’s O scale Cushwa Coal Crane kit sells for $150.00 and has a foot print of 21/2- x 41/2-inches. The prototype was built around 1895, in an era when manual labor moved the bulk of materials from one form of transport to the next. The Cushwa Coal Crane was at the cutting edge of technology in those days and was constructed on the banks of the C&O Canal’s Cushwa Basin in Williamsport, Maryland. It was used to transfer coal from canal boats to Western Maryland Railroad’s gondolas for shipment throughout the mid-Atlantic region.
The crane was a basic stiff leg derrick with a metal clad, combination boiler, machinery and control structure attached. The model replicates this housing with laser-cut, milled basswood sheets which follow conventional kit assembly steps. Additional basswood strips provide for interior bracing of the structure. A laser-cut chipboard roof panel is covered with strips of black construction paper to replicate the rolled roofing commonly used on industrial structures in this era. A strip of PVC piping cut to length, provides the chimney stack. Injection molded window and door castings with clear glazing complete this housing.
The spar and boom are laser cut from basswood with two thicknesses laminated together to complete each structural component. These are joined together with a pivot fabricated with flexible floral wire. Various reinforcing plates and pulley assemblies are built up from laser board to add the details to the crane. The plates are further detailed with applied injection molded NBW castings. Stripwood is cut to length for the ladders to access the various crane’s structural components.
Stranded thread is provided to rig both the standing and running rigging. This proved to be coarse and had a lot of fuzz, so I replaced it with heavy, nylon, upholstery thread. Also, attachment points for the rigging were added using jewelry eye pins. These provided a secure attachment point and made tying off the various rigging lines much neater and easier.
A 3D-printed clamshell bucket completes the model. The components of which were easily removed from their carrier with a sharp hobby knife and finished with a fine emery board. The assembled bucket was first washed and then painted before being added to the crane. Two additional 3D-printed figures are also included with the kit. They are nicely modeled and once painted will add a sense of proportion to the completed model.
The crane was finished following some of the available black and white photos I could find on the internet. The main structure was finished in flat white with black roof, windows, and door. The spar and boom assembly were finished in flat black. In use, it is certain that the structure would have weathered quickly with coal dust, soot from the boiler and other contaminants. While this building is presented in a newly constructed format, weathering will follow once it finds a place on the layout.
Foggy Mountain Models has truly captured the look of a unique and rare late nineteenth century industrial structure, which while appearing complex, was easily assembled. Each of the parts were precisely cut with only a minimum of additional cutting and fitting necessary. This would be a useful item, not only dockside, but in any scenario where bulk minerals are being handled.
-George Riley.
Berkshire Valley Models
438 Morgan Woods Dr.
Fenton, MO 63026
www.berkshirevalleymodels.com
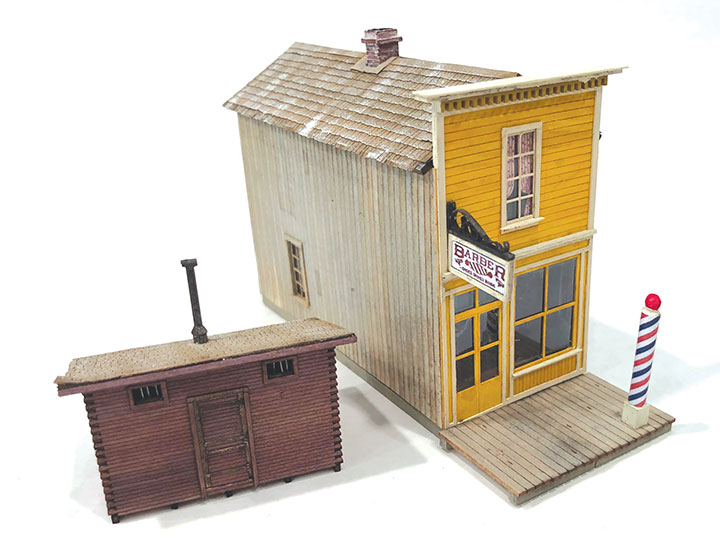
Berkshire Valley Models has released two more buildings in its frontier series. The first is a re-release of a product formerly offered by Anvil Mountain Models. The diminutive HO scale Red Mountain Jail, kit #2011 at $19.95 is an accurate copy of the prototype. This laser-cut kit consists of wood components, wire, a sheet of shake shingles and illustrated instructions. The prototype was constructed of interlocking timbers, and the kit reproduces this effect with actual interlocking corners. Everything fit precisely and I was able to assemble the kit in one long session. Note that the original Anvil Mountain instruction sheet does not reflect some changes made by BV. For example, the shingles are no longer self-adhesive, which is fortunate as an addendum notes that the original shingles did not adhere well. I used Ragg’s double-sided tape which worked well. The self-adhesive hinges/lock assemblies did adhere well. The walls were first aged with a gray stain, then Hunterline stains were used to recreate the red color as shown in the full coIor picture on the header. A clever jig is provided to assist in drilling holes for the wire window bars, though a few of mine look as if an escape was attempted! The roof shingles were stained, then dry-brushed with white. I also added a smokestack from my scrap pile, though the prototype apparently had no heat. I cannot imagine subjecting even prisoners to a Colorado winter without heat. This is a great kit and perfect for someone who wishes to try a laser-cut kit, but may be hesitant to invest in a more complex one. The finished product is charming and without the barred windows, would make a great outbuilding. You will enjoy this kit.
The second HO kit, #3060, the Barber Shop, available for $29.95, is a narrow mid-block building with a false front disguising the peaked roof. It also is primarily made of laser-cut wood, laser board, acetate, shake shingles, signs and white metal castings with full instructions. This is another well-engineered, easy to assemble model requiring only two sessions to assemble. As with past kits, a plywood sub-wall is overlaid with a matching detailed thin-veneer wall. The veneer material takes stain and paint well. No bracing is required, and an interior can easily be added. A partition wall/door is provided, although I did not use it. Instead, I installed a curved internet photo of a vintage one-chair barber shop interior and a light. The layered construction allows for a clean separation of colors. I used craft paint for my multi-colored front wall scheme and the side/back walls/windows/door were stained a weathered wood color, typical of false front construction. The roof was finished the same as the jail. The building can be press-fit upon the floor/foundation and/or the shake roof can be made removable. I elected for the latter to gain access to the added light. All parts fit perfectly with no problems. The barber pole and signs add a lot, especially the two-sided hanging sign. I am saving two provided and colorful wall signs for future use, as my model will be placed between two other buildings one day, hiding any wall signs. Another fun kit to assemble and add to your western town.
-Charlie Getz.
Berkshire Valley Models
438 Morgan Woods Dr.
Fenton, MO 63026
berkshirevalley@gmail.com
www.berkshirevalleymodels.com
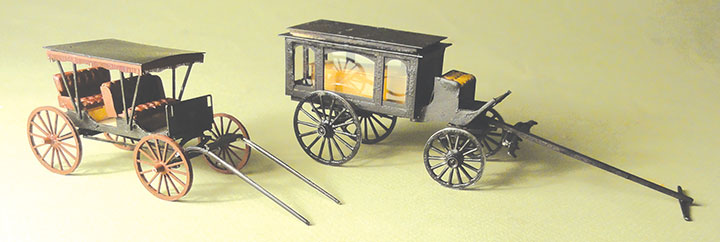
Berkshire Valley Models sells O scale models for a hearse and a surrey, yes, with the fringe on top. The hearse sells for $29.95, and the surrey is $25.95. Both vehicles come less horses, but horses are available from BV. I found both kits detailed and took some care to assemble. The body of the hearse is assembled from laser-cut wood and laser board. The sides and rear end door are layered for a nice fancy look. The hearse looks like the one driven by Yul Brynner and Steve McQueen up to the cemetery in The Magnificent Seven. The roof of the kit is also in three pieces giving a nice, layered look. There is a cast metal seat cushion. The wheels and springs are also white metal. I had to drill the axle holes a bit larger in the wheels, and I recommend drilling the holes deeper in the axles giving the little pins on the leaf springs a better attachment. The springs and axles are simple and easy to assemble. My kit was missing the fifth wheel, but I substituted a washer since it really does not show. The kit also contains some laser-cut templates that you can tape over the window holes if you want to paint the interior a different color than the outside of the hearse. I sprayed my model black inside and out. Laser-cut window “glass” is provided, plus a laser board coffin you have to assemble that takes up most of the space in the hearse. I understand the coffin is available separately. The kit includes one page of instructions with photos of the model under construction and completed. I am pleased with my hearse but made a big mistake using spray can paint on it, since the paint came out so thick.
The surrey was an easy build. The body is laser-cut wood and laser board and fit together perfectly. The roof has a ceiling with two curved ribs. You glue the top of the roof over the ribs to get the curved effect. The fringes are laser-cut laser board and actually have little fringes, neat! The roof uprights are one-piece laser-cut wood parts and the seats are metal castings. The axles and springs are one-piece metal castings with flanges that fit into slots in the body. This is the easiest undercarriage I have assembled on a BV wagon. The wheels on the surrey are laser-cut wood with laser-cut rims. I find them more fragile looking and easier to work with than the cast metal wheels. I decided to use MicroLux paint and brush my surrey. I painted the wheels, fringe and seats Tuscan red, and the paint job came out much better than the hearse.
I have assembled all the O scale wagons and vintage trucks from BV and am delighted when another one pops through my mailbox. They always result in an excellent model, and my collection just keeps growing.
-Bob Brown.
Micro-Mark
340 Snyder Ave.
Berkeley Heights, NJ 07922
1-800/225-1066
www.micromark.com
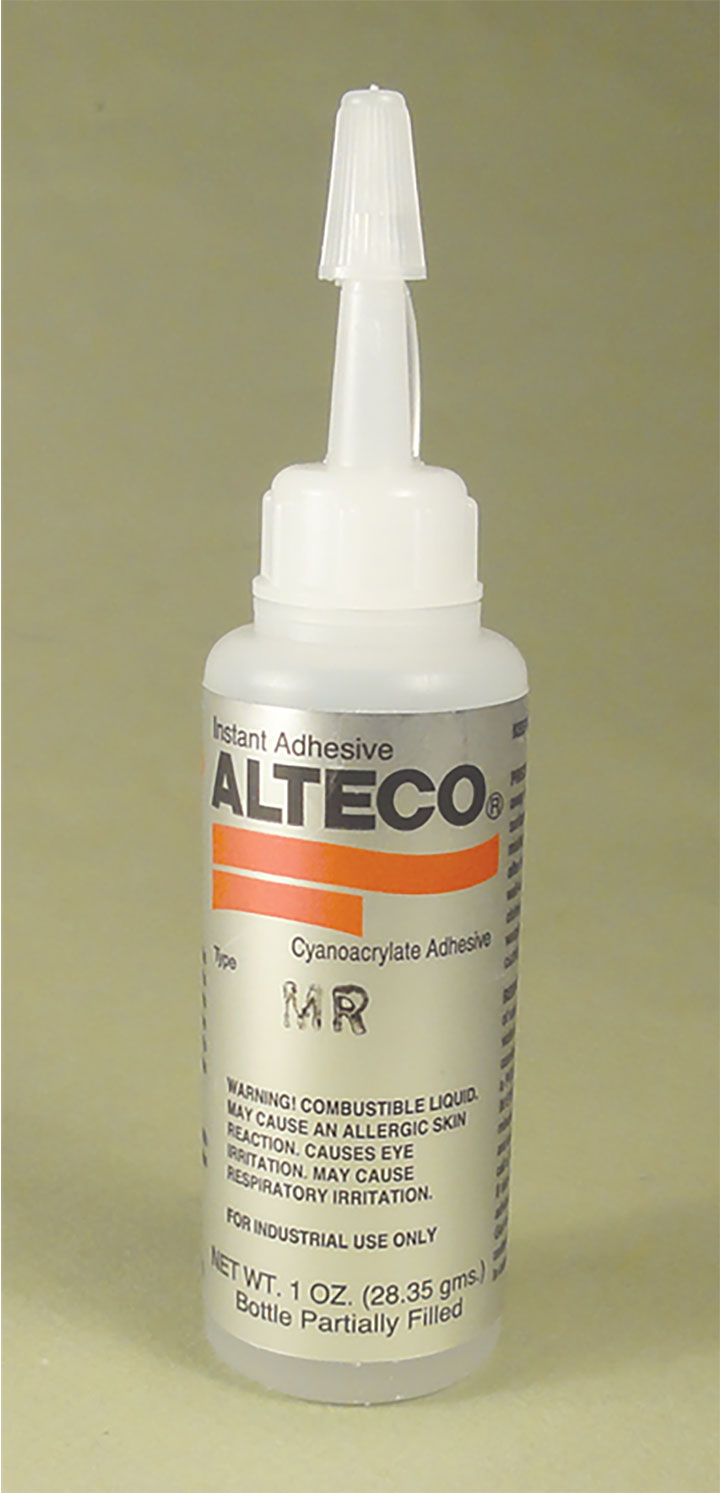
Long-time GAZETTE reader, Harold Buckley, sent me a tear sheet from his latest Micro-Mark catalog listing a new CA called Alteco MR Metal Cyanoacrylate Adhesive (#89160). Harold mentioned that he had glued some feeders to the track on his HO layout. The Micro-Mark catalog states “that sometimes you just want to join metal parts and assemblies to other metal parts and assemblies without the hassle of soldering or welding. This instant cure metal-to-metal glue makes that process quick and easy.” So, I just had to buy a bottle. It cost me $21.95 and arrived in a week. I immediately glued a feeder wire to a short piece of flextrack and let it cure overnight. The next morning, I could not dislodge the feeder wire from the track. However, don’t put your soldering gun away, this CA insulates a joint and electricity can’t get though. I checked with Harold, and he had the same problem. Then Charlie Getz came by with a broken kitchen utensil belonging to his wife, Margaret. She is a world class chef. We glued it back together and it lasted, under hard use and hot water, for about 10 days. Charlie cleaned off the mating surfaces, and we tried again. So far so good. At any rate this new CA is powerful and worth adding to your workshop.
-Bob Brown.
Bar Mills Scale Model Works
P.O. Box 609
Bar Mills, ME 04004
207-929-3400
www.barmillsmodels.com
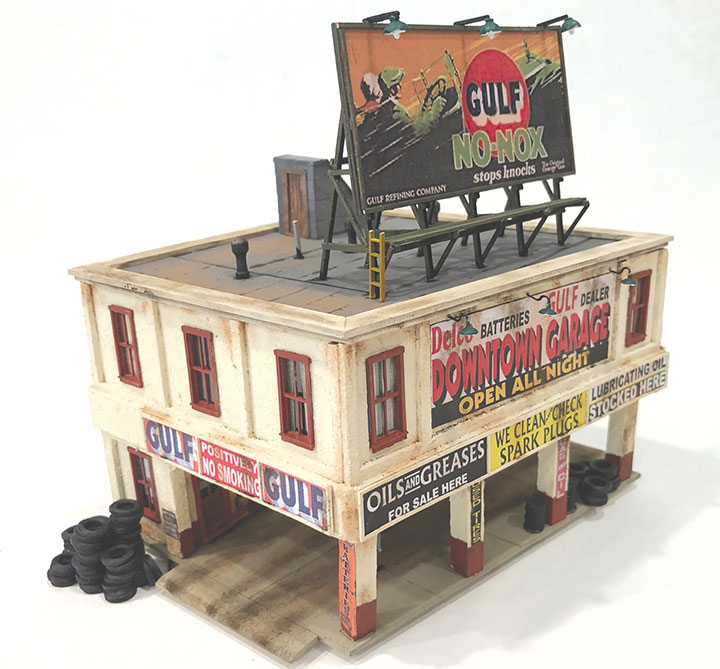
Bar Mills Scale Model Works has released the Metropolitan Garage in N, HO and O scale. This structure was originally part of the limited release Cigar Corner super-kit. I assembled the HO model, priced at $79.95. If you wish to add a set of discounted Woodland Scenics gas station figures, the cost is $84.95. Check their website for other scale information and pricing.
Based upon a notable George Sellios designed building from his Franklin & South Manchester model railroad, the gas station is on the lower floor with apartments above in a wedge-shaped design. One wonders how desirable living above a gas station would be! The kit consists of pebbled laser-cut Taskboard, laser board, wood, acetate, Tichy windows, wire, resin/white metal castings, and full color signs and instructions. Assembly is not difficult and is very enjoyable. The instructions are not comprehensive, but sufficient, and an added supplemental instruction sheet is provided on general modeling tips. The pebbled Taskboard is assembled in layers to simulate stucco. I enhanced the stucco effect by overbrushing Crescent Creek Scale Models’ stucco material. I made sure not to apply it where another layer was to be laminated. I also added lights in the ceiling of the overhanging canopy to light the resin cast pump island underneath.
The kit is well engineered and as presented, is detailed with more signs than can be used for this application. I elected to add two Roomette interiors and internet graphics with LED lights to both the first and second stories. I also substituted CC Crow seamed tarpaper to the flat roof instead of the provided rolled roofing since the roof is flat. Finally, I added figures, small diameter wire for gas pump hoses and a short ladder to the provided billboard. It is the signage, true to Sellios’ design, that lifts this structure above the normal. The plentitude of roof details also adds interest, including the lovely billboard. I was impressed with the resin one-piece gas pump island casting and the fire alarm/fire water hook-up details for the walls. The finished structure demands a prominent location and reeks of character. Given its wedge shape, it will be perfect at the end of a city block where its detail and the added interiors can be appreciated. It is a spectacular urban structure that will be a focal point for any city scene.
-Charlie Getz.
Apogee Locomotive Works
apogeelocoworks@gmail.com
www.apogeelocoworks.com
Apogee Locomotive Works sells an On30, 25-ton freelance boxcab locomotive kit for $30.00. The model was inspired by IATR #53 currently stored at the Boone & Scenic Valley RR. This 3D-printed boxcab model follows the typical construction and design of early 20th century industrial equipment. The body and underframe have been correctly proportioned for a 2-foot to 30-inch loading gauge. Featuring a one-piece 3D-printed underframe and cab, nicely appointed with correctly placed rivets and printed details. A separate removable roof allows full access to the cab’s interior should further detailing or additional electronics be added. Two included can-type sand boxes can be added to either porch for added detail. The end beams allow easy installation of Kadee #58 couplers in #242 coupler boxes. These are held in place by the provided printed coupler box plugs.
Each of the parts has a smooth finish with very little layering apparent and no graininess. The printed parts readily accept nearly all types of hobby paints without any issues. Following standard practice, each part was thoroughly washed and dried, then primed with a spray primer. Once the primer had set, the body was masked and several color coats applied. The finished paint was then over sealed with a coat of clear lacquer in preparation for future decaling.
The model is designed to be powered using an HO scale North West Shortline Stanton Drive with a 10-foot wheelbase and 40-inch diameter wheels. NWSL item numbers 39219-4 with .088-wheel tread or 39209-4 with .110-wheel tread can be used and are available directly from North West Shortline. These power blocks are first mounted in the printed drive mount and then secured to the underframe with the drives integral mounting screw and nut. The drive mount is a snug fit and may need to be opened-up to accept the drive. In the case of my sample, a Dremel tool with a grinding bit quickly did the job. Once installed in the locomotive, the Stanton Drive provides smooth, quiet operation.
With its large cab, there is ample room for the addition of more weight, DCC decoders, current savers, speakers, lighting packages or other details. Bear in mind that this is an easily completed basic kit with nicely rendered 3D-printed parts, the builder will inevitably want to add a whole range of added details and finishing touches to personalize their critter. This can be as basic as adding clear glazing to the cab windows, to fully detailing the model to suit a particular taste and railroad.
-George Riley.
Bar Mills Scale Model Works
P.O. Box 609
Bar Mills, ME 04004
207-929-3400
www.barmillsmodels.com
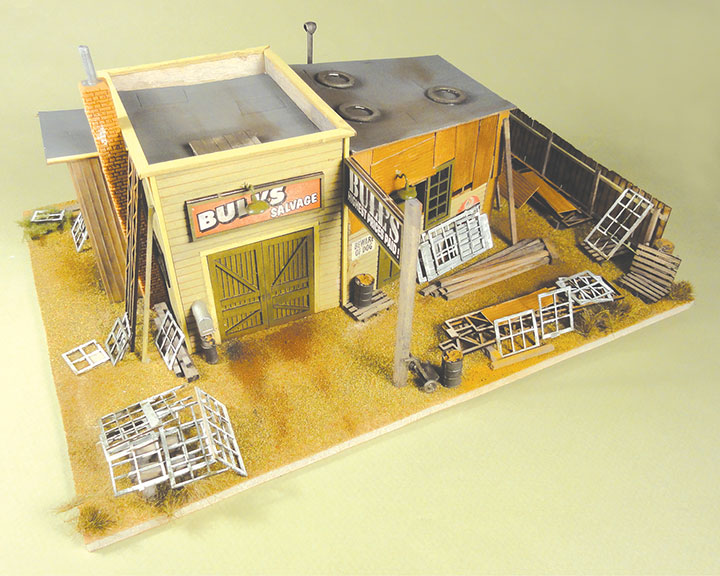
I usually do not feel right if I don’t have a project underway, so I recently decided to try an O scale Bar Mills kit. I have assembled two Bar Mills kits in the past and really enjoyed the experience. I chose Bull’s Salvage from their website and ordered a kit for $99.95 in O scale. I was impressed when it arrived in California from Maine in only three days, wow! I liked the clutter of the salvage yard and felt the two walls with siding missing covered with corrugated sheet metal interesting. Wonder if it was termites? The kit has detailed, conversation-like instructions where one writer gives his ideas, and another shares his way of doing things. Make sure you follow the directions when adding the interior wall bracing. Incidentally, Bar Mills’ website has some excellent how-to-do-it videos. The laser-cut walls and roof fit perfectly, and the windows, doors, and their trim were all peel-and-stick. The corrugated metal was striated cardboard that I dry-brush painted a rust color. I was very pleased with the result. The tar paper roof material was also peel-and-stick. There is a nice cast chimney and several signs you cut from the instructions. I mounted my Bull’s Salvage on a piece of Gatorfoam and added ground cover. Then the fun began adding all the salvage. The kit comes with old rafters, and a sheet of doors and windows. There are also metal barrels, a hand cart and a nifty mailbox on a support stuck in a milk can. There is also a weather-beaten laser-cut fence. And the best set of pallets I have seen. The top boards were laser cut and held together. I just had to glue three strips of wood along their bottom, and then cut off the pallets every four boards. Took minutes. There is so much salvage (junk) that I couldn’t fit it all in. The only items in the photo not included in the kit were the ground cover and foliage. I am really satisfied with my Bull’s Salvage, and I agree with Bar Mills’ slogan, “Making it simple—keeping it fun.” I have ordered another Bar Mills kit and am looking forward to assembling it.
-Bob Brown.
Leadville Designs
5 Stapledon Cr.
Ottawa, ON, K2H 9L1
Canada
www.leadvilledesigns.com
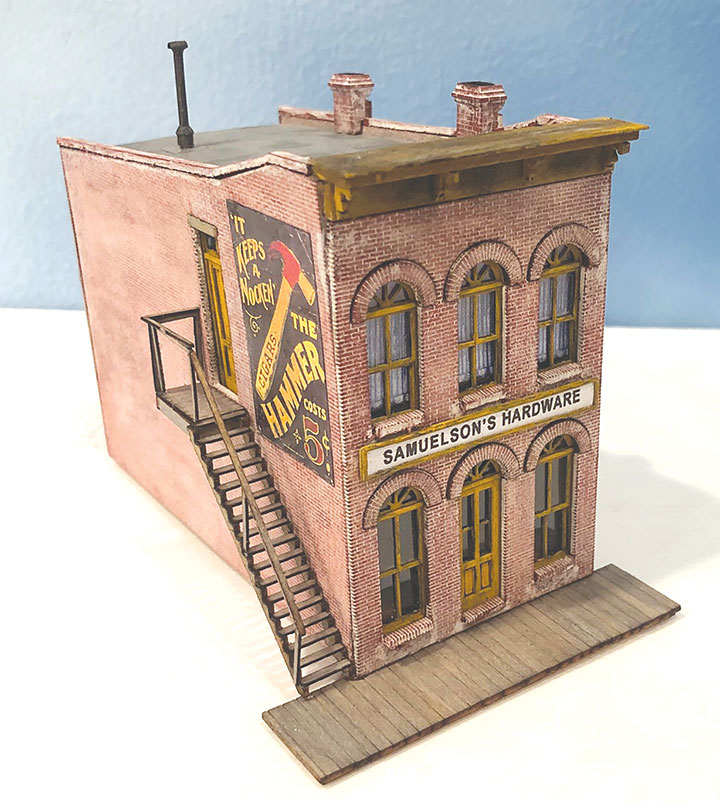
Leadville Designs has released some new building kits in HO, including the Silver Spur and Saddle, a mid-block brick building based upon Samuelson’s Hardware store in Black Hawk, Colorado. (I was surprised to discover that Samuelson’s still exists in a much larger building as Samuelson’s Tru-Value Hardware). The kit retails for $74.95 U.S. This is a very nicely done and well-engineered kit, but one for a moderately experienced builder as the instructions do not cover every single step. The kit contains mostly laser-cut and engraved wood parts plus acetate, signs, pre-cut rolled roofing, 3-D printed chimneys and illustrated instructions. A thin sub-shell supports the engraved brick walls with brick overlays for detail. My kit was missing the sub-walls, but a note to Leadville Designs resulted in prompt replacement. The windows and doors are created from up to three layers of laser-cut wood to create delicate, yet well-defined and detailed assemblies. While minimal, the instructions cover assembly sufficiently. There were a few times I filled in the next step, but nothing was too challenging. For example, I goofed on the brick sills, placing them below instead of atop the windowsills. Easily corrected.
Since I am unsure what the Silver Spur and Saddle does, though I suspect a saloon not a saddle shop, I elected to re-name the kit Samuelson’s Hardware with a sign created on the computer by my wife Margaret. I added a light and a City Classics interior graphic for a hardware store, along with a new wall sign from one I created years ago, to support that use. However, with an SS Ltd. saddle casting or two in the front windows, you could create an interesting saddle and tack shop using the kit sign. The signs provided are excellent by the way, and will be used elsewhere. I used craft paints and Robert’s Mortar without problem and added some curtains/blinds to the upper windows. The outside staircase and side door add a lot to this interesting design as do the chimneys that fit precisely on the side wall. (Just to add more detail, I installed an additional smokestack.) Despite the few small problems outlined above, assembly was enjoyable over a week of evenings, and all parts fit well. The store is charming with well-defined features and would fit into any scene well.
-Charlie Getz.
B.T.S.
1782 Trinity Rd.
Belington, WV 26250.
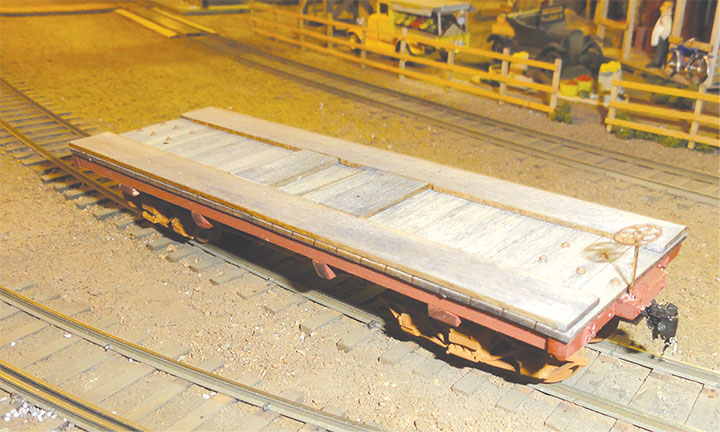
B.T.S. have sold HOn3 and Sn3 West Side flatcar kits for several years. Now they have an On3/On30 version. Single flatcars less trucks and couplers sell for $29.95, and a five-pack is $135.95. The West Side Lumber Company used hundreds of these 24-foot flatcars over the years. The first were built by Carter Brothers and J.S. Hammond. The WS shops also built the cars, and I remember seeing them under construction in the carpenter’s shop at the sawmill in Tuolumne City. At first, the flatcars were used to haul logs, then they found their way for all sorts of purposes. They could be found as-built or modified under boxcars, sand cars, parts cars, tank cars, and even a caboose or two. They were simple cars and lacked stake pockets, stirrup steps, and turnbuckles.
The B.T.S kit is also simple. The center sills and intermediate sills come as a one-piece laser-cut wood piece. You then glue on laser-cut outer sills, end beams, and deadwoods above the couplers. The deck is laser cut in two pieces. The kit comes with material for making the deck ready for equipment such as trucks and tractors. I have even seen photos of flatcars loaded with the families of loggers on their way to the woods.
The truss rods are monofilament. I have used this material for years. I drill out the end beams, thread the truss rod through a hole, run it under the bolster and over the pedestal beam. Then I put a drop of CA on one end and pull the line into the hole and let it set up. Then a drop of CA on the other end as I pull the line taught and clamp it with clothes pins. Some of my truss rods have held up for over 60 years.
The prototype cars have either oval shaped or rectangular end washers. B.T.S. gives you laser-cut oval cardboard washers onto which you add a nut/bolt washer. I cheated and added some cerro bend rectangular washers cast by the late Bill Coffey. Bill cast every metal part of a WS flat in cerro in the early 1960s, and I am still using them.
You need to add some more nut/bolt washer castings, a brake cylinder, brake lines, brake wheel with ratchet and pawl, and air hoses to complete your flatcar. There are two sets of air hoses. One is a lost wax casting, the other is a little rubber hose with a lost wax gladhand. I use the cast hose because I couldn’t get the rubber hose to bend and stay put.
Every WS modeler seems to have his or her own formula for WS red. B.T.S. recommended Floquil Oxide Red, and I had an unopened bottle. Since Floquil is no longer available, B.T.S now recommends you check the MicroScale site for matching colors. The instructions were complete, guiding you along the assembly with several handy drawings.
I haven’t built or assembled a WS flatcar for years, and enjoyed assembling this excellent B.T.S. kit. The photo shows it ready for service on my layout.
-Bob Brown.