Deerfield River Laser
92 Parkview St.
Ludlow, MA 01056
413-610-0488
www.deerfieldriverlaser.com
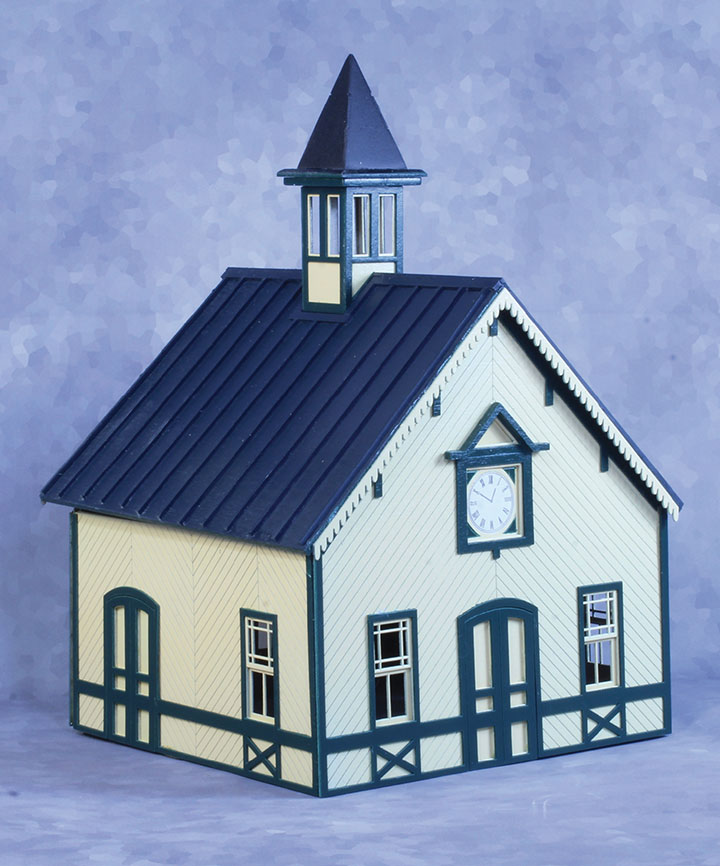
Located in Lincoln, New Hampshire, Clark’s Depot is an attraction that is part of Clark’s Trading Post. The Depot serves the White Mountain Central Railroad, which is a tourist line that hosts a roster of geared steam locomotives. While the providence of the structure cannot be firmly established, it is finished in a Victorian style with a wealth of gingerbread trim. The O scale Deerfield River Laser Clark’s Depot kit is inspired by this eye-catching prototype and sells for $96.00.
To capture the intricate trim of the structure, each wall is laminated from three layers of laser-cut thin plywood. These include the inner wall, the outer wall with scribed planks and the last layer of trim. I pre-painted each of the parts in their appropriate color as recommended by the manufacturer. Following the prototype, this included light yellow walls and windows with dark Hunter green trim. The clock face on the front wall was painted white first, then masked off before the other colors were applied.
While laminating the wall components is straight forward, attention should be paid to making sure that each corner is properly aligned. This will assure tight corners on the finished model. Each wall was assembled and clamped to a board so that they would lay flat while the glue dried.
The provided floor was used to build up the structure’s carcass, assuring that each wall was assembled square to the base. The cupola on the roof was built up following similar techniques to that of the four walls. The roof consists of two plain laser-cut pieces of plywood with the roof covering left to the desires of the builder. To replicate the standing seam metal roof on the prototype, strip wood was glued every ½-inch for the raised seams. When completed, the roof was painted separately before being added to the model.
Since no glazing is provided in the kit, the builder will need to provide this item. Once the windows are glazed, the roof can be added, and the cupola fitted on its peak. The finished building has very simple lines, however, the Victorian trim really sets it off, particularly when painted in contrasting colors. While the prototype currently serves on a tourist line, the model can easily be pressed into service for a few uses. The footprint of the finished depot is six inches square.
-George Riley.
Banta Model Works
421 Hopkins Road
Dummerston, VT 05301
802-258-3869
www.bantamodelworks.com
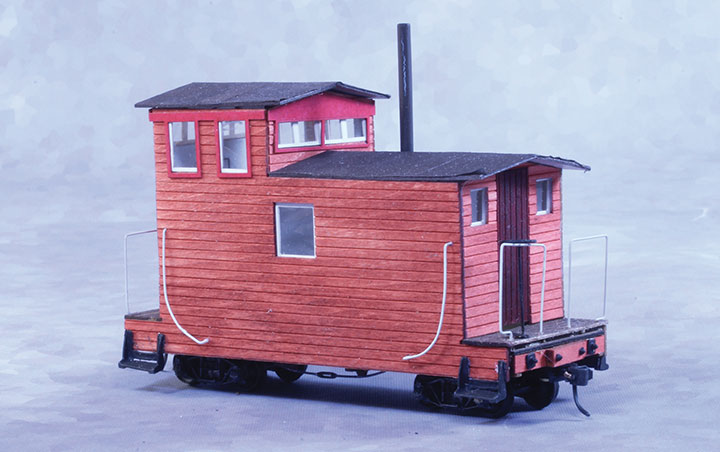
Reminiscent of West Side Lumber Company’s home-built cabooses with their horizontal wood cladding, Banta Model Works is offering an O scale kit designed to convert Bachmann’s On30 18-foot flatcar into a caboose. The kit sells for $42.00 and follows Banta’s standard practice of utilizing a laser-cut plywood base over which scribed sheeting is attached. This produces a robust model, yet still maintains the delicate details one expects from this type of kit.
A couple of frets of laser-cut laser board provide some of the finer items like the window frames and exterior trim pieces. Several lengths of wire and a bending fixture are also included in the kit so that the builder can fabricate the various end rails and grab irons.
While the kit is designed for Bachmann’s On30 18-foot flatcar, other options are available to the builder ranging from scratchbuilding an underframe to fit, or in the case of my model, using the 18-foot 6-inch flatcar kit from Mount Blue Model Company (either kit #28g with trucks, couplers and weight; or kit #28h less trucks and couplers), (www.mountbluemodelco.com). The Mount Blue underframe fit the caboose kit perfectly with the only modification needed was to leave off Banta’s end sills. When using the Bachmann flatcar, the stake pockets, and brake pawl will need to be shaved off the car for a proper fit.
To get a rustic finish on the model’s upperworks, each of the exterior parts was given a wash of Vetero’s (www.besttrains.com) barn red stain, or in the case of the end walks, muddy brown. Likewise, the wooden underframe was given a wash of stain prior to assembly. The interior structure received a spray of sanding sealer followed by a spray of white primer. The metal grab irons and end railings received a coat of white primer while the other “metal” parts were painted with Rustoleum Dark Gray Auto primer prior to assembly.
With all the parts pre-stained or painted, assembly is quick and straight forward. The kit’s design is well thought out and the laser-cut parts precise, so very little filing or sanding was needed for a perfect fit. In the kit, there is a choice of end steps, either a set of diecast ones, which were used for my model, or a set cut from laser board which is folded and glued for the steps. Either makes for an acceptable model.
The laser-cut clear glazing was installed in each of the window frames prior to adding the roof to the body. To replicate the painted canvas or tar paper roofing commonly used in the car’s era, tissue paper is provided. Cut into strips, this is then glued in place and once dry, given a couple of coats of paint, either brushed or sprayed. Finished with dry brushed light tan or gray craft paint, this system yields a nicely weathered and authentic roof.
The finished superstructure was then added to the underframe which was assembled per the provided kit instructions. Once glued in place, Kadee couplers in their boxes were added to the cars along with a set of HO archbar trucks which were on hand. The completed, easily assembled caboose has that home-built, back woods feel. It readily complements the shorter rolling stock so popular with On30 models.
-George Riley.
Woodland Scenics
P.O. Box 98
Linn Creek, MO 65052
573-376-5555
www.woodlandscenics.com
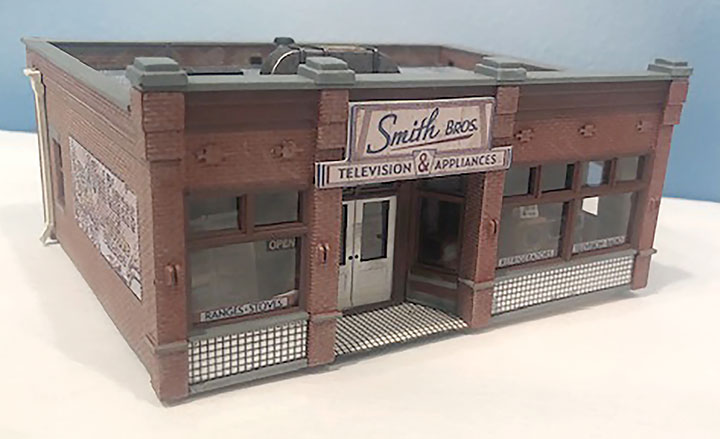
Woodland Scenics has released Smith’s TV and Appliance in N and HO scales. I examined the HO version with an MSRP of $84.99. From the late 1940s through the mid 1950s, it was a common experience for people to congregate before the local Radio-TV Appliance store to watch and listen to the new medium, Television. Whether made by Dumont or RCA, the TVs of the era were small and crude, but magical to a generation used to radio dramas and comedies. The flickering black and white screens must have proven irresistible as by the mid 50s, TVs were common in households nationwide. This offering recreates such a store.
This is a contest-quality pre-weathered and highly detailed ready to operate release. Literally, you merely need place the provided lighting plug into a Woodland Scenics lighting hub, apply power and the fully decorated interior comes to life. Besides 3D refrigerators and other appliances, there are a series of flickering TV screens that look as life-like as any interior I have ever seen. Plus, the exterior is as detailed as the colorful interior with wall signs, a loading dock, dumpster, and a myriad of details. The roof is weathered tarpaper with a weathered brick finish on the walls and even faded wall signs. I am competent when it comes to constructing buildings, and I must admit, I could not do better than Woodland Scenics has done. You would have to pay a skilled craftsman many times the list price to create such a detailed result. This release is but one of many similar offerings, and I am a huge fan of what WS has accomplished. Indeed, the only additions I can envision are, of all things, a TV antenna for the roof and maybe a crowd of people watching the televisions! If you model from the late 1940s–60s, this product is for you. Your visitors will be astonished. I can’t wait for the next release from this innovative company.
-Charlie Getz.

Leadville Designs
5 Stapledon Cr.
Ottawa ON, K2H 9L1
Canada
www.leadvilledesigns.com
Leadville Designs has produced a kit for an HOn3 C&S/RGS boxcar for $39.95 U.S., less trucks and couplers. LD notes it offers correct trucks for this car. As with past offerings, this car is fantastically detailed, consisting of laser-cut wood pieces, 3D printed parts, brass etchings, styrene injected parts, decals, wire, and nylon for truss rods. Full instructions are included. While I had no problems in assembling this kit, it is a demanding build, but very satisfying. Even interior detail is included, so I elected to leave one door open with a partial load inside.
As with previous releases, you can elect to build a contest-quality highly accurate rendition with full brake rigging and every detail found on the prototype, or compromise some detail for a more rugged layout-quality version. I elected for the latter, but still was challenged by the exquisite detail presented in etching and 3D printing. I was pleased by the level of detail and never felt the construction was beyond my abilities. I added Kadee #714 couplers and Grandt Line #5120 C&S/RGS Bettendorf trucks without problem, though I did modify the end beams to fit the Kadees. Different etchings are provided should you wish to build the C&S or RGS version, or even the earlier F&CC version. I did not add the legions of tiny nut-bolt castings, nor bend my own grab irons using the jigs provided. I cheated and used commercial grabs which fit perfectly. I painted the car a D&RGW red color over weathered wood, leaving the roof walk unpainted. The provided custom decals were applied over a gloss coat, then dull-coated. I also added weight to bring the car up to NMRA RP-20.1 recommendations, hidden by the load. The result was a lovely and accurate RGS boxcar to add to my fleet.
-Charlie Getz.
Leadville Designs
5 Stapledon Cr.
Ottawa ON, K2H 9L1
Canada
www.leadvilledesigns.com
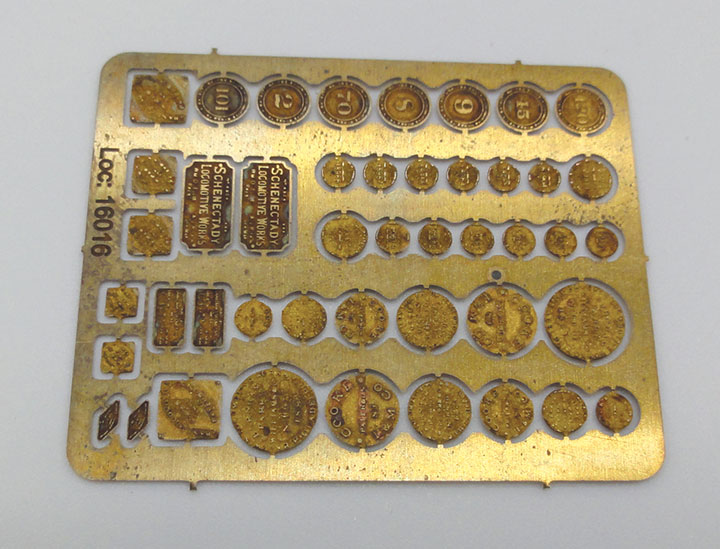
Leadville Designs has released some lovely etched-brass builder’s plates in HO, S and O scale for Baldwin, Cooke, and Grant, three common locomotive builders of narrow gauge locomotives. I received a small sheet with examples of these plates and found even the smallest script readable under magnification. These Finescale Builder’s Plates retail for $6.00-$8.00 per pair depending upon scale, and when added to a locomotive, will greatly increase the detail level. Check their website to order and for more information including specific prices. Also note that HO plates for Canadian Pacific locomotives are available in brass or stainless steel.
-Charlie Getz.
Mount Blue Model Co.
3 Gate Street
Carver, MA 02330
www.mountbluemodelco.com
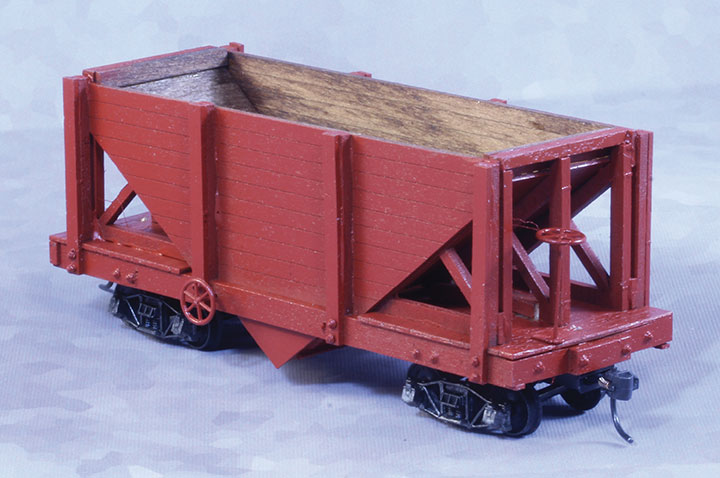
Mount Blue Model Co. continues to add to their series of 18-foot On30 rolling stock with the addition of the 18-foot V Bottom Hopper Car kit that sells for $35.00. This freelance model follows the common car building practices of the late 19th and early 20th centuries for an early wooden bottom discharge hopper car. Constructed on a one-piece laser-cut frame from pre-cut plywood and basswood parts, the model assembles quickly into an outstanding item of narrow gauge rolling stock. Noteworthy is that the side panels and slope sheets are scribed on both sides giving the appearance of board-on-board construction, both on the interior and exterior. Injection molded detail parts, brass wire and laser-cut laser board details complete the model. While trucks and couplers are not included, either Tichy or Kadee HO scale archbar trucks will work well on this model along with Kadee couplers.
Staining all the wood parts with a solvent-based stain was the first step in the pre-assembly preparation. While these pieces dried, the plastic detail parts were painted on their sprues. Once the paint and stain had set, construction of the car’s structure moved forward. Assembly was quick and easy following the nicely laid out instructions provided with the kit. While appearing complex due to the multiple angles involved in the car’s geometry, the precisely cut parts made capturing the outline straight forward. When the body was assembled less the details, the interior was masked off and the exterior painted with an Oxide Red spray primer. The bodywork was finished off with the addition of the pre-painted “hardware” detail parts. This step was followed by giving the entire body an over spray of matte lacquer. Trucks and couplers in coupler boxes completed the model.
Even with the painting, the build for this model can be accomplished in an evening. Assembly required only a few tools; a hobby knife and some sandpaper along with the builder’s choice of wood glue and ACC. Finished to the modeler’s specifications, the hopper will go a long way to fill out an On30 rolling stock roster.
-George Riley.
Berkshire Valley Models
438 Morgan Woods Dr.
Fenton, MO 63026
www.berkshirevalleymodels.com
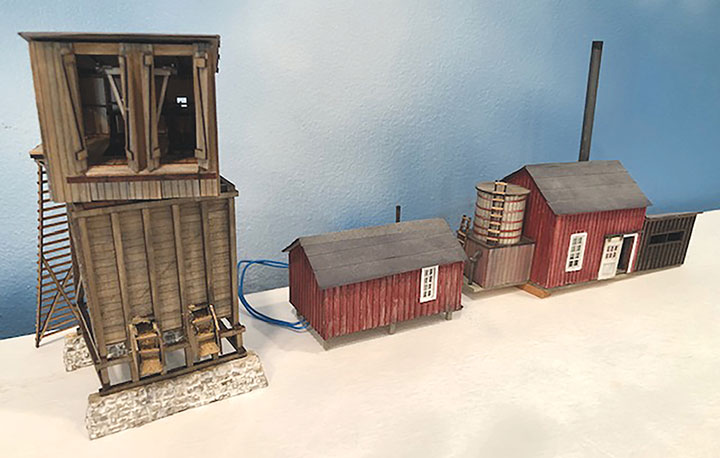
Berkshire Valley Models has released HO scale King Mine kit for $99.00. According to the instructions, the King mine, also known as the Detroit mine, was located south of Silverton, Colorado, along the D&RGW’s narrow gauge tracks with its ore bin served by a spur. What makes this mine and kit unusual is that the mine itself is not part of the kit nor was it directly served by the railroad. The mine tipple/shaft was dramatically located wedged into a cliff face a few hundred yards up the mountain and across the Animas River from the spur. The mine’s ore bin was served by a two-bucket ore tram line from mine to an angled tram house atop the ore bin. A boiler house with attached coal shed and water tank along with a storage building were adjacent to the ore bin on a narrow, cramped shelf along the river. From historical photos provided by BV, this row of accessory structures was positioned just as the kit shows them, in a line. A crude pipe (not included) brought water from a source above to the water tank, and what appears to be a steam pipe ran from the boiler house across the Animas apparently to the mine to operate the hoists. Loaded ore buckets dropped via gravity along a fixed line and were then hauled back to the mine by a hoist. A small footbridge crossed the Animas allowing the miners to tramp up to the mine headframe.
The kit consists of several sub-assemblies to create the complex of buildings along the Animas River shelf. There are 6 separate projects with components separately bagged, an excellent idea. The design seems very faithful to the prototype. In addition, information is provided for setting the components in place. The kit consists of good quality laser-cut wood and laser board parts, wire, tubing, acetate, decals, white metal castings and illustrated instructions. This kit is intended for the more experienced modeler and not every step is fully described. I encountered no major problems, though a few steps required a bit of dry-fitting and study to figure out what went where. The only issue needing clarification was the provided castings to detail the Tram House interior. The instructions use technical terms, for example, “Fit the cable saddle on the beam saddle…” as if we all know what that means. A quick check with Rich Rands at BV cleared up my confusion, and a photo was added to the instructions to better explain what goes where. The white metal castings represent the cable guides and are mounted to allow provided EZ line to be set over them to represent the fixed line for the ore bucket tramway. The rest of the assembly was more straightforward. Note there are two bases for the Boiler House complex, as explained in the instructions. So, unlike me, read the whole set of instructions through first. It will make the subsequent assembly a lot easier.
I built each section in instruction-sheet order adding only lights for the boiler house and storage building (the wires showing in the photo), a pipe to the water tank for a water source and coal to the coal shed. I also added some decomposed granite ore to the bin chutes. By the way, the chutes do not have a door but rather lift-out gates to regulate the ore flow. I used Hunterline stains and craft paints to color the parts. I painted the boiler house and storage building a red color with white windows/doors, typical of mines. The ore bin/tram house were left unpainted, stained a weathered wood color. Paper hinges are provided if you keep your tram doors closed; I opened mine, saving the hinges for another project. A decal for “King Mine” is provided to attach to the boiler house per the prototype. Until I determine where this complex will go, I will reserve the sign. Assembly of the water tank is innovative with pre-spaced bands and easily bent wrapper around a constructed core. Bravo! The water tank can also be built with an enclosed or open base.
This is a very nice kit, and its uses transcend the King Mine. The Boiler House complex would be a natural for a railroad yard or industrial complex where power is needed. The storage building is also perfect for several other industrial uses. And the ore bin/tram house is like others along the RGS and Rio Grande. I hope BV will consider a release of the Boiler House complex alone for that reason. Similarly, the buildings could be used as accessory buildings for an adjacent more traditional mine. Don’t forget to add an outhouse! The photo shows one next to the boiler house. This is a very versatile and challenging kit well worth your consideration. I enjoyed it.
-Charlie Getz.
Sanchem Inc.
1600 S. Canal St.
Chicago, IL 60616
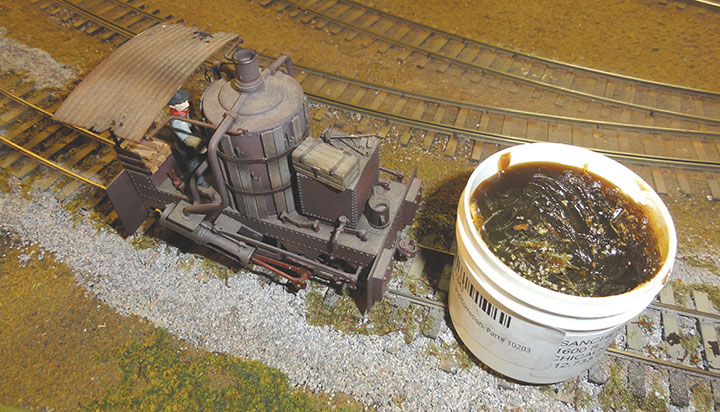
Sanchem Inc. sells an electrically conductive grease called NO-OX-ID. I was informed of this product by GAZETTE reader, Duane Danielson. This material has been around in industry for over 65 years and is designed to keep metal electrical connections free of rust and corrosion, you know like between the rail and wheels on a model railroad. Duane directed me to several videos about using NO-OX-ID on model railroads and after watching them, I ordered a 2-ounce jar from Amazon for $5.94. You can find these videos by Googling NO-OX-ID.
NO-OX-ID is a dark brown Vaseline-like grease that when spread on track improves operation. It is not a track cleaner; it only works on clean track. I have a 25-foot long, On3 DC spur on my layout used to run several small locomotives I do not want to destroy by trying to add decoders. The spur is modeled in a weed covered, derelict condition. I have never been able to run a locomotive to the end of track, stop it, and reverse it without having to poke the locomotive.
So, I went over the track with a Bright Boy and added NO-OX-ID to the top of the rails using my finger. It does not stain. Then I wiped the tops of the rails with a soft cloth. The first locomotive I ran went to the end of the line, stopped, and reversed without being touched. Remarkable!
This material is greasy, so be careful not to get it on scenery. But it does wipe off easily. I had some difficulty around wood planked road crossings, and my grass got a bit stuck up. But vacuuming took care of the problem. I have no idea how long my NO-OX-ID will last. It has been about four weeks and my spur is still working. I have also gone over the main line of my On3 layout with NO-OX-ID and am holding my breath.
-Bob Brown.
Silver City Models
5 Royal Oaks Drive
Carleroi, PA 15022
724-747-9929
silvercitymodels@comcast.net
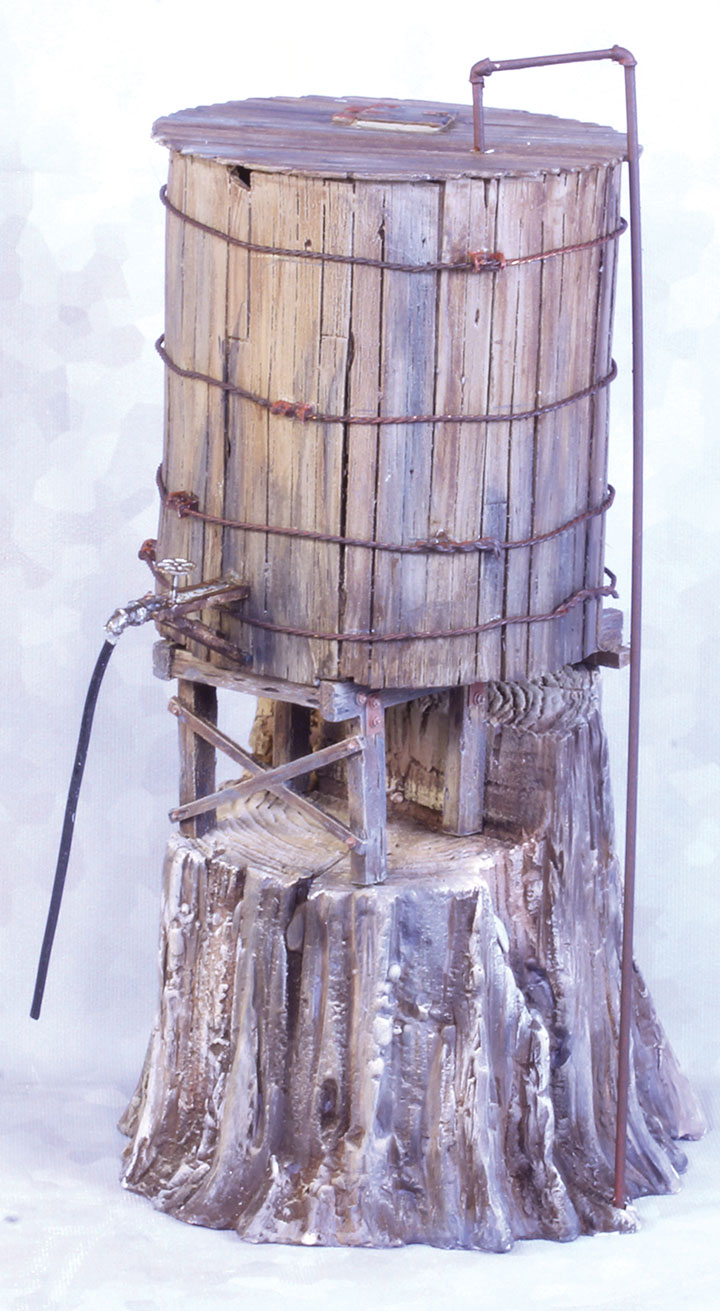
This O scale water tank was inspired by a model by the late Boone Morrison whose tank article appeared in the pages of the GAZETTE. This multi-media kit is based on an actual water tank mounted on a large tree stump in the Pacific Northwest.
The kit sells for $60.00 and comes with a full set of detailed, easy to follow instructions on a compact disk included in the kit. Most of the parts consist of detailed resin castings from original molds and a stump cast from dental plaster. Ancillary to these is a coil of stranded wire, several lengths of plastic tubing and a cast valve wheel with a short section of straight wire.
The stump is a dental resin casting. It was finished separately using Vetero Alcohol Stain from Bollinger Edgerly Models (www.besttrains.com). Once the stain was dry, an over wash of thinned burnt umber oil paint was applied to darken the crevices in the tree’s bark, followed by a dry brushing of off-white craft paint for overall highlights.
Following finishing the stump, each of the cast resin parts were cleaned in an ultrasonic cleaner and primed with gray spray primer. This was followed with a light spray of flat khaki. Once the tan coat had dried hard, over a couple of days, progressive washes of burnt umber and Payne’s gray artist oils thinned with naphtha were applied to the tank and its supports.
While the tank and stump were still separate, tank bands from the provided stranded wire were added to the tank and attached to the adjustment points. These were applied loosely to simulate bands that had slipped as the tank aged.
The tank supports were assembled and the NBW and mending plates were picked out with flat rust hobby paint before the entire subassembly was dry brushed with off-white craft paint. Once attached to the stump, the tank was glued in place and the various piping and spouts added to finish the model.
Only ACC Gel adhesive and a few simple tools were needed to assemble this model. The resulting model is a real eye-catcher and will be the center piece of any scene. While easily built, taking less than three hours of assembly time, discounting the time needed for the paint to dry, the completed water tank is nicely detailed with that truly rustic look common to most backwoods railroad operations.
-George Riley.