P.O. Box 1021
Chase, British Columbia, V0E 1M0
Canada
1-888-850-1742
www.interactionhobbies.com
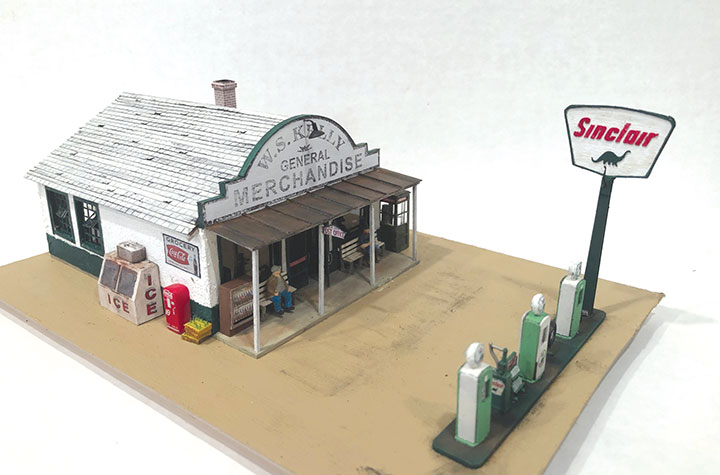
Inter-Action Hobbies is selling the HO scale “W.S. Kelly General Store” for $72.95 (U.S.) with optional interior details and lights for $16.95. Based upon a real building still standing in Cogar, Oklahoma, this Depression-era store was featured in the movie “Rain Man” with Dustin Hoffman and Tom Cruise.
The kit contains laser-cut resin-impregnated board, basswood and matt board parts; 3-D printed parts, styrene components, tulle screen, acetate, wood, wire, signs, decals, laser-cut shingles and full-color illustrated instructions. The detail/interior set is absolutely worth ordering as it includes interior lighting and full interior details. The kit can be partially customized when ordering with options for which brand gas you wish to feature. Inter-Action kits are known to be challenging, but this kit was one of the most straightforward I have assembled. However, there are fine details and assemblies requiring patience and the kit took the better part of a month to assemble, but none of the steps was inherently difficult. Indeed, the hardest steps were optional, such as adding the interior components and detail lights (not included) for the Coke machine, telephone booth and gas sign.
I followed the instructions without problem but did stray from the assembly chronology where it made sense. The walls represent stucco so I added a thin coating of Crescent Creek Scale Stucco to the assembled shell, smoothing around corners. The walls were then painted white with a dark green lower band as I exercised the Sinclair Gas option. I also researched Sinclair gas pump colors, using craft paints to achieve that look. In so doing, I learned that the Sinclair gas pump islands were painted a dark green. Interior walls were also painted and the laminated/layered wall assembly made bracing unnecessary though bracing is provided. I used Paper Creek printed wood siding (discontinued) for the store’s wooden floor. The next step was assembling and adding the myriad of details included both in the main and detail kits. The LED light bar, which must be wired, insures both the detailed store and garage interiors will be visible. I added more details and some figures to each and also a chimney run under the roof chimney opening. I added wood stoves for heat to each portion. There are more signs than can be used and lovely custom decals for the gas globes and Coke cases. Even the prototype’s rusted sign on the awning, which I left off, is provided. I followed the instructions suggestions on coloring the shingles, using transfer tape to affix them to the lined roof cards. I added dental X-ray lead-foil insert strips as flashing around the chimney.
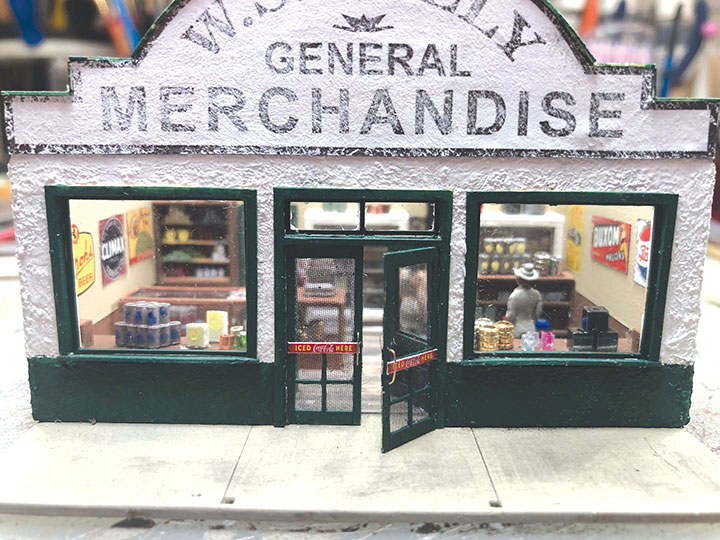
Both the Coke machine and telephone booth are modern image so I back-dated the phone booth with olive-green paint and styrene filler panels in the lower portion (I suggest Inter-Action consider adding this option to future kits). The modern Coke machine components were saved for a friend and I substituted a vintage HO-size Coke machine casting I obtained from Coca-Cola of all sources, at their Atlanta headquarters gift shop. (Inter-Action does offer a vintage Coke machine separately.) I also added an Inter-Action cigarette machine, available separately, to the front porch, shortening one of the lovely provided benches to fit. I installed my own pre-wired 0604 micro-LED lights in the cigarette machine, gas pole sign and front façade light.
The details lift this kit above the ordinary. The Ice Machine (also available separately) is superb as are the pumps created from laminated layers with a laser-cut nozzle, chrome rings and decaled 3-D printed globes. The final details are the 3-D printed Coke cases with decals and individual empty Coke bottles (which are microscopic!). I hope these parts will be available separately one day. Provision is made for adding detail lights to various components, as noted, and a provided jig allows formation of door handles from the wire provided. I appreciated the screen doors with push bars for the front entry. The engineering and thought put into this kit is reflected in the overall ease of assembly and precise fit of the parts. All in all, this kit is another winner for Inter-Action.
-Charlie Getz.
Berkshire Valley Models
438 Morgan Woods Dr.
Fenton, MO 63026
314-401-4005
www.berkshirevalleymodels.com
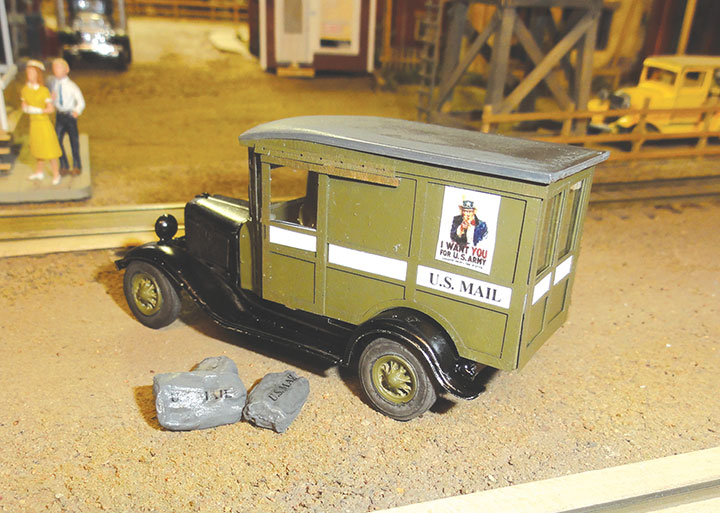
Berkshire Valley Models sells O scale kits for a 1934 Mail Truck for $29.95 each. The underbody, fenders, and running boards are a one-piece white metal casting. The axles and wheels are separate metal castings, as are the spoked wheel centers, bumpers, cab front, headlights, roof, license plates, and four-piece hood. The body is made up of two layers of laser board. The outer layer gives the walls their panels. Laser-cut material is provided for the windows, and there are separate sliding side doors and little angled walls on the front of the body. Three white metal mail bags are also provided. While the instructions are clear, I relied on the construction photos to help assemble my kit. There is a white stripe running around the body with “U.S. Mail” printed on it. Instead of painting this stripe, the kit has printed strips of white paper complete with lettering that you cut out and fit in place. The location of these strips shows after the body has been painted, making it easy to locate them. This results in a nice crisp strip with clear lettering. Uncle Sam posters are provided to decorate your mail truck, and there are decals for the three white metal mail bags. I sprayed my underframe black, blackened the tires, and painted the body olive green. Keep your wits about you when painting your model. You will need to paint the basic body and the panel overlay separately so you can install the white stripe between them. Also, while there is a ceiling in the body, don’t forget to install the rear door windows before gluing the ceiling in place. I did have difficulty mating the rear of the hood with the front of the cab and have a bit of a gap between them. Other than that, I had no difficulty in assembling my kit, but found I did have to take care and not get my painting out of sequence. The completed model is detailed and realistic.
-Bob Brown.

Oakridge Products, available from Amazon. For years and years I have discarded my used x-Acto knife blades and single edge razor blades carelessly in the waste basket under my workbench. I felt guilty each time I did this thinking of the poor waste disposal worker who might encounter one of my old blades. Then I read Jack Hamilton’s Tool Car article in the April 2022 NMRA Magazine and found out about Sharps Containers. I checked Amazon and found a one-quart container for only $13.97. You can get larger containers, but it will take forever to fill up one quart. The idea is once full, you discard the Sharps Container so no one gets hurt.
So now I have eliminated one more source of guilt from my life, and know those disposal workers are safe.
-Bob Brown.
Leadville Designs
5 Stapledon Cr.
Ottawa ON, K2H 9L1
Canada
www.leadvilledesigns.com
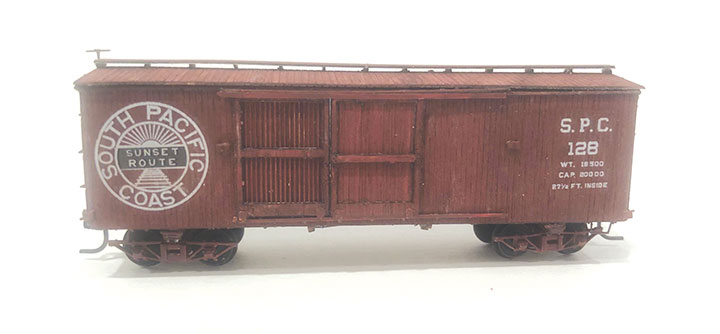
Leadville Designs sells kits for a Carter built combination boxcar as used by the SPC, C&C, and N&C in HOn3 for $44.95. Correct HOn3 brass trucks are available in kit form for $29.95. The same car kit is also produced in Sn3 and On3, so check their website for pricing. I built the HOn3 version. In so doing, I could not help but think of the late Jim Vail and how he would have jumped at this kit (and no doubt have done a better job of assembly!). The kit contains laser-cut wood parts, etched brass details, 3-D printed parts, wire, custom decals and full instructions. As with other Leadville Design kits, this one is exquisitely detailed and a welcome release of a distinctive Carter car made in Newark, California. The dual door system allowed perishable commodities to be shipped in a ventilated car while retaining the option of a closed-door car when needed. Even the end door featured dual panels. The kit accurately follows the design as presented in the Bruce McGregor books on the SPC. Every detail is present, including many that will be unseen once installed. The kit is not for the beginner, but also not beyond the capability of one who has previously built craftman rolling stock kits. The work is delicate and precise with often miniscule pieces requiring a dexterity and care guaranteed to tax even the most skillful builder. I elected to add as many of the fine details provided as my skills allowed, but skimped where the details did not show. Though I am far from a builder in the Jim Vail class, I was pleased with the result, as imperfect as it is.
Construction begins with the underframe and its simpler brake system. Clevises are formed from the etchings provided and a 3-D printed brake cylinder installed. The two queenposts are brass etchings as the wire formed truss rods lie relatively flat. I added Kadee #714 couplers with little difficulty and assembled the correct Carter trucks from the separate kit. No instructions are provided, but most parts are self-evident, and it helps to have at least three hands. I decided to use superglue and not solder on the brass parts. Wire and castings are provided for brake shoe hangers though I cheated and left mine off. I added a small washer to space the trucks properly. Two bolster sizes are provided to assist with this.
The body was assembled next. The etched parts diagram and call outs of some of the wood parts numbers were very helpful, but there were a few steps I had to puzzle out. Follow the very helpful hints in the instructions and make sure you understand each step clearly before proceeding. Forming clevises or the corner steps from the very small brass etchings is taxing, but if you want an exquisite result, you will gladly attempt it. I chickened out by using commercial parts that were very close. I also used commercial grab irons though there is nothing wrong with the grab iron forming jig/procedure outlined in the instructions. The body parts fit perfectly and had I not faced deadline, I would have done a far better job of blending the corners. A lot of thought was put into this kit with etched lines on some wood parts to help with placement of brass etched details for example. This is one car where the On3 version would be easier to assemble just due to the size of the parts. If assembled slowly and carefully, the results will rival the finest scratchbuilt car. I added weights to bring the car to the NMRA recommended level.
I painted the car with Floquil Red Oxide though any similar red paint should do. The decals are superb and curiously, not mentioned in the instructions. I added them at Step 40 and encountered no problems though in hindsight, I should have moved the large heralds a tad more toward the center. The brake staff was cut per the diagram but came out too low. After a few weeks of effort and even with re-doing a few steps, the car was complete. It is a handsome car with a dramatic lettering scheme. The finely etched barred doors and brass details add a wealth of texture to this car. More cars in the series are promised, including an early SP narrow gauge boxcar. I look forward to them.
-Charlie Getz.
Berkshire Valley Models
438 Morgan Woods Dr.
Fenton MO 63026
www.berkshirevalleymodels.com
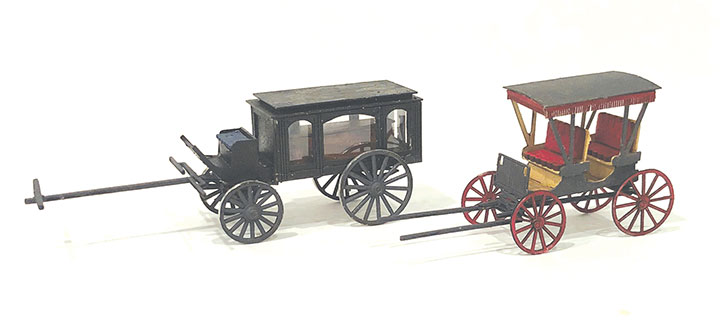
Berkshire Valley Models has released two more HO wagons in their series. The Hearse (#2112, $14.95) comes with a wooden coffin and the Surrey (#2113, $12.95) comes with the fringe on top, as the song says. Earlier released in O scale, these HO versions are just as charming and detailed. They contain laser-cut laserboard and wood parts, white metal castings, acetate (Hearse) and fully illustrated instructions. The labeled parts diagram assists in identifying each assembly step component. I encountered no problems in assembling either wagon, following the instructions closely and painting sub-assemblies as I went. Do test-fit each part first and insure you understand what goes where. The finished wagons are delicate and detailed, but nothing is beyond the ability of the average modeler.
The Hearse is perfect for an Old West Boot Hill scene and comes with a somewhat challenging coffin “mini-kit” as it must be assembled from individual laserboard parts. I placed mine in the Hearse though it could be used as a separate detail. I painted my Hearse black with a few red touches. The Surrey is truly tiny but the well-fitting components ease assembly. The fringed top is a laser-cutting triumph. Horses and drivers are available separately, but I chose to park both wagons, so did not include either. I enjoyed building these latest wagons and look forward to new releases in the series. Though addicted to building them, I am still trying to figure how to use these wagons in my proposed 1948 miniature world.
-Charlie Getz.