An Interesting Idea
Like most modeling projects, this one started with a great idea, albeit a little crazy seeming. The two of us have been friends and chatting all-things White Pass and modeling for some time now, always brainstorming projects and solving modeling challenges. The White Pass is one of those roads that isn’t the easiest to model due to the lack of available models and parts. One Diesel locomotive prototype that we’ve talked about is #81 which was likely better known as U.S. Army #3000. As far as we knew it would need to be a complete scratchbuild project, at least until one slightly crazy idea was floated. This is the tale of two locomotive models, built on the same premise at the same time, but on different sides of the country and with different stories.
Both Rob and I model the White Pass & Yukon Route in HOn3. My (Mike) layout has graced the pages of the HOn3 Annual, the GAZETTE, and Great Model Railroads 2021. Rob’s layout is set in 1983, a year after the prototype shut down. His layout is only a few years old and still under construction, but is set to represent the White Pass circa 1955 to 1975. Both of our layouts have taken modeler’s license on different aspects of the prototype which relate to the different takes on this locomotive.
Locomotive #81’s History
In the mid 1950s, the United States Army approached several locomotive builders for experimental Diesels for possible foreign service. One such result was the U.S. Army Transportation Corps #3000 built by General Electric in 1957 and powered by an Alco 251 I6 Diesel. This locomotive had the ability to operate on rail gauges of 42-inches, 39-inches (meter), or 36-inches by moving the wheels on one side in or out as needed. The locomotive was centered when configured for meter gauge track, but was slightly off balance when gauged for 36- or 42-inch gauge. Not necessarily an attractive locomotive, it could best be described as unique.
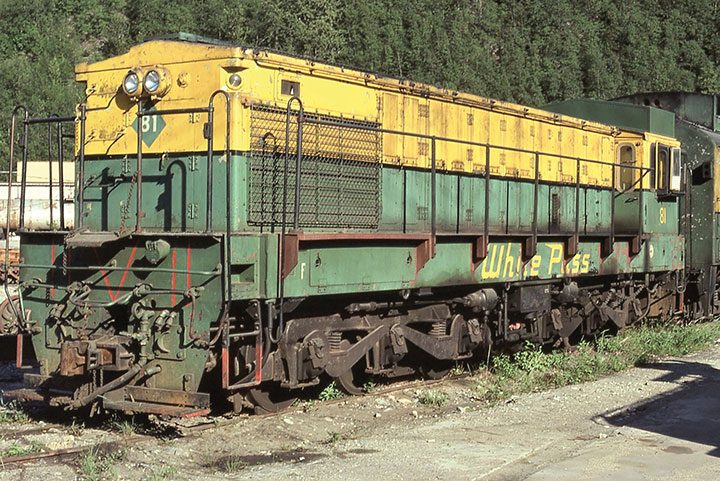
-Photo by Bryan Saul, Rob Bell collection.
Specifications for this locomotive included several unique features for foreign service such as it’s low height and narrow width, with a relatively high clearance over the track using 40-inch diameter wheels. The unit was built for extreme cold weather conditions and could be started without external help at temperatures down to -50 degrees Fahrenheit due to special low temperature batteries. Other unique features included double-paned, insulated heated windows, and blind center wheels on the six-wheel trucks.
Number 3000 had slightly more tractive effort than a D&RGW K-37, at 38,000 lbs., and the locomotive was tested on the Denver & Rio Grande Western in Durango, Colorado, until 1960. It was then stored until 1973 when the Army sold it back to G.E., who in turn sold it to the White Pass & Yukon Route in southeast Alaska where it became their #81 in the fall of 1973; the second locomotive to carry this number on the White Pass. The White Pass was a very busy, modern narrow gauge railroad at the time, and thus they needed a switcher for the Skagway end of the railroad. They had started to dieselize in 1954, and this slightly used engine must have seemed like a good deal.
The White Pass crews like the earlier D&RGW crews, complained about the visibility over the long hood of the locomotive and the cramped cab. So the shop installed bay windows, and later they raised the roof making the Diesel even odder looking. Wider walkways and full length handrails were also added. According to John Stutz, #81 was in a dead line behind the shops by October 1978, and according to Bryan Saul it was shipped to Bandegua (a Guatemalan subsidiary of Del Monte Foods) in 1979 where it became their #314. Reportedly it was scrapped by 2006.
The Australian Connection
As such a unique prototype, no models of this locomotive have been produced commercially. On an unrelated internet search one day, Rob ran across HO scale models of another unique narrow gauge Diesel locomotive, Australia’s Queensland Railway class 1720. The similarities to #81 were immediately apparent. The Queensland Railway is a 42-inch narrow gauge railroad that had 56 class 1720 locomotives built between 1966 and 1970, powered by EMD 645s. The model of this prototype is actually an HOn3.5 model made to run on 12mm gauge track by the Australian manufacturer Wuiske (pronounced Whiskey) Models. Their website is www.wuiskemodels.com and they have a Facebook page as well.
With an idea to convert one of these models into a recognizable model of the 81, more research and general proportion estimates began. Information is scarce for the 81, the main reference material being an article by Ed Cass in the magazine Short and Narrow Rails issue 48. Additional photographs were also provided by Bryan Saul, John Stutz, and a few others.
Rob purchased his 1720 class model on eBay and ordered it, but they can be ordered directly from Wuiske, where I acquired mine. These locomotives retail for $295.00 AUD (Australian Dollars), which at the time came out to about $200.00 USD plus shipping.
So how does a 1720 compare to the real 81? Well, #81 is 38-feet 1-inch long compared to 44-feet for the 1720. The model’s 37-inch diameter wheels and unequal axle spacing on the trucks were close. Cab and hood heights also compared favorably.
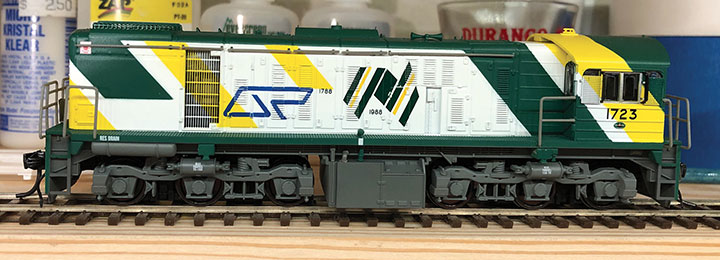
-Photo by Mike May.
Regauging the Aussie Model
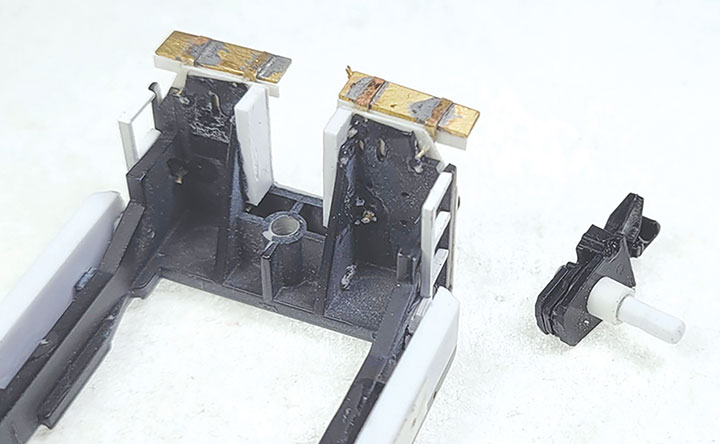
The Wuiske 1720 class is very easy to regauge to HOn3. To do so, first remove the gearbox cover plate from each truck with the six clips molded onto the plate. Cut off the lip on the outside of the plate with a sharp blade, leaving the side clips to reinstall the cover plate. Using a razor saw to cut vertically next to these clips makes quick work of this. Then remove the wheelsets and press each wheel further in on its axle. Using a piece of steel and a small ball peen hammer, the wheels can be tapped in on the axles, but be careful that the wheel only moves about 0.030-inch in and stays true to the axle. Check the gauge with an NMRA standards gauge. Reinstall wheelsets, snap the cover plates back on and test run. On Rob’s, the wheels were pushed slightly more to one side to replicate the slight “off-balance” look of the prototype.
Decoder and Sound
We both used a SoundTraxx Tsunami II Alco sound decoder, using the 251I6 prime mover option (Alco 251c.i.d., Inline 6-cylinder). The models are DCC ready with an NMRA 8-pin plug and provisions for speaker mounting. There is even a groove for the speaker wires to be routed on the chassis. Both of us used a modified iPhone 5 speaker hidden in the fuel tank, and TCS KA-4 Keep Alives. Each of our models used different mounting choices for the DCC equipment though. Rob mounted his Keep Alive to the underside of the long hood directly behind the light board using Loctite’s Go 2 Glue. This puts the Keep Alive above the truck gearing and out of the way. I mounted my Keep Alive to the top of the front truck gearbox with epoxy. Both models had their metal frames milled out slightly to hold the decoder above this same truck. Keep in mind that there is surprisingly little room under the body shell for any extras.
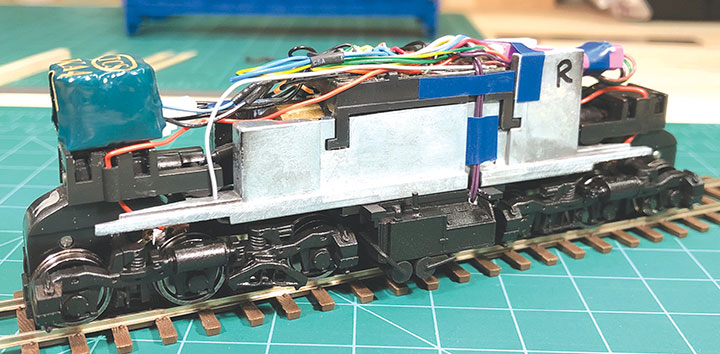
-Photo by Mike May.
Body Modifications
We took different approaches to the body modifications due to our differing layout timeframes and individual modeling license. If you are not modeling the White Pass, you have even more freedom to make more or less modifications.
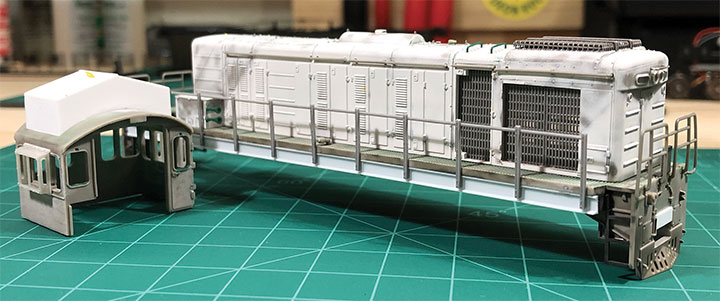
Both of us started by removing most of the separately applied details and removing the paint. Do not try paint removers as none that were attempted touched the Wuiske paint without leaving the body immersed far beyond the recommended time for plastic. Instead, use an air eraser with aluminum oxide to strip the paint, you will be happier — trust us.
-Photo by Mike May.
Once the body was lacking paint and details, the fun began. Both of us added styrene to “beef up” the frame. I used .125-inch C-channels and Rob used 0.080- x 0.188-inch styrene strips. The fuel tank was also shortened in height and a pair of main reservoir tanks were added below it. I came up with the idea of using a dental scraper to remove the ridges from the sides of the Aussie cab, and Rob took this technique to the extreme and removed every ridge from the cab and the body. He also used this same tool to remove all of the molded-on detail from the end beams.
The Long Hood
I cut out some of the side doors from the front of the long hood and replaced them with radiator grills, and used Tichy plastic handrails for the long handrails that are not on the Aussie model. Rob also used the Tichy handrails, but he cut off the plastic handrails and carefully drilled each with a #80 drill and used 0.010-inch music wire for the handrails. Rob used sheet styrene to fill in the air inlet openings on both sides, and made new doors for another section closer to the cab where the ribs had been removed. Bits of 0.020-inch styrene rod were used to simulate the hinges on these new doors. The latches were carefully sliced off of the doors at the very front and then glued in place on these new doors. Both sides of the front were filled and/or sanded as needed for the new radiator shutters and framing closer to the prototype 0.020-inches. V-groove styrene with 0.050-inch spacing was used to simulate the radiator shutters, and 1/32-inch brass angle was used to make the frame.
-Photo by Mike May.

-Photo by Rob Bell.
Rob's Coupler Mounts
The prototype could have the couplers mounted at several heights from 22½ up to 36-inches, and the model needed a better way to simulate the space above and below the prototype’s coupler. Rob came up with a method that effectively simulates this. First the coupler mounting screw holes were drilled out on the locomotive frame with a #46 (0.080-inch) drill bit. Next, Rob bored out a piece of 0.125-inch (1/8”) styrene tube to a depth of about .25-inch with the same #46 (0.080-inch) drill bit and then cut the tube into two lengths of about 0.090-inch each. Then cut two approximately .25-inch lengths of 0.080-inch diameter styrene rod, and glued one of these into each tube; making a pair of what looked like “Battleship” game pegs. A #56 hole was carefully drilled in the center of the large end of each “peg” for a Kadee 714 mounting screw, or you could drill and tap for an 0-80 machine screw. The small end needs to be carefully sanded or filed just a little so that it fits snugly but is removable because the height of the big end may need to be adjusted. With the locomotive reassembled and on the track, the coupler height can be checked and adjusted as needed by trimming the large end of the peg. This took three or four tries and only ended up messing up one peg that required starting over! The Kadee 714 HOn3 couplers were then installed, but still needed to have the rear portion of their boxes trimmed off to clear the locomotive’s trucks.
-Photo by Rob Bell.
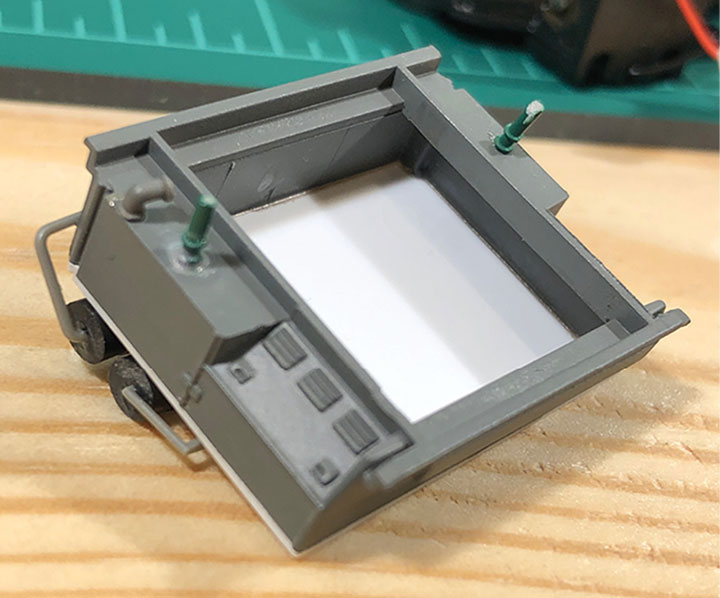
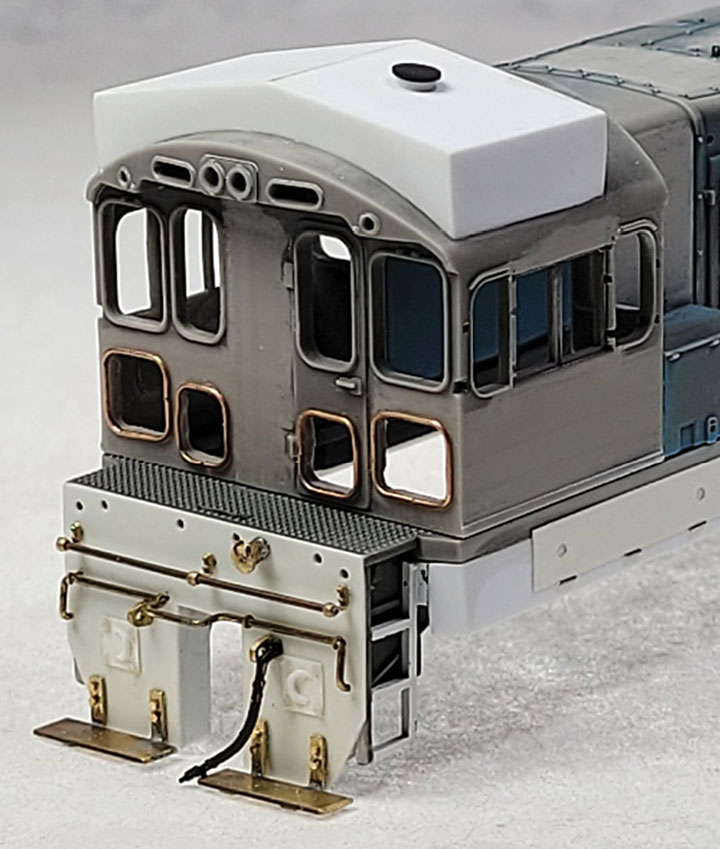
Cab Changes
To replicate the distinctive raised cab roof, I cut a rectangular hole in the existing cab roof and the addition was built with sheet styrene cemented together. The seams were sanded to a slight radius to simulate the welded construction. Rob made his in the same way, but did not cut a hole in the roof, instead opting to sand the lower portion of the extension to the cab roof radii and cemented it in place. Rob also meticulously planned and milled out new lower windows on the rear of the cab. New window edges were formed from Tichy phosphor-bronze wire, bent and glued to edges of these new window openings with CA.
-Photo by Rob Bell.
-Photo by Mike May.
Lighting Board Updates
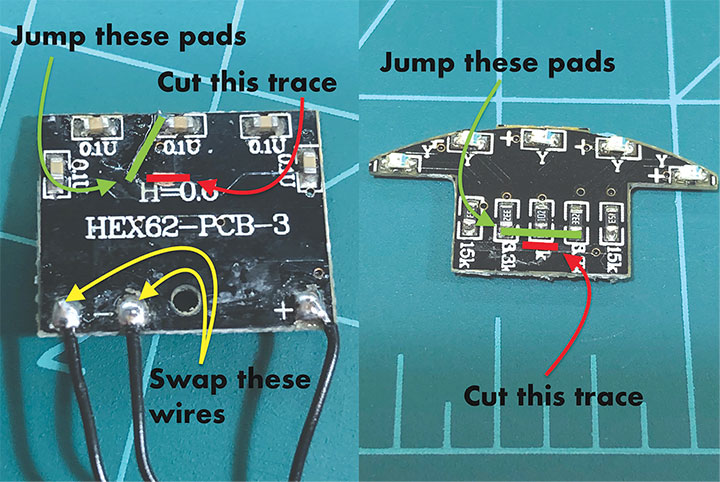
The model’s lights are all LEDs mounted to two circuit boards, one in the roof of the cab and the other at the end of the long hood. There are individual LEDs for the four class lights, four number boards, and the headlight and backup light. All of them looked too yellow, so on both of our models they were replaced with golden white LEDs of the same size. The factory wiring was also a little odd to us as the headlight/backup light function would also illuminate the class lights on that end of the locomotive, but there was a separate decoder function for the number boards. With a few cut traces on the circuit boards and the addition of a few jumper wires we got that changed around so that the number boards illuminated with the headlights and all four class lights were now together on another function. Each board required swapping the two function wires, a simple task. The slightly more challenging change was the traces. The long hood board required the trace below the headlight LED to be cut with a sharp knife. Then a jumper wire was soldered in place from the hole in the board by the “H” to the left side of the headlight LED. On the cab board, the trace below the backup light was cut and the bottom of the three center LEDs were jumpered together. Like the long hood board, the two function wires had to be swapped as well.

-Photo by Rob Bell.
Paint and Decals
The prototype #81 wore the classic White Pass Rodeo Yellow and Alhambra Green paint scheme during its time in Alaska. Since Rob was modeling the locomotive as it appeared on the railroad, he painted his model in that scheme using Floquil BN Green and Reefer Yellow, lightened a touch with white. The decals were made by me to Rob’s specified height and printed by Draw Decals. Apple Barrel Brown Oxide craft paint and a tiny brush were used to paint the red primer in the approximate pattern the real #81 had after the White Pass added the wider walkways and long hood handrails. Rob weathered his model with Pan Pastel powders using photos of the prototype as a guide.
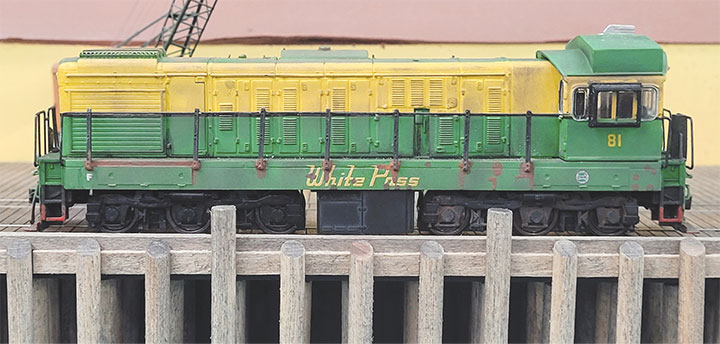
-Photo by Rob Bell.
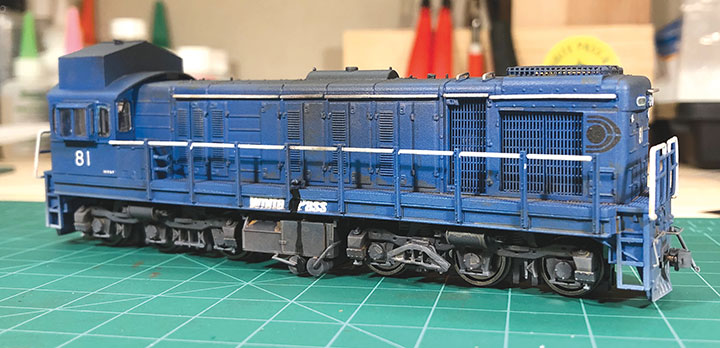
-Photo by Mike May.
My model was painted in the solid blue Federal Industries scheme that the White Pass used in the last few years before the railroad closed in 1982, even though #81 was never dressed in this scheme. Tru-Color GTW Blue is a very close match to the prototype blue. Decals are a combination of Republic Locomotive Works and some custom ones again printed by Draw Decals. I weathered my model with Tru-Color paint washes, pan pastels, and airbrushing.
Collaboration
Building a representation of this unusual locomotive would have been a great project under any circumstances, but to collaborate in real time with another modeler across the country made it that much more interesting and enjoyable. Sometimes it was the technical discussions of how to make something work, and other times just the fun of tossing ideas around. Many of us have been inspired by construction articles to build an identical or variation of a project that another of us in the modeling community has done, but to work at the same time was certainly something that I think we’ll both be doing again.