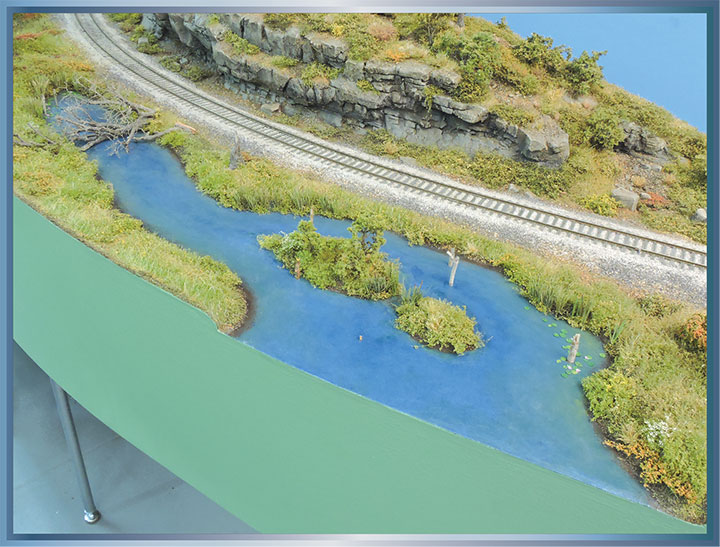
One of several pandemic-duration projects I’ve completed recently was scenicking a pair of HO Free-mo modules representing a central Ohio shortline in the 1920s. There were several scenic features I wanted to model in a lightweight fashion (but that were sturdy enough to withstand handling during transport, setup, and takedown). The feature this article focuses on is modeling a pond along the right-of-way (like a beaver pond that developed along an abandoned right-of-way that a pair of friends in the Free-mo group photographed on a prototype-detail scouting trip). Steps for painting and texturing water from a pond carved out of foam insulation, painting shore and water details (such as duckweed and clouds), along with adding a fallen tree and the more traditional details of cattails, lily pads, tree remnants, and bank brush are described in the following photos and captions.
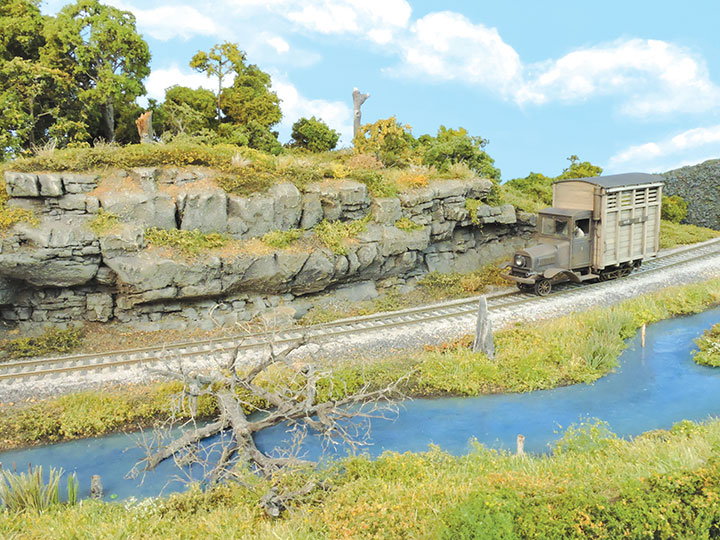
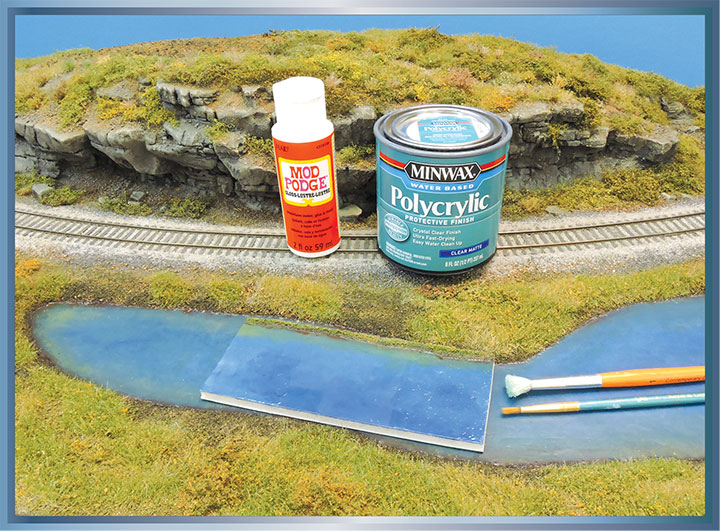
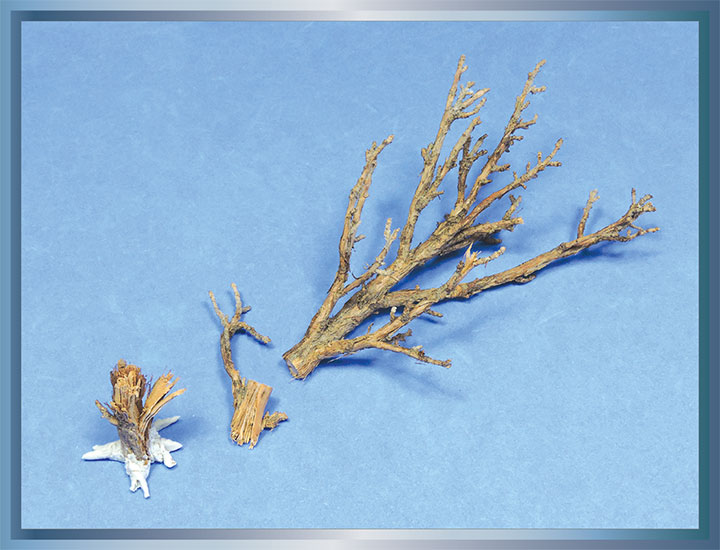
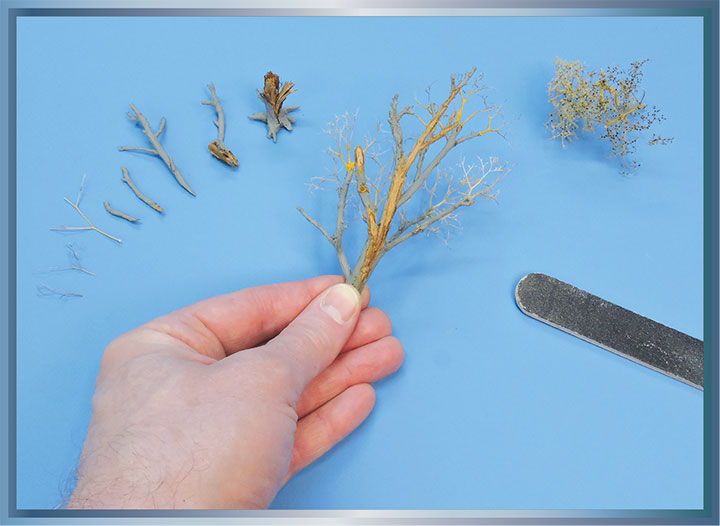
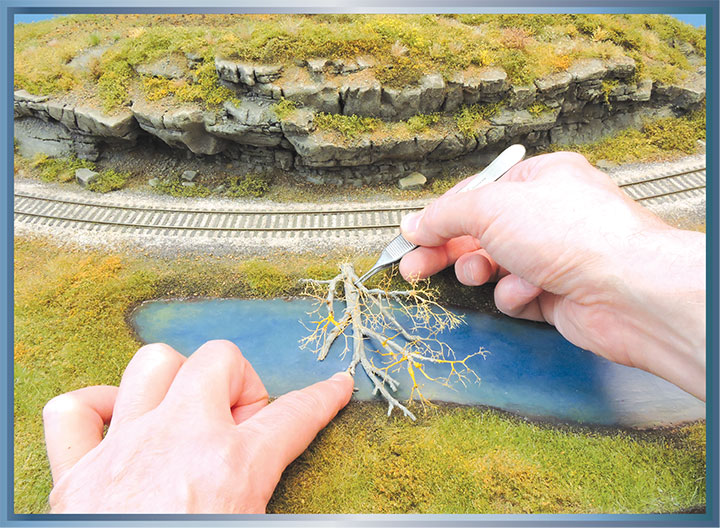
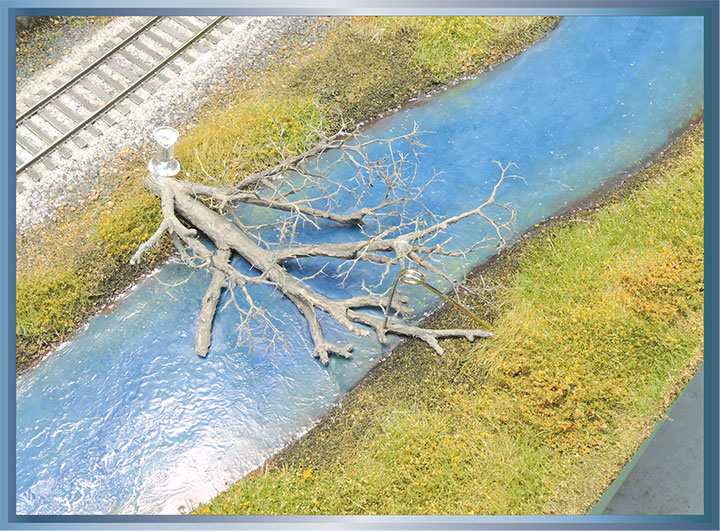
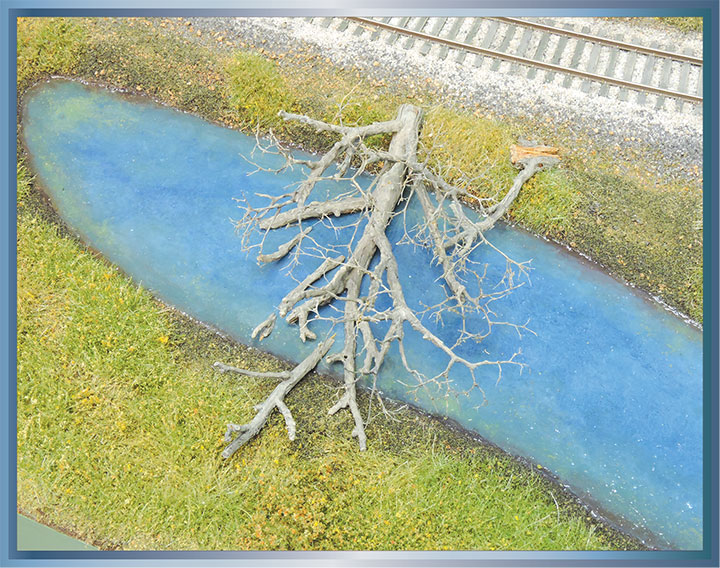
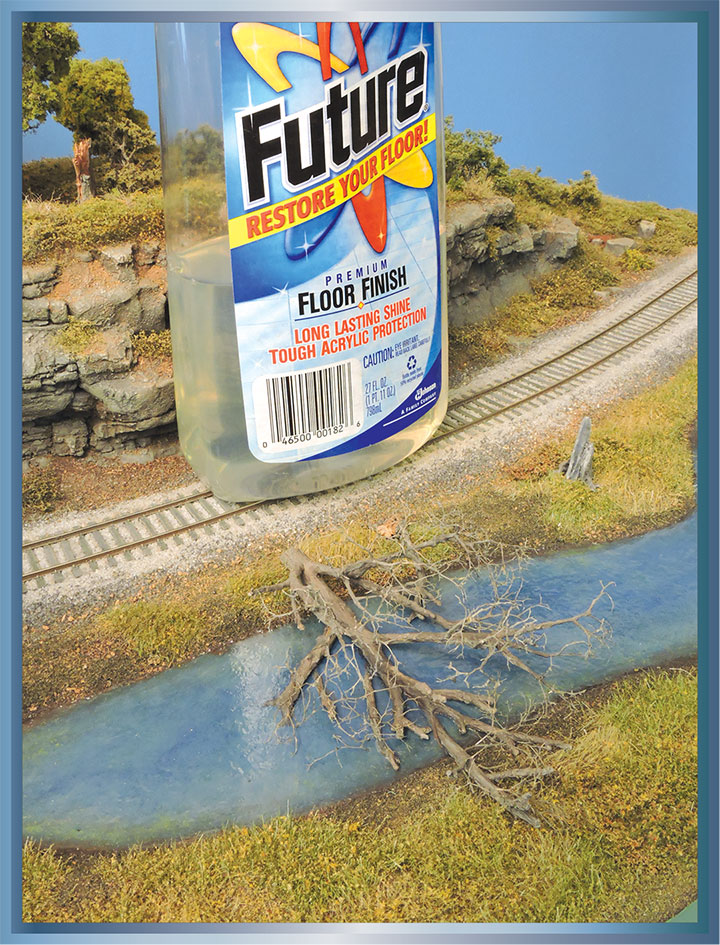
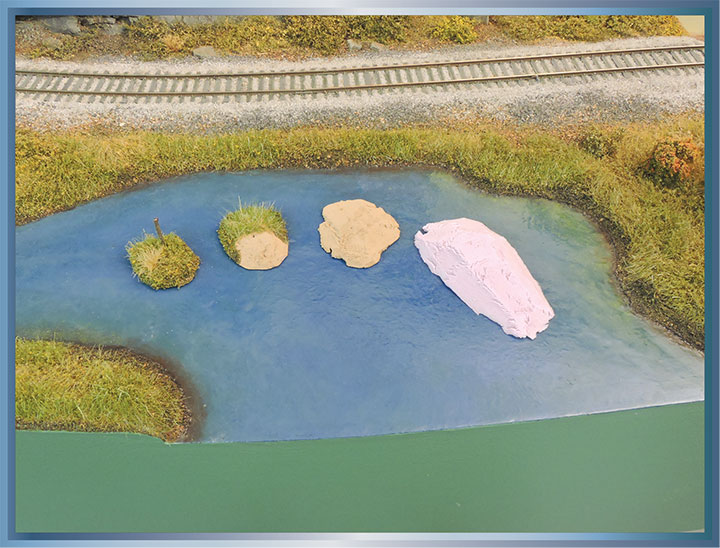
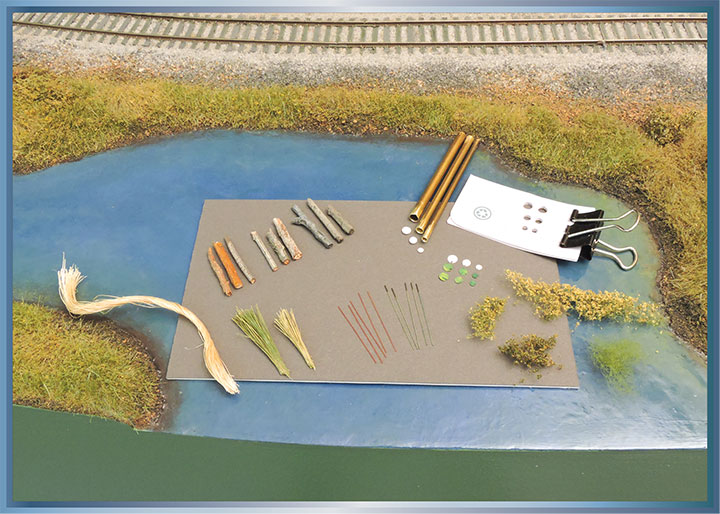
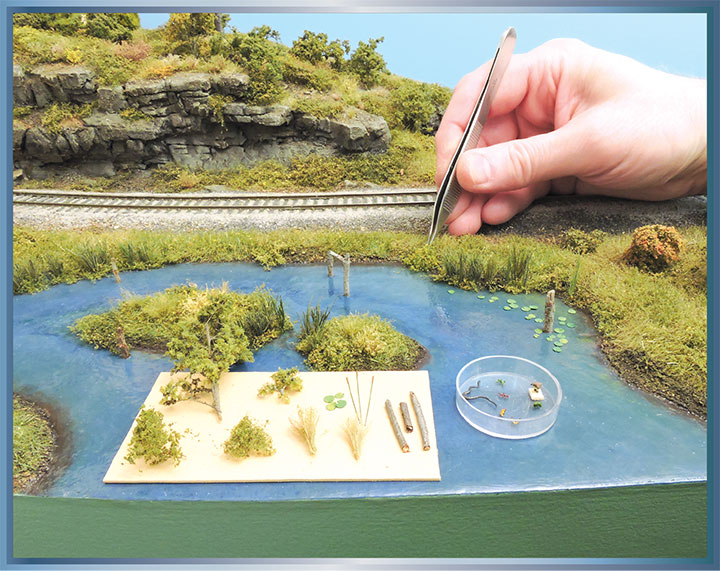
In late September, motortruck G&LR 8 ambles along the beaver pond and rock outcropping, which is one of the more scenic corridors along the shoreline.With the track laid through the center of the 16-inch-wide module and the rock outcropping developed on the far side; the pond was carved out of the 2-inch foam panel on the near side. The bank surrounding the pond was sloped with white lightweight spackling compound and is essentially a triangular fillet between the pond bottom and the scale 3-foot 6-inch vertical cut made into the foam. With this lightweight approach and no material to be poured into the pond, your cut for the pond can be as shallow as the water surface you desire for the scene.Following the initial ground cover application of soil and fine ground foam forming the pond’s bank, the water depth pattern (in deep blue and shallow green shades) was painted with craft acrylics. Painting with flat or matte acrylic allows dips and imperfections to be seen and then filled with lightweight spackling (available at home improvement stores, under a variety of names and produced by Dap). Keep filling and sanding (400 grit paper) until the surface of your pond is flat and smooth.Prior to painting, texturing, and overcoating the pond on your module or layout, it’s beneficial to determine these on a test panel (or several panels, as they can help you decide what you find most appealing). I used a piece of foam core board with a bank finished with spackling, fine ground foam, and brown acrylic that simulated mud above and below the water surface. I then experimented with blue and green shades to simulate deep and shallow water, and then washed the entire area with a light blue acrylic stain that looked like reflected clouds. And lastly, to indicate duckweed accumulations along the pond’s edges, stippled on some light green acrylic with a stiff brush. The paint was then sealed with five coats of Minwax polyurethane (satin allows seeing any imperfections) and lightly textured using Mod Podge dabbed on with a soft brush to indicate shallow ripples.The starting point for the fallen tree is a length of sagebrush 6-inches long, which had a trunk diameter that seemed appropriately proportional to the height of the tree. To form the still-rooted portion of the trunk with the broken section, I made a series of 1/8-inch or so vertical cuts a scale 8 feet from the bottom of the trunk, and then used two sets of pliers (wrapped in cloth to minimize bark damage) to break this area. The stump portion was further defined with a hobby knife blade to make it look as though a storm microburst snapped the trunk, and roots were added with epoxy putty. I then used a razor saw to cut off a scale 4-foot 6-inch segment of the trunk, so the scene can include a portion of the fallen tree that was cleared from the ballasted right-of-way.I gathered some SuperTrees to make fine upper branches, and some additional sage brush to make larger branches. Those elements, along with the stump, were brush-painted an intermediate grey acrylic. I then trimmed down and sanded a portion of the trunk and major branches flat (so they could be glued on top of the pond to simulate being submerged). Once that contouring was completed, I added the fine upper branches by gluing SuperTree twigs into place with Loctite CA and then using thick tube-style acrylic to make the transition (yellow ochre color in this case). To make delicate upper branches, completely strip the seeds and seed-related fuzz from the SuperTrees twigs with tweezers. This may take several attempts to produce useful branches, as often you’ll remove a good bit of the branch detail in the process.During the trimming and sanding process, test fit your tree frequently (at this point of water development, only the paint and urethane layers formed the pond). To ensure the same location between fittings, I softened the pond bank with water and made a lengthwise divot with the tree’s trunk. Another way to make the upper and side limbs match up with the water surface is to bend or even break them (but not to the point of separate pieces). Reinforcing the bend with CA after you’ve found the proper shape will finalize the tree arrangement. Then install and paint the tree’s fine branches at your workbench (as you’ll likely find that easier, along with eliminating the chance to splatter your pond with grey paint).Before gluing the tree into place, I added very shallow ripples with gloss Mod Podge to the narrow half of the pond. Originally, I was going to use Mod Podge to secure the truck to the banks and water surface, but went with Aleene’s Tacky Glue instead (as it was thick enough for toothpick cleanup of the oozed glue). Pin the trunk and branches as necessary to get the waterline surfaces to match up and use Mod Podge to touch up any glue smears or gaps.Once you are happy with the basic layout of the tree, add additional limbs emerging from the water. Segments of large branches were cut flat, with smaller branches inserted into holes. Use the bark color to paint submerged branches on top of the water. The slight ripples didn’t seem to affect the representation, and be sure to look at a twig underwater to get an idea of how the submergence distorts the above-to-below water alignment. I also glued the cut portion of the trunk (which was placed to make it look as though it was pushed down the bank after cutting).With all the branches above and below water installed and painted, touch up the water surface by brushing on additional Mod Podge sealer or using an acrylic floor finish like Future (or current Pledge product, Revive It Floor Gloss). I prefer a clear floor acrylic overcoat, as it seals any tacky nature of the Mod Podge (which seems to be particularly evident in high-humidity environments) and allows easy cleanup from dust and fingerprints for those visitors that want to touch the pond or use it to steady their camera or phone during model railfanning shots.With the fallen tree completed, adding a couple of islands in the wide portion of the pond was the final feature. Painted foam scenicked with static grass and a ring of fine ground foam to simulate bank mud work well for the islands. I completely scenicked each before securing into place with tacky glue. Because the foam was relatively thin, and I used full-strength white glue to hold the static grass, they both slightly warped during the drying stage. But a bit of pressure allowed them to lay relatively flat on the surface. Fill any gaps with a paste made up of diluted white glue and fine ground foam, and then use brown paint to paint in the underwater portion of each island’s bank.Cattail reeds and stems, stumps, lily pads, and bank foliage are the scenic details used to supplement the fallen tree. I made the reeds from jute twine stained and dry brushed with green and yellow acrylics. The cattail stems were cut from Playstreet 0.010-inch rod, which is a red plastic that takes solvent-based paint well. After painting them green, top them off with a length of brown acrylic to form the cattail head. For three sizes of lily pads, I filed the ends of brass tubes sharp and used them to punch circles from stacks of thick paper. After cutting a V-shaped slot in each paper circle, I painted both sides green with swirls of yellow. The stumps are twigs from a variety of shrubs and trees in my yard, and the bank foliage was made from tufts of polyfiber textured with fine ground foam held in place with super-hold hairspray.With the islands’ groundcover completed and surrounding water touched up, the stumps, cattail reeds, lily pads, bank foliage, cattail stems, and island trees were added in that order to select areas of the pond and bank. Carefully punch holes into the water surface to accept the stumps and reed clumps and use a dab of Mod Podge to secure them. Then add the lily pads atop dots of Mod Podge. Check the water surface and make any repairs or adjustments prior to adding the bank foliage (which can be installed to hang out over the water to simulate an overgrown bank near the end of the growing season). And once you are happy with those details, white glue the cattail stems into and around the reed clumps.Additional details, such as lily pad flowers (using colored coarse foam), saplings, and animals can be added to complete your trackside pond. A few of those features, including saplings on the pond islands, light purple lily pad flowers, and some Busch creatures (frogs, salamanders, and butterflies from their Small Animals HO 1153 set) are visible around the pond, that extends most of the length of the 4-foot-long modules.