Walthers
5601 W. Florist St.
Milwaukee, WI 53201-3039
800-487-2467
www.walthers.com
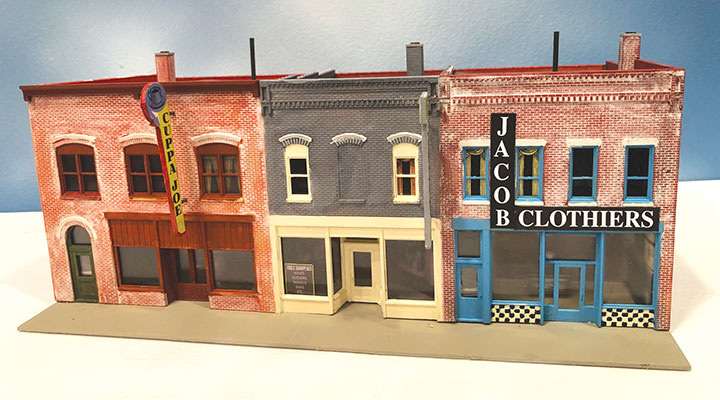
Walthers sells HO Merchant’s Row VI kits for $44.98. As with previous releases in the Merchant’s Row series, this kit builds into multiple adjoining stores, in this case, three mid-block units. This release represents Victorian-era brick stores that have been updated with more modern storefronts which was commonly done in the 1940-50s to “modernize” the appearance of older urban businesses. I appreciated the mid-block design as far too many such kits feature corner locations. This limits their usefulness. I also appreciated the many extras included such as alternate cornices and extra signs, sign frames and entry doors. These will be saved for future projects.
The kit consists of high quality precise-fitting styrene components, decals with matching sign frames, printed signs/window treatments and illustrated instructions. The instructions, while basic, cover assembly well with part numbers used for each part including the pre-cut acrylic windows. The cover picture on the kit box provides excellent coloration ideas. Due to the superior design/fit, this kit can be assembled in a short time, but I urge you to spend the time needed to add detail. By that, I mean painting the components carefully, adding lights and interior details or graphics and maybe extra details. I did so and it took me almost two weeks to assemble the kit. Painting will occupy much of that time. I elected to use a different brick color for each store and added C.C. Crow seamed tarpaper to two of the roofs. The roofs can be left loose, sitting on molded ledges. I added two extra brass smokestacks, firmly glued, which act as handles to lift the roof from the structure for access to the interior. Assembly was straightforward and brushed styrene cement quickly glued the components. All parts fit perfectly, but ensure the mitered corners are tight and paint the interior walls black to limit light leak if you add lights.
Though the box claims that interior graphics are included, they are not. Good quality printed signs and window treatments are included but nothing that would suggest interior details. I elected to use both City Classics interior graphics plus room graphics produced by Roomettes for the three stores as well as the living quarters upstairs. I also added several LED lights as well, testing for light leaks. I used both the kit window graphics as well as my own plus my collection of wall signs for the various commercial uses. More external details could (and one day will) be added, especially to the front. I loved the decal sheet of colorful signs designed to fit the provided plastic sign frames for a variety of different businesses. I only used the two large vertical signs, inserting them into drilled holes and secured with ACC. However, I elected to paint and assemble all the remaining signs, saving those unused for the future. This will save time and ensure the decals are not lost.
The result is a busy-looking addition to any town’s business district. I thank Walthers for sending the sample. I was very pleased with the outcome.
-Charlie Getz.
Inter-Action Hobbies
P.O. Box 1021
Chase, British Columbia
VOE, 1MO
Canada
1888-850-1742
www.interactionhobbies.com
Inter-Action Hobbies sells a series of kits for HO and O scale vending machines and a telephone booth. I assembled the O scale kits. Each kit includes two machines or telephone booths. The kits have instructions with diagrams, but Inter-Action also has a series of short You Tube videos on each kit at www.youtube.com and search for InterAction Hobbies.
The Cigarette machines sell for $12.00 a pair and was the easiest to assemble. The body consists of a 3D printing. You clean off the sprues and paint the body of the machine. There are two rows of nine push buttons on the print. You paint these brass. Then you cut out the provided advertising and place it in the machine. A piece of acetate drops into the front of the machine. A laser-cut piece that you paint silver and add a touch of glue to has two rows of little holes for the push buttons. It presses precisely into place holding everything neatly together. But remember smoking is bad for your health.
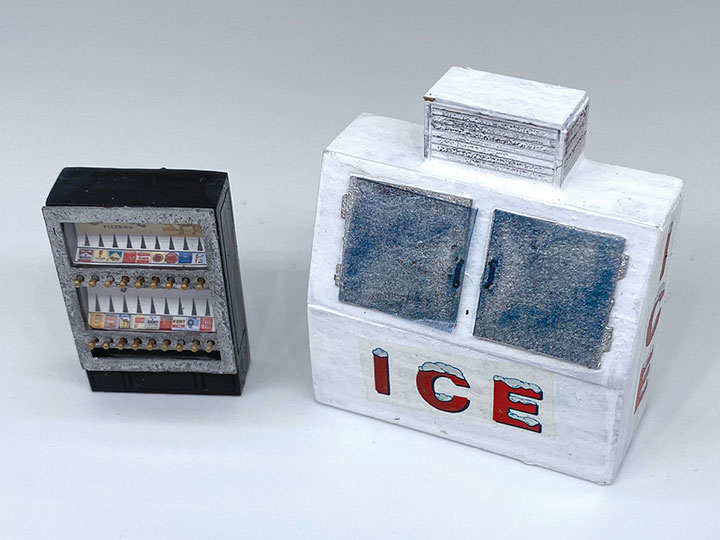
The Ice Vending machine was also easy to assemble and sells for $11.95 a pair. It has a back wall and base of thick laser-cut wood onto which you glue laser-cut laser board sides, top, front, and housing on the top. Everything fit perfectly. The two doors are separate laser-cut laser board parts and a decal is provided to make them appear to be metal. After painting the machine, white decals are provided for the lettering. I found the decals on all the machines easy to use and strong, and did not tear.
Inter-Action has two different Coke machines. One is for the 1950s and the other the 1960s. The 1950s kit sells for $10.95 a pair and the 1960s version is $11.50 a pair. I found painting these machines a challenge. The 1950s version is assembled from three pieces of thick laser-cut wood and two pieces of laser-cut laser board and has a round top.
Once assembled, you coat the sides and top of this machine with some sort of filler. I used Squadron White putty and sanded the surface down to hide the laminations of wood. Then the front, sides and top were painted red or white. Some of the parts were painted silver and I ran a silver strip of paper around the top of the machine between the red and white paint. Again, the decals went on with no trouble.
The 1960s Coke machine is also assembled from layers of laser-cut wood and laser board. One of the layers has a channel cut into it for an LED wire to light up the machine. But the kit does not include the LED. The machine, having a square top, does not need sanding. Laser-cut laser board top, front and sides cover up the laminations. You paint the front, top and sides before assembling them and small groves help keep the paint colors apart.
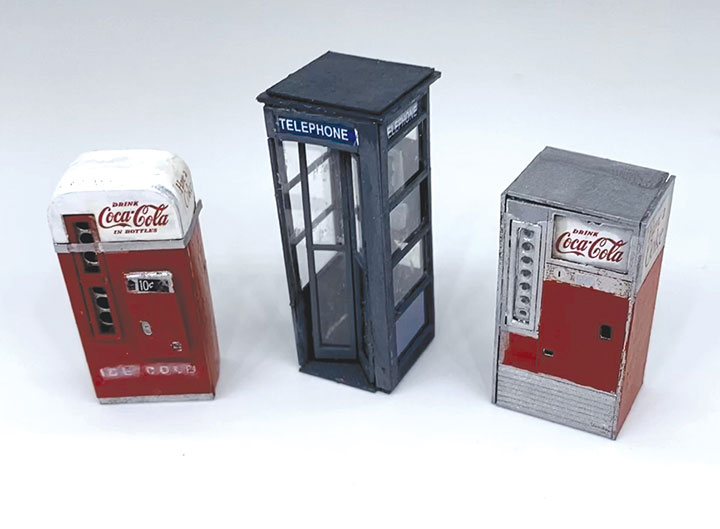
The last kit assembled into a “A Modern Phone Booth” and sells for $13.99 a pair. Remember Tippi Hedren in the movie Birds hiding from those seagulls? This kit assembled into that kind of phone booth. All four of the kit’s walls are laser-cut laser board and the fourth wall is folded up as if open. There is acetate for each wall and printed paper graphics, but no decals. The roof is slotted for tabs on the tops of the sides to align everything and the floor has a pattern cut into it. There are lovely little 3D phones onto which you add a phone cord, and even telephone books. But no seagulls. I found this kit a challenge to assemble and keep the paint and glue where it belonged.
All these kits assembled into detailed little models, and I am pleased with them. The Coke machines presented a challenge to paint and the phone booth was fragile. By following the enclosed instructions and watching the YouTube videos you should have no trouble recreating these vending machines and phone booths once so common in our world.
-Bob Brown.
Deerfield River Laser
92 Parkview St.
Ludlow, MA 01056
edfillion@cs.com
www.deerfieldriverlaser.com
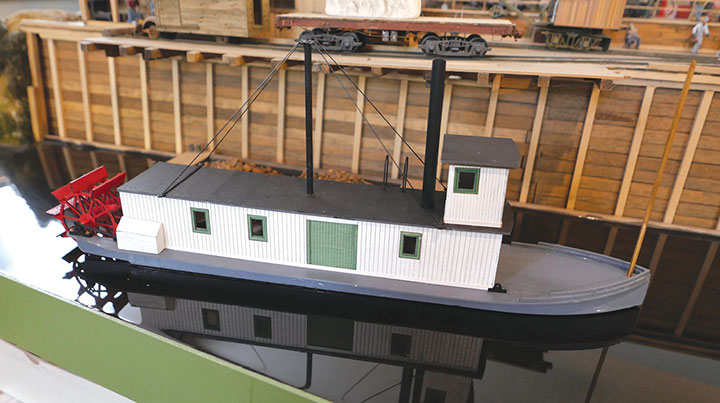
Deerfield River Laser sells an extensive line of laser-cut O scale structures, rolling stock, and boat kits. They have 8 boat kits plus the Mad River Paddle Boat I assembled for this review. The paddle boat is a scale 72-foot-long model and sells for $135.00. It is made-up entirely of laser-cut wood parts except for a styrene smokestack and mast, wood dowel Jack shaft and some thread for rigging.
The hull is made up of a bottom sheet with a keel and outer keels and a top sheet covered with a deck, these parts are tab and slotted together and assembled with a nice snapping sound when tapped into place with a spot of glue. I left my hull under weights all night to make sure it had the correct up and down curve. Then I added the thin plywood sides by placing a weight on the deck and pushing weights against the sides after adding some glue. The result was a neat and easily assembled hull.
The cabin has exterior and interior walls. The window frames come off for painting. I painted my outer walls white and the big side doors, inside the windows and their frames green. This made for a very neat paint job. My kit did not have acetate for the windows, so I added some. I also added a pre-painted scale 1x2 strip of wood along the base of the cabin, so no crack showed where it met the deck.
I had sprayed the hull and cabin roof with Rust-Oleum Primer Gray but did not like the look of it on the cabin roof, so I covered the roof with some paper “tarpaper” giving the boat some texture. After painting them, I added the smokestack and mast. They lined up perfectly in their laser-cut holes. The mast was used for towing cables allowing them to pass over the paddle wheels and needed to be wired down to withstand the strain. The kit comes with a laser-cut piece of wood with holes for the cables that attaches to the top of the mast. There are also two laser-cut wood strips with holes that glue across the roof. You are to use the thread to run guy wires from the top of the mast to the strips on the roof. I just could not get the thread to behave so substituted brass wire, and all was perfect.
The wheelhouse has a nice big steering wheel that shows off through the windows.
The paddle wheel was easy to assemble using the jig provided. I painted the three wheels and paddles red using a spray can and assembled the paddles. The wheels are held together with a styrene shaft with cranks at each end. The shaft is mounted to the hull with bearing blocks, and main rods reach into little enclosures on each side of the hull.
Instructions consist of several pages of step-by-step instructions with two pages of illustrations. I enjoyed assembling this kit. All the parts fitted, the instructions were clear, and my new paddle wheel steamer looks great nestled up to the wharf on my Shoehorn Harbor scene.
-Bob Brown.
Rusty Rail
3426 N. Clover Ave.
Fresno, CA 93727
559-288-5780
rickanmary@rustyrail.com
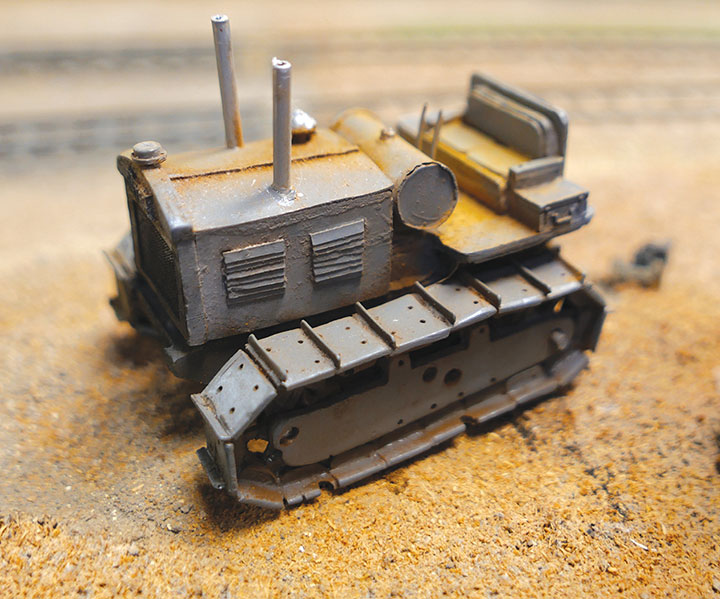
Rusty Rail sells a large selection of cast urethane HO and O scale detail parts and vehicles. They seem to bring out new parts every month, have a newsletter, and free videos on assembling their models. I ordered an O scale Bates Crawler to detail my tractor repair facility. It cost $25.00 and comes with one page of illustrated instructions. The kit comes in four pieces with two aluminum tube exhaust vents. The body is in two pieces and there are two castings for the track assemblies. I found very little flash to clean up and merely spray painted the assembled tractor with Rust-Oleum Primer Gray. Then I picked out the floor grates, control handles and exhaust vents and dusted the model with rust, black and white chalks. I found this kit gave me a large piece of detail in very little time and am pleased with my Bates Crawler now nestling in my tractor repair shed.
-Bob Brown.
Crow River Products
P.O. Box 2082
Pawtucket, RI 02861
401-723-0065
CrowRiver@cox.net
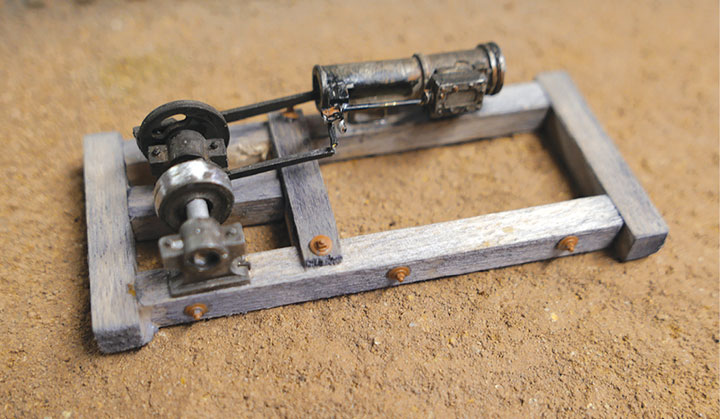
Crow River Products sells a large selection of machinery and detail kits in HO and O scale. I recently assembled two O scale kits. The first kit assembled into a Single Cylinder Steam Engine (kit #311) and sells for $22.00. The kit consists of cast pewter parts for a one-cylinder steam engine with a cross shaft, bearings, gears, and belt wheels. There is no wood base or frame, and no boiler. The gears, belt wheels, and bearings must be drilled out for their shaft, but the parts have little flash. The cylinders are in three pieces, with a separate valve chamber, cross head, main rod, valve rod, crank disc, and eccentric lever, making for a detailed model. I colored my single cylinder steam engine with chemical blackener but found doing so made the parts hard to glue together with ACC. The kit with an added base would make a nice flatcar load or look great in the back corner of an engine house.
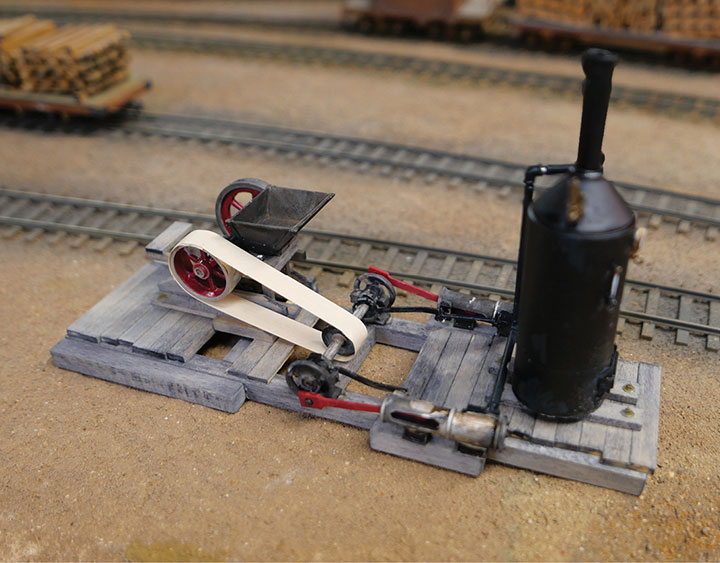
The second Crow River kit I assembled consisted of two cylinders just like the single cylinder steam engine and sells for $55.00. It has two sets of cylinders with all the details of the single cylinder model such as detailed multi piece cylinders, cross shaft with belt wheels, gears and bearings, eccentrics, and crank discs. But it also comes with a beautiful cast urethane vertical boiler (available separately for $27.49.) Like the single cylinder steam engine, this kit has no wood base. The parts are designed to be used as stated in the instructions, “only limited by one’s imagination.” So that is what I did. I needed a power source for the crusher in the dump on the railway described in Robert’s Ramblings in this issue on page 5. So, I mounted the Crow River boiler and engine on a wood frame and added a scratchbuilt crusher. Note the wood frame or crusher in the photo do not come with the Crow River kit. The boiler is cast in urethane and is solid. The smokestack is metal, as are the tri cocks, steam gauge, water level indictor, firebox door, safety valve, and steam connection. You do have to drill holes to mount these details, but their locations are marked on the boiler and the urethane is soft. The metal parts need some cleaning, and several holes need to be drilled out. The metal castings include pipe fittings such as elbows, T-joints, and way more plumbing than you will need for almost any arrangement. A length of aluminum tubing is provided for piping. Both kits come with instructions with two pages of diagrams and suggestions for wood bases.
I love machinery kits like these. They really made adding a detailed interior easy and that’s what I like to do, add interiors to my industrial buildings.
-Bob Brown.
Conowingo Models
440 McCauley Rd.
Conowingo, MD 21918
http://conowingomodels.com
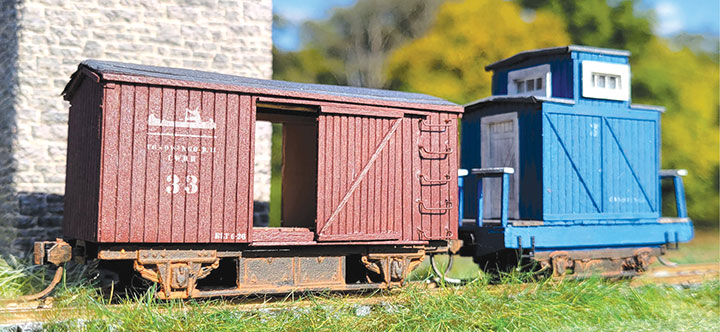
Conowingo Models sells HO kits for a Bobber Boxcar for $30.00, and Caboose #3 for $33.00. The kits include LaBelle (Ye Old Huff ‘n’ Puff) metal castings, plastic wheels, laser-cut wood parts, Conowingo Railroad decals and Kadee couplers.
-Bob Brown.
Berkshire Valley Models
438 Morgan Woods Dr.
Fenton, MO 63026
www.berkshirevalleymodels.com
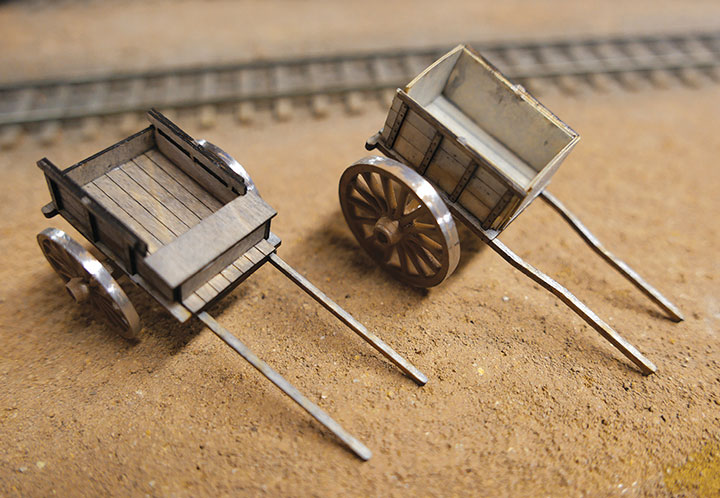
Berkshire Valley Models has added a pair of O scale two-wheeled carts to their extensive line of wagons and vintage automobile kits. Each pair sells for $19.95. The carts are different from one another. One has heavier wheels and a simple box body, and the other has lighter wheels with hub caps, and a more complicated body with railings. Both carts lack springs and merely have cast metal wheels with an axle making them easy to assemble. The heavier cart has a laser-cut laser board two-layer body and curved shafts on which to attach a horse. The lighter cart has a laser-cut wood body and straight shafts and looks like a trap to me, once used to haul people back and forth to the nearest railroad depot. I had no trouble assembling my carts until I colored them. The double sided, one page instruction sheet recommended not painting your carts, but rather use Pan Pastel colors, so I decided to stain mine causing them to warp, but not to worry, I put them under weights, and all was well. Remember to follow the instructions. Carts like the heavy one were often found in bunches on wharfs or around factories. I think the lighter cart might be called the sports cars of their day. Both kits belong in any vintage scene.
-Bob Brown.