Deerfield River Laser
92 Parkview St.
Ludlow, MA 01056
413-610-0588
edfillion448@cs.com
www.deerfieldriverlaser.com.
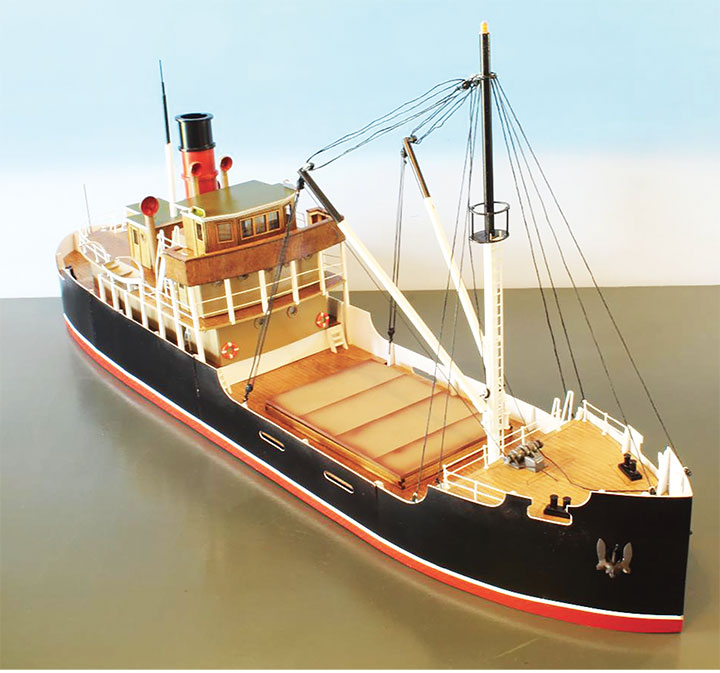
Deerfield River Laser sells an O scale kit for a 142-foot-long tramp steamship named the S.S. Venture for $496.00. The S.S. Venture represents one of the legion of tramp cargo steam ships that were commonly seen in the late nineteenth to mid-twentieth century. The model is based on the ship of the same name used in the 2005 King Kong film. While it has been compressed to better fit the model railroad scene, the vessel still has a presence that belies its size.
Completed, the Venture measures 35.5 inches long by 7 inches abeam and rises to over 15 inches over the masts. The kit features 32 sheets of laser-cut plywood and basswood components for the hull and superstructure with plastic parts for the masts, spars and smokestack. A pack of Blue Jacket die-cast metal detail parts is included to fully outfit the model. Line for rigging is also included, however, the builder may want to supplement this with additional line. This is readily available at most craft and fabric retailers and is commonly known as heavy carpet thread.
The S.S.Venture kit is built in sub-assemblies with first the hull, followed by the superstructure, and finally the addition of the railings, masts and individual metal details. I painted each assembly prior to adding it to the ship. The model required roughly twenty five hours to assemble with the lion’s share of time devoted to constructing the hull. The upper works assembled quickly with each having a tab and slot core over which the exterior sheeting was applied. This sheathing was pre-painted, and clear plastic glazing was attached to the back of each wall before gluing it over the framework. The clear plastic and some jump rings to attach the blocks to the rigging were the only additional items that need to be supplied by the builder.
The model was finished with the addition of the railings which were assembled and painted on the provided jig. The other hardware items were also pre-painted prior to installation in their respective locations. Rigging the foremast completed the model. This proved easy since only a few stays and two booms needed to be rigged. However, this quick and simple task really sets the model off.
Three sets of instructions were provided. The first was a comprehensive step by step text on the model’s construction. The second provided a series of exploded views of the assembly of each component sub-assembly. The third set showed photos of the prototype vessel on which the model was based. They should clarify assembly for even the beginning maritime model maker. A search of the internet provided additional photos of the movie version of the S.S. Venture, as well as some fascinating details of its travels.
Deerfield River Laser with the S.S. Venture kit offers a complete, easy to build model of an iconic type of cargo vessel that plied the seven seas. I finished my ship as it would have looked after leaving the works, or after a major refit. Most ships of this type would have been subject to years at sea with minimal maintenance and would be showing their age. The beauty of building a kit is that the fit and finish are totally at the whims of the builder. Deerfield provides value, and most of the components necessary, to successfully construct an eye catching waterline marine model.
-George Riley

Sierra West Scale Models
972-618-5563
brett@sierrawestscalemodels.com
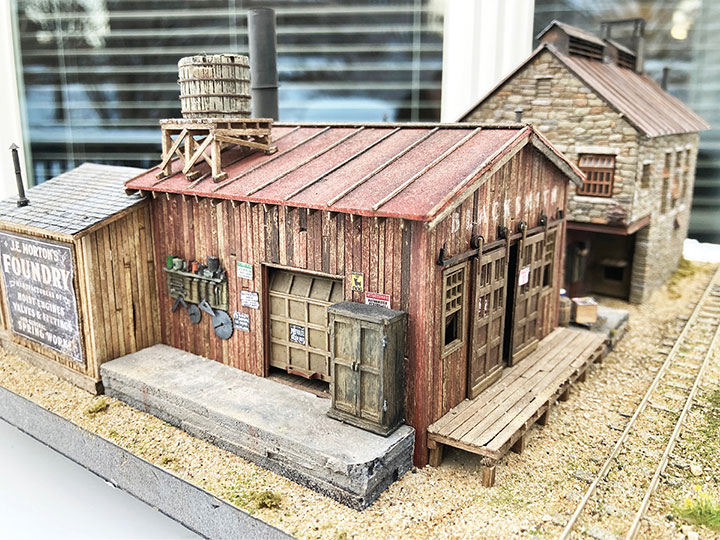
Sierra West Scale Models sells an HO scale craftsman kit for a Brass and Iron Foundry for $325.00 plus shipping. This kit is their most recent, and the most enjoyable SWSM kit I’ve assembled. This kit assembles into a detailed diorama and comes with a thorough, 130 page, spiral-bound construction manual, with some 200 great photos to guide you. Step-by-step instructions take you from the best kind of base, to assembling the kit’s six sections. You are then shown how to detail, grain, stain, or paint each part with acrylics, and finishing and weathering them with pastel chalks. The instructions also show you how to add scenery, and color and weather the several hundred clean resin and white metal detail castings included in the kit. There are also many cleanly die-cut laser paper, card stock, and several types of wood parts. Fuzz-free strip wood is used for building board-on-board wooden structures, and the main foundry is made from excellent resin stone wall castings. Windows and doors are made using layers of die-cut laser stock. The manual includes suggested tools and adhesives by brand name, a list of materials and paints and pastel chalks, and more. These instructions are supplemented by free videos, forums, and photos by noted model builders on Brett’s website. I found assembling this kit straight forward and should be accomplished by beginning and seasoned modelers if they read the instructions carefully, use patience, and are willing to learn new skills and techniques. If you do this, you will be rewarded with a fine model. I encountered no surprises with missing or damaged parts. The details are exquisite and you can choose how many details to add, but I think you will be encouraged to add many more details than you thought you would. I reduced my diorama footprint to 12 x12 inches, and will drop it into a layout slot, and pile any unused detail castings around it. This finely designed and produced kit provided me with great entertainment and artistic expression for about “4 bits” per hour.
-Mike Engler
Berkshire Valley Models
438 Morgan Woods Dr.
Fenton MO 63026
berkshirevalleymodels.com
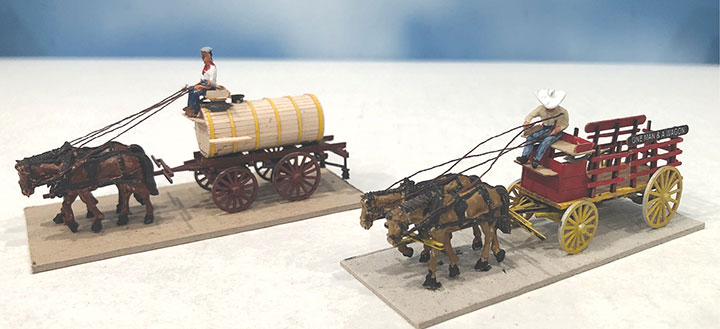
Berkshire Valley Models has produced two more HO scale wagons, similar to their O scale versions. Kit #2104, the Stake Wagon is $12.95, and Kit #2105, the Water Wagon is $13.95. The kits are similar to BV’s earlier HO offerings and consist of laser-cut wood parts with cast metal wheels. The assembly process is well covered by the illustrated instructions and I had no problem with either kit. The only “fussy” step was insuring a smooth fit for the tank wrapper over the formers on the water wagon. It came out well. The Stake Wagon comes with a sign and I added the optional white metal horse team ($4.00) and driver ($2.00) to each wagon. To one driver, I provided an SS Ltd. Cowboy hat. Waxed thread reins completed assembly. The Water Wagon has a decal for the tank end, and is almost identical to a wagon pictured in Telluride Colorado in Volume II of the RGS Story on page 221. These wagons were used to wet the dirt roads of the era to keep down dust. Since the demise of the Jordan line of Highway Miniatures and their fine wagons, this impressive line is filling the gap in spades. I enjoyed building these wagons, and cannot wait for more in the series.
-Charlie Getz
Crescent Creek Models
P.O. Box 238
Clarkdale, AZ 86324
Crescent Creek Models
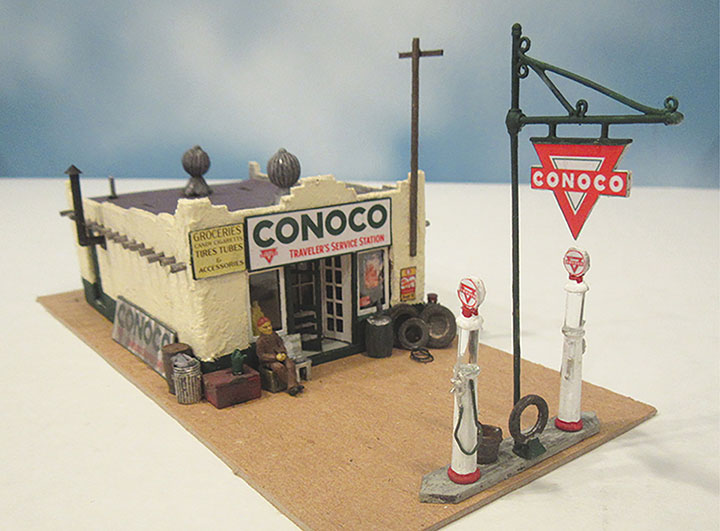
A new manufacturer, offers the Last Chance Gas in HO scale for $72.00, and soon also in S scale, price TBA. I assembled the HO version and found it superb, especially for a first offering. Based upon a prototype in Penasco, New Mexico, this stucco gas station features typical southwestern features such as a crenulated top, stucco over cement blocks and exposed vigas, or roof supports. The kit has good quality laser-cut components from laser board, along with white metal castings, 3-D printed parts, wood, acetate, wire and color signs. Assembly is covered by an illustrated booklet and parts list, and starts with assembly of the shell over which I applied Crescent Creek’s outstanding scale stucco material, available separately for $6.59. This is the best scale stucco I have used and created the look so typical of these structures. The recessed storefront requires careful assembly, but fit well. I did shorten the vigas as I felt they protruded a bit too far. I also added two of my homemade cyclone roof vents, a figure and chairs for the front, some interior graphics and a light. Otherwise I assembled the kit as intended. All the other details shown are included, and the front screen door is a very nice touch. My finished gas station is an absolute gem and would fit on any Route 66 scene. Crescent Creek even offers a separate laser-cut road stencil for Route 66. My station will be on an increasingly crowded Route 68. I really enjoyed this kit, loaded with character and hope this new company will offer many more structures.
-Charlie Getz

Wild West Scale Model Builders
P.O. Box 1971
Englewood, Colorado 80150
303-842-6106
sales@wildwestmodelbuilders.com.
Several years ago, WWSMB purchased the line of Western Scale Models stamp mill, sawmill, and machine shop equipment kits, and has slowly been bringing these excellent kits back out in HO, S, O and F scales. I recently decided to add a stamp mill to My Eureka Mill Railroad and inventoried my collection of WSM stamp mill kits. I was surprised to find I lacked a crusher. So, I checked WWSMB’s website and found I could buy an O scale crusher kit for $24.99 plus shipping (HO crushers are $17.99, S scale $21.99). So, I ordered one, and the kind folks at WWSMB added a free O scale “Pullman” or sanitary car kit. These cars were used as toilets in the mines, and kits sell for $14.99 in HO, $15.99 in S, and $16.99 in O scale. They are 3D printed, come in five pieces, plus a laser-cut wood running board, and snap together. Both the mine car and crusher are cast in what WWSMB calls fragile plastic. The castings are clean with no flash, and the wire shafts fit into the cast holes in the crusher. However, they are fragile. Two of the four feet on my crusher had broken off in the plastic envelope. But, not to worry, I ACCed them back on.
-Bob Brown
Inter-Action Hobbies
P.O. Box 1021
Chase, British Columbia V0E 1M0
Canada
1-888-850-1742
www.interactionhobbies.com
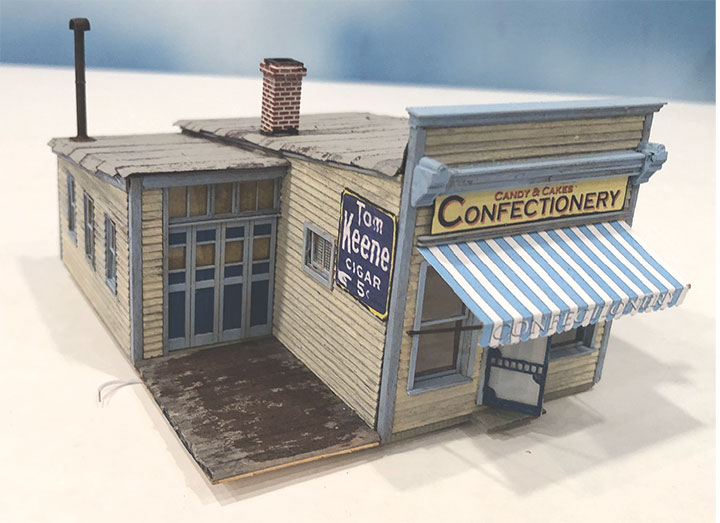
Inter-Action Hobbies produces an HO scale kit for Keeger’s Garage & Repair, for $36.95 (USD). This kit is based on an actual business from the 1920s located in the Midwest USA, but typical of the 1900-1940s era. Inter-Action co-owner, Darryl Jacobs, supplied a prototype photo showing the business after it was changed from a confectionary to a rather unlikely home for an auto repair and garage facility. Given the smaller size of automobiles in the 1920s however, this use may not be that unlikely. In any event, I chose to backdate the use to the original confectionary, and signs are included should you wish to do the same.
As with other Inter-Action kits, this one consists of Resin Impregnated Board, laser-cut wood/matboard, 3D printed parts, acetate, full color graphics and instructions, interior LED lighting, wire, roofing paper and plastic details. For some reason, my kit was missing both the roofing paper and screen door, but these were promptly sent with a note of apology. Pre-painting is strongly recommended and I agree, followed by bracing of the walls. Note that some bracing shown may need trimming for a close fit. Assembly is precise and flows in a logical order. I appreciated the provided auto repair interior and window display graphics, though I used interior graphics of a vintage bakery from the internet. I saved their graphics for future use.
I tried the roofing paper weathering suggestions and was very pleased with the approach. I elected to use the awning, but not the non-operational outdoor lights, though one could easily add working lights. The parts diagram has a wire-bending template for both lamps and awning frame. The screen doors for front and back are very effective and I saved my rear screen door for future use since it probably will not show. All parts fit well and the precise assembly results in a very attractive realistic building, including a planked driveway. I was very pleased with the result and you get a lot for the price.
-Charlie Getz
Inter-Action Hobbies
P.O. Box 1021
Chase, BC, VOE 1MO
Canada
888-850-1742
www.interactionhobbies.com
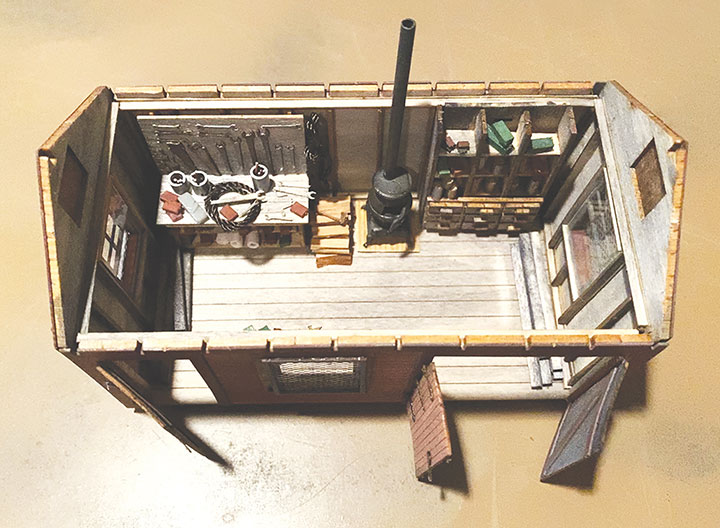
Inter-Action Hobbies sells a new O scale kit called the Standard No.3 Single Tool House. This kit sells for $34.95 and assembles into a 3- x 5-inch section house. The kit is actually available in two versions. You can buy the basic kit and add a detail kit for $19.95. I purchased the basic kit, and the folks at Inter-Action generously sent a detail kit. I suggest you buy the detail kit for a really outstanding model.
The basic kit includes laser-cut scribed wood walls, with laser board trim around the walls and windows. There are also laser board windows that can be installed open or closed, laser-cut acetate, and material, that when attached to laser board frames, makes wonderful looking screened windows. The roof is also laser board and has lines to guide the laser-cut paper shingles that have to be glued in place. There is no way to hold the roof on, so you will probably have to glue it in place. The instructions consist of twenty, 81/2- x 11-inch pages of printed photos and instructions stapled in the upper left corner. There is also a sheet showing each part of the basic and detail kits with numbers, so you can see which part goes where. The parts are divided between basic and detail kits. As you read the instructions and come upon a detail kit part, it is so noted.
The detail kit includes ten laser board roof rafters that fit together so the roof can be removed. It also has a set of laser board studs that fit each wall and end. Each set is in one piece, and you glue them in place while the walls are flat. Once in place, you use these studs as a placement guide for scale laser-cut wood 2 x 4s that are cut to length for you. The laser board studs serve as guides for gluing on the actual studs. Neat! The detail kit also includes a hollow, 3-piece, 3D printed pot belly stove. It has a base, body, and door and is designed to have a light bulb added to make it glow. No bulb is included, but an LED system to light the shed is.
There is also a set of laser-cut shelves with 12 drawers, each with a separate end and separate door pull (available separately for $10.95). A large, laser-cut workbench is also included with a back piece on which to hang tools. The favorite part of any model for me is its interior, and I have detailed some mighty cluttered interiors over the years. So, I have a lot of Cerro Bend detail castings. However, I decided to only use parts or suggestions in the instructions, such as using string for rope, to add the details to my shed. I really enjoyed this. A wood dowel is provided to be cut into sections and painted to represent paint cans. Strip wood is provided to be cut into boxes, little laser-cut squares can be painted to represent boxes of nuts, bolts, and washers. I cut some pieces of styrene tubing, painted them, and added little pieces of styrene to represent paint brushes. All great fun. The kit also includes several kinds of laser board wrenches, saws, hammers, a drill brace, and hatchets. These details resulted in a model bristling with detail. I know it will be up front on your layout. Mine will become part of the soon to be started stamp mill for My Eureka Mill RR.
-Bob Brown
Walther’s
5601 West Florist Ave.
Milwaukee, WI 53218
www.walthers.com
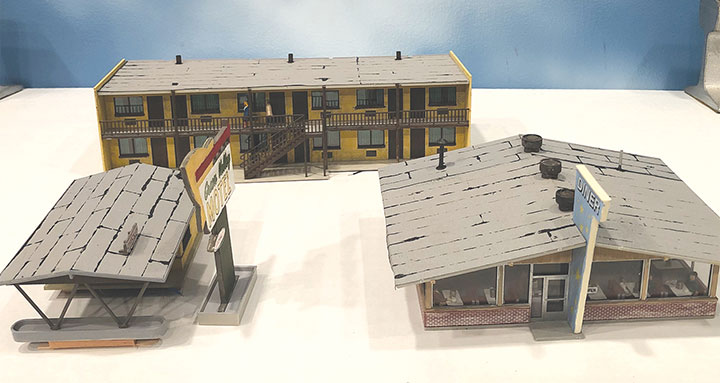
Walther’s sells the Vintage Motor Hotel and Restaurant in HO scale as a combined kit for $59.98, or separately as the Vintage Motor Hotel (and Office) for $39.95, as well as the Vintage Motor Restaurant for $29.95. The first truly modern Motor Hotel, later shortened to Motel, was created in San Luis Obispo, California, in 1925, and motels blossomed after WW II. The increased automobile traffic may have spelled doom to the passenger train, but proved a boon to a network of motels and restaurants designed to serve the burgeoning highways across the nation.
This kit is a typical motel from the mid-1950s to the modern era. My time frame is slightly earlier, late 1940s, but I still was entranced with the overall look. Completely molded in styrene, every part fit like a glove with fine cross sections, and built into a very attractive complex. But its true strength is the flexibility provided to super detail and even modify as needed. For example, I built two wings using the combined kit and a second motel-only kit. The extra office is perfect for an industrial complex, coal yard or mine. Two room wings could be stacked for a four story apartment complex.
I built my kit as designed, but added a few features. The roof is pebbled styrene to represent gravel; I elected to add CC Crow (formerly BIS) seamed tarpaper to backdate it and applied the same material to the office and restaurant. I extended the small soil pipes using small straws for visibility, and also added hotel room graphics to a few windows with the provided curtains, and also added lights. The only issue encountered was a minor error in instructions where the motel rooms’ front wall is mistakenly labeled as part 21 (which is the office front wall), and not part 2. I was impressed by the precise fit of the front balcony and staircase structure, though a tad fiddly. I selected a uniform Craft paint color scheme and with a few figures, had the hotel rooms ready. Similarly, the Office was given interior details given its large windows. No problems were encountered in its assembly.
The Restaurant really shines as it includes an interior, very visible through large picture windows. I will use a second restaurant kit in order to combine a modified base with a brick office building to create a ground floor café in an urban setting. In addition to the CC Crow tarpaper, I added three Suydam roof vents and a soil pipe for the included restrooms. I also added lights, some on-table utilities and customers, as well as a waiter and cashier for the cash register/counter. Both Motel and the Restaurant include appropriate signage with options. Typical of roadside architecture, the signs are Art Moderne.
I was very pleased with the complex and my proposed Route 68 will need to be pretty long to accommodate excellent kits like this latest Walther’s release.
-Charlie Getz